2GD-FTV ENGINE MECHANICAL ENGINE ASSEMBLY INSTALLATION
PROCEDURE

 12361
1.INSTALL FRONT ENGINE MOUNTING INSULATOR
Install the 2 front engine mounting insulators to the 2 front engine mounting brackets with the 2 nuts.
- Torque:
- 64 N*m (653 kgf*cm, 47 ft.*lbf)
12391
2.INSTALL FRONT ENGINE MOUNTING INSULATOR RH
Install the front engine mounting insulator RH to the front engine mounting insulator sub-assembly with the bolt.
- Torque:
- 13 N*m (133 kgf*cm, 10 ft.*lbf)
82121
3.INSTALL ENGINE WIRE
Install the engine wire to the engine assembly.
4.INSTALL ENGINE HANGER
5.REMOVE ENGINE ASSEMBLY TO ENGINE STAND
- NOTICE:
- ·
Pay attention to the angle of the sling device as the engine assembly or engine hangers may be damaged or deformed if the angle is incorrect.
·With the exception of installing the engine assembly to an engine stand or removing the engine assembly from an engine stand, do not perform any work on the engine assembly while it is suspended, as doing so is dangerous.
Attach the engine sling device and hang the engine assembly with the chain block.
Remove the engine assembly from the engine stand.
6.INSTALL ENGINE ASSEMBLY
Slowly lower the engine assembly into the engine compartment.
Install the engine assembly to the body with the 4 bolt and 4 nuts.
- Torque:
- 42 N*m (428 kgf*cm, 31 ft.*lbf)
- HINT:
- ·
Make sure to tighten the side with the nut.
·When installing a bolt with a claw (stopper), make sure that the claw (stopper) does not damage the body of the vehicle.
Remove the 3 bolts, No. 1 engine hanger upper and No. 2 engine hanger.
11355
7.INSTALL REAR END PLATE
Install the rear end plate to the cylinder block with the bolt.
- Torque:
- 10 N*m (102 kgf*cm, 7 ft.*lbf)
13405
8.INSTALL FLYWHEEL SUB-ASSEMBLY
Clean the bolt holes.
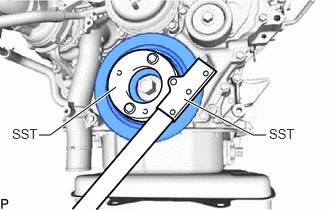
Using SST, hold the crankshaft pulley.
- SST
- 09213-58014 (91551-80840)
09330-00021
Install the flywheel sub-assembly to the crankshaft with the 8 bolts.
- Torque:
- 178 N*m (1815 kgf*cm, 131 ft.*lbf)
- NOTICE:
-
Do not start the engine for at least 1 hour after installation.
Install the crankshaft pulley cover to the crankshaft pulley with the 4 bolts.
- Torque:
- 21 N*m (214 kgf*cm, 15 ft.*lbf)
31250
9.INSTALL CLUTCH DISC ASSEMBLY
31210
10.INSTALL CLUTCH COVER ASSEMBLY
31210
11.INSPECT AND ADJUST CLUTCH COVER ASSEMBLY
33030
12.INSTALL MANUAL TRANSMISSION UNIT ASSEMBLY
37100
13.INSTALL PROPELLER WITH CENTER BEARING SHAFT ASSEMBLY
37140
14.INSTALL FRONT PROPELLER SHAFT ASSEMBLY
17410
15.INSTALL FRONT EXHAUST PIPE ASSEMBLY
88320
16.CONNECT COOLER COMPRESSOR ASSEMBLY
Temporarily install the cooler compressor assembly to the compressor mounting bracket with the 2 stud bolts.
Using an E8 "TORX" socket wrench, tighten the 2 stud bolts.
- Torque:
- 10 N*m (102 kgf*cm, 7 ft.*lbf)
Install the 2 bolts and 2 nuts.
- Torque:
- 24.5 N*m (250 kgf*cm, 18 ft.*lbf)
Connect the connector to the cooler compressor assembly.
Connect the suction hose sub-assembly to the water inlet and timing chain cover with the 2 bolts.
- Torque:
- 5.4 N*m (55 kgf*cm, 48 in.*lbf)
27020
17.INSTALL GENERATOR ASSEMBLY
44774
18.CONNECT UNION TO CONNECTOR TUBE HOSE
Connect the union to connector tube hose to the No. 1 hose to hose tube, and slide the clamp to secure the hose.
44320
19.CONNECT VANE PUMP ASSEMBLY
Connect the vane pump assembly to the generator bracket with the 2 bolts.
- Torque:
- 21 N*m (214 kgf*cm, 15 ft.*lbf)
Connect the connector to the power steering oil pressure switch.
20.CONNECT WATER HOSE SUB-ASSEMBLY
Connect the water hose sub-assembly to the air conditioning unit assembly, slide the 2 clamps secure the 2 hoses.
74431
21.INSTALL BATTERY TRAY
28800
22.INSTALL BATTERY
74404B
23.INSTALL BATTERY CLAMP SUB-ASSEMBLY
Install the battery clamp sub-assembly to the battery with the 2 nuts.
- Torque:
- 5.4 N*m (55 kgf*cm, 48 in.*lbf)
24.CONNECT WIRE HARNESS
Connect the engine room main wire to the battery positive cable with the nut.
- Torque:
- 7.1 N*m (72 kgf*cm, 63 in.*lbf)
Attach the clamp and connect the No. 2 engine wire with the 2 bolts.
- Torque:
- 14 N*m (143 kgf*cm, 10 ft.*lbf)
Connect the 2 connectors to the engine room relay block sub-assembly.
Connect the wire to wire to the engine room relay block sub-assembly with the nut.
- Torque:
- 12.5 N*m (127 kgf*cm, 9 ft.*lbf)
Attach the 2 clips and install the No. 1 relay block cover side to the engine room relay block sub-assembly.
Attach the 3 clips and install the No. 1 relay block cover upper to the engine room relay block sub-assembly.
23273H
25.CONNECT NO. 2 FUEL HOSE
Connect the No. 2 fuel hose to the No. 3 nozzle leakage pipe assembly, and slide the clamp to secure the hose.
Attach the clamp to the No. 2 fuel hose.
23271H
26.CONNECT NO. 1 FUEL HOSE
Connect the No. 1 fuel hose to the No. 2 fuel pipe, and slide the clamp to secure the hose.
Attach the clamp to the No. 1 fuel hose.
23300
27.INSTALL FUEL FILTER ASSEMBLY
17363K
28.INSTALL INTERCOOLER AIR TUBE
Install the intercooler air tube to the diesel throttle body assembly, and slide the clamp to secure the hose.
- Torque:
- 6.5 N*m (66 kgf*cm, 58 in.*lbf)
Connect the connector to the intake air temperature sensor.
17344E
29.INSTALL NO. 4 AIR TUBE
Install the No. 4 air hose to the No. 2 air tube and intercooler air tube, and slide the 2 clamps to secure the hose.
- Torque:
- 6.5 N*m (66 kgf*cm, 58 in.*lbf)
Connect the oil return hose to the engine oil level dipstick guide assembly, and slide the clamp to secure the hose.
17341F
30.INSTALL NO. 1 AIR HOSE
Install the No. 1 air hose to the compressor outlet elbow and No. 1 air tube, and slide the 2 clamps to secure the 2 hoses.
- Torque:
- 6.5 N*m (66 kgf*cm, 58 in.*lbf)
17801
31.INSTALL AIR CLEANER FILTER ELEMENT SUB-ASSEMBLY
32.INSTALL AIR CLEANER CAP AND HOSE
Attach the 4 clips and install the air cleaner cap and hose.
Tighten the hose clamp.
- Torque:
- 4.0 N*m (41 kgf*cm, 35 in.*lbf)
Attach the 2 clamp and connect the connector to the mass air flow meter.
82121
33.CONNECT ENGINE WIRE
Pass the engine wire into the cabin.
Attach the grommet to the body.
- HINT:
-
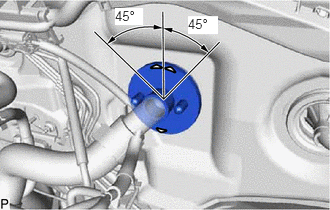 1.958,0.167 2.271,0.354 0.313,0.188 10 true 45° 1.198,0.083 1.49,0.26 0.292,0.177 10 true 45°
-
Make sure the direction of grommet is shown in the illustration.
Attach the clamp to connect the engine wire to the bracket.
Attach the clamp and connect the 4 connectors to the glow plug controller.
Connect the connector to the engine room main wire.
Attach the 2 clamps and connect the 3 connectors to the instrument panel wire.
Install the ECM.
Click hereEngine / Hybrid System>2GD-FTV ENGINE CONTROL>ECM>INSTALLATION
16400
34.INSTALL RADIATOR ASSEMBLY
53301
35.INSTALL HOOD SUB-ASSEMBLY
Install the hood sub-assembly to the 2 hood hinge assemblies with the 4 bolts.
- Torque:
- 13 N*m (133 kgf*cm, 10 ft.*lbf)
Connect the washer nozzle hose to the hood sub-assembly.
36.ADD ENGINE OIL
37.ADD MANUAL TRANSMISSION OIL
38.CONNECT CABLE TO NEGATIVE BATTERY TERMINAL
- NOTICE:
-
When disconnecting the cable, some systems need to be initialized after the cable is reconnected.
-
Click hereGeneral>INTRODUCTION>REPAIR INSTRUCTION>INITIALIZATION
39.BLEED AIR FROM FUEL SYSTEM
40.ADD ENGINE COOLANT
41.INSPECT FOR COOLANT LEAK
42.INSPECT ENGINE OIL LEVEL
43.INSPECT ENGINE IDLE SPEED AND MAXIMUM SPEED
12601B
44.INSTALL NO. 1 ENGINE COVER SUB-ASSEMBLY
51442
45.INSTALL NO. 2 ENGINE UNDER COVER
- Torque:
- 28 N*m (286 kgf*cm, 21 ft.*lbf)
51410
46.INSTALL NO. 1 ENGINE UNDER COVER ASSEMBLY
- Torque:
- for M6 bolt : 11.5 N*m (117 kgf*cm, 8 ft.*lbf)
- for M8 bolt : 28 N*m (286 kgf*cm, 21 ft.*lbf)