1GD-FTV ENGINE CONTROL ECD SYSTEM(w/ DPF) P0093 Fuel System Leak Detected - Large Leak
DESCRIPTION
The fuel pressure sensor mounted on the common rail assembly converts the fuel pressure inside the common rail assembly into an electrical signal and outputs the signal to the ECM. The ECM controls the fuel supply pump assembly in order to maintain the fuel pressure inside the common rail assembly at a target pressure calculated by the ECM. Refer to System Description (Click here Engine / Hybrid System>1GD-FTV ENGINE CONTROL>ECD SYSTEM(w/ DPF)>SYSTEM DESCRIPTION).
- HINT:
- ·
If the drop in the internal fuel pressure is large when injecting fuel, the ECM interprets this as a fault and stores P0093.
·If P0093 is present, refer to "Diagnostic Trouble Code (DTC) Table for Common Rail System" (Click here Engine / Hybrid System>1GD-FTV ENGINE CONTROL>ECD SYSTEM(w/ DPF)>SYSTEM DESCRIPTION).
| DTC No. | Detection Item | DTC Detection Condition | Trouble Area | MIL | Memory |
|---|---|---|---|---|---|
| P0093 | Fuel System Leak Detected - Large Leak | Fuel pressure drop before and after the fuel injection is larger than the threshold a certain number of times (0.2 seconds or more).
(1 trip detection logic) |
·
Fuel line between fuel supply pump assembly and common rail assembly ·
Fuel line between common rail assembly and each injector assembly ·
Common rail assembly ·
Injector assembly ·
Pressure discharge valve (common rail assembly) ·
Fuel pressure sensor (common rail assembly) ·
Crankshaft position sensor ·
Fuel filter element assembly ·
Open or short in injector assembly circuit ·
ECM |
Comes on | DTC stored |
| DTC No. | Data List |
|---|---|
| P0093 | ·
Common Rail Pressure ·
Target Common Rail Pressure |
- HINT:
-
When DTC P0093 is set, check the internal fuel pressure of the common rail by entering the following menus on the GTS: Powertrain / Engine and ECT / Data List / Common Rail Pressure.
- Reference:
Engine Speed Common Rail Pressure Idling Approximately 30000 to 50000 kPa 3000 rpm (No engine load) Approximately 80000 to 110000 kPa
CONFIRMATION DRIVING PATTERN
| DTC No. | DTC Detection Drive Pattern |
|---|---|
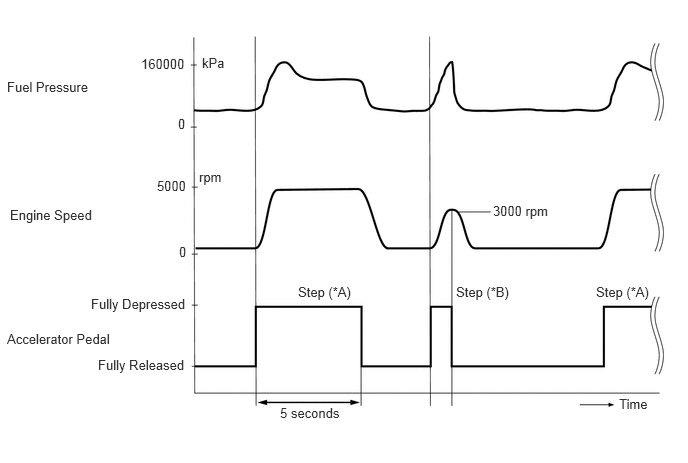
| P0093 | After idling for 60 seconds, run engine at 2500 rpm for 30 seconds.
Fully depress the accelerator pedal for 5 seconds, and then release it. (*A) Rev the engine to 3000 rpm and fully release the accelerator pedal immediately after the engine reaches 3000 rpm. (*B) Repeat procedures (*A) and (*B) 5 times. |
MONITOR DESCRIPTION
This DTC indicates that fuel leaks exist in high pressure areas in the common rail system. The ECM constantly monitors the internal fuel pressure of the common rail after the engine is started. The ECM stores this DTC if the drop in the internal fuel pressure is large when injecting fuel.
In the common rail system, high-pressure fuel is always supplied to the high-pressure areas including the fuel supply pump assembly, common rail assembly, injector assemblies and piping.
The ECM adjusts the timing of when the pre-stroke control valve is closed to obtain the target internal fuel pressure.
If this DTC is stored, the ECM enters fail-safe mode. In fail-safe mode, PM forced regeneration and fuel supply pump assembly operation is prohibited. The ECM continues operating in fail-safe mode until the engine switch is turned off.
CAUTION / NOTICE / HINT
- NOTICE:
- ·
Soon after starting the engine, visually check for fuel leaks in the fuel line.
·After replacing the ECM, the new ECM needs registration (Click here Engine / Hybrid System>1GD-FTV ENGINE CONTROL>ECD SYSTEM(w/ DPF)>REGISTRATION) and initialization (Click here Engine / Hybrid System>1GD-FTV ENGINE CONTROL>ECD SYSTEM(w/ DPF)>INITIALIZATION).
·After replacing an injector assembly, the ECM needs registration (Click here Engine / Hybrid System>1GD-FTV ENGINE CONTROL>ECD SYSTEM(w/ DPF)>REGISTRATION).
- HINT:
-
Read freeze frame data using the GTS. Freeze frame data records the engine condition when malfunctions are detected. When troubleshooting, freeze frame data can help determine if the vehicle was moving or stationary, if the engine was warmed up or not, and other data from the time the malfunction occurred.
PROCEDURE
Before starting the engine, visually check for fuel leaks from the fuel supply pump assembly, injector assembly, common rail assembly, and the fuel pipes in high-pressure areas.
- OK:
No fuel leaks in high-pressure areas.
- Result:
Proceed to OK NG
OK
NG
Connect the GTS to the DLC3.
Turn the ignition switch to ON and turn the GTS on.
Enter the following menus: Powertrain / Engine and ECT / Trouble Codes.
Read the DTCs and freeze frame data.
- Powertrain > Engine and ECT > Trouble Codes
- 50001 234
- Result:
Result Proceed to P0093 and "P0190, P0192 and/or P0193" are output C P0093 and "P0335, P0337, P0338 and/or P0339" are output B Except above A
A
B
Click hereEngine / Hybrid System>1GD-FTV ENGINE CONTROL>ECD SYSTEM(w/ DPF)>DIAGNOSTIC TROUBLE CODE CHART
C
Check if the fuel level is low.
- Result:
Result Proceed to The indicator (fuel warning light) is illuminated A The indicator (fuel warning light) is not illuminated B
A
B
Add fuel.
- Result:
Proceed to NEXT
NEXT
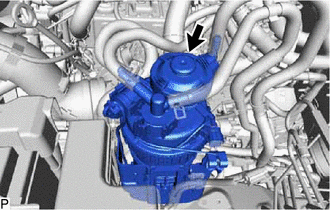
Using the hand pump mounted on the fuel filter cap, bleed the air from the fuel system. Continue pumping until the pump resistance increases.
- NOTICE:
- ·
Hand pump pumping speed: Max. 2 strokes/sec.
·The hand pump must be pushed with a full stroke during pumping.
·When the fuel pressure at the supply pump inlet port reaches a saturated pressure, the hand pump resistance increases.
·If pumping is interrupted during the air bleeding process, fuel in the fuel line may return to the fuel tank. Continue pumping until the hand pump resistance increases.
·If the priming pump does not become harder to push even after pumping continuously 200 times or more, the pipe between the fuel tank and the fuel filter may have a leak, there may be an insufficient amount of fuel or the priming pump may be malfunctioning.
·If a large amount of air remains inside the fuel system, the common rail pressure does not rise to the pressure range necessary for normal use, and the engine cannot be started.
Start the engine.
- NOTICE:
- ·
Even if air bleeding completes with the priming pump, the vehicle may take 10 seconds or more to start.
·Do not crank the engine continuously for more than 20 seconds. The battery may be discharged.
·Use a fully-charged battery.
When the engine can be started, proceed to the next step.
If the engine cannot be started, bleed the air again using the hand pump until the hand pump resistance increases. Then start the engine.
Turn the ignition switch off.
Connect the GTS to the DLC3.
Turn the ignition switch to ON and turn the GTS on.
Clear the DTCs.
- Powertrain > Engine and ECT > Clear DTCs
- 50002 234
Start the engine. (*A)
Enter the following menus: Powertrain / Engine and ECT / Active Test / Test the Fuel Leak. (*B)
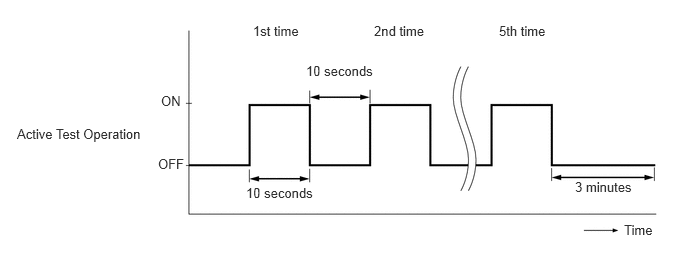
Perform the following test 5 times with on/off intervals of 10 seconds: Active Test / Test the Fuel Leak. (*C)
- Powertrain > Engine and ECT > Active Test
-
Tester Display Test the Fuel Leak - 50004 234 90
Allow the engine to idle for 3 minutes or more after performing the Active Test for the fifth time. (*D)
Enter the following menus: Powertrain / Engine and ECT / Trouble Codes.
Read Current DTCs.
- Powertrain > Engine and ECT > Trouble Codes
- 50001 234
When no DTCs are output, the air bleeding is completed.
If any DTCs are output, proceed to the next step.
Repeat steps (*A) to (*D).
Clear the DTCs.
- Powertrain > Engine and ECT > Clear DTCs
- 50002 234
Start the engine and warm it up.
Confirm that the shift lever is in neutral and securely apply the parking brake.
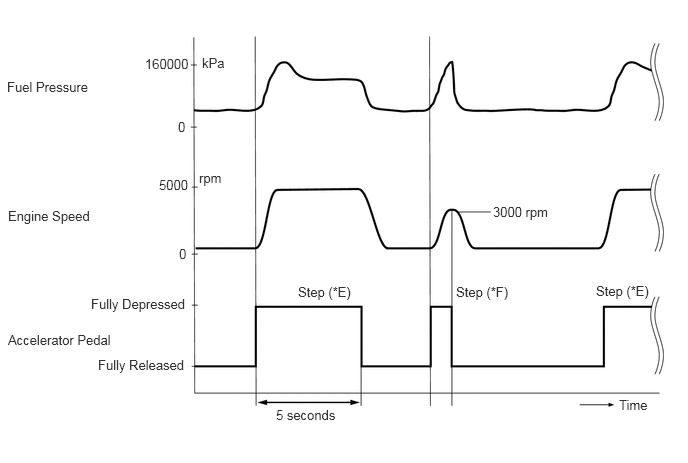
Fully depress the accelerator pedal for 5 seconds, and then release it. (*E)
Rev the engine to 3000 rpm and fully release the accelerator pedal immediately after the engine reaches 3000 rpm. (*F)
Repeat procedures (*E) and (*F) 5 times.
Enter the following menus: Powertrain / Engine and ECT / Trouble Codes.
Read Current DTCs.
- Powertrain > Engine and ECT > Trouble Codes
- 50001 234
- Result:
Result Proceed to DTC is output A No DTC is output B
A
B
Read the value of Injection Feedback Val #1 to #4 in the freeze frame data recorded in Procedure 2.
- Result:
Result Proceed to Injection Feedback Val for at least one cylinder is 5 mm3/st in at least 1 set of freeze frame data B Except above A
- HINT:
-
When there is a problem with the operation of an injector assembly due to foreign matter in the inside of the injector assembly, etc., the fuel injection volume decreases. As a result, the ECM gives instructions to increase the fuel injection volume, which causes Injection Feedback Val to increase.
A
B
Connect the GTS to the DLC3.
Turn the ignition switch to ON and turn the GTS on.
Clear the DTCs.
- Powertrain > Engine and ECT > Clear DTCs
- 50002 234
Enter the following menus: Powertrain / Engine and ECT / Data List / Common Rail Pressure.
- Powertrain > Engine and ECT > Data List
-
Tester Display Common Rail Pressure - 50003 234 851
Start the engine.
Read the value of Common Rail Pressure while cranking and idling the engine.
- Result:
Result Proceed to The engine cannot be started or the engine can be started but Common Rail Pressure is below 20000 kPa 2 seconds after the starter signal changes from OFF to ON B Except above A
A
B
Connect the GTS to the DLC3.
Turn the ignition switch to ON and turn the GTS on.
Start the engine and warm it up.
Enter the following menus: Powertrain / Engine and ECT / Data List / Injection Feedback Val #1 to #4.
- Powertrain > Engine and ECT > Data List
-
Tester Display Injection Feedback Val #1 Injection Feedback Val #2 Injection Feedback Val #3 Injection Feedback Val #4 - 50003 234 778,779,780,781
Read the values.
- Standard:
GTS Display Engine Condition* Normal Value Injection Feedback Val #1
Injection Feedback Val #2
Injection Feedback Val #3
Injection Feedback Val #4Idling -3.0 mm3/st to 3.0 mm3/st
- HINT:
-
*: The A/C switch and all accessory switches should be off, the engine coolant temperature should be 75°C (167°F) or higher and the engine should be idled for 1 minute or more.
- Result:
Result Proceed to Injection Feedback Val for at least one cylinder is more than 3 mm3/st and engine vibration is abnormally large B Except above A
- HINT:
- ·
When there is a problem with the operation of an injector assembly due to foreign matter in the inside of the injector assembly, etc., the fuel injection volume decreases. As a result, the ECM gives instructions to increase the fuel injection volume, which causes Injection Feedback Val to increase.
·The ECM controls the system so that the sum of Injection Feedback Val for all of the cylinders is approximately 0 mm3/st. Even if the value of Injection Feedback Val for a cylinder is less than -3.0 mm3/st (-3.0 mm3/st is the lowest normal value), as long as the value of Injection Feedback Val for each of the other cylinders is 3.0 mm3/st or less, the injector assemblies are not malfunctioning.
A
B
Start the engine and drive the vehicle until the engine coolant temperature reaches 75°C (167°F) or higher.
Stop the vehicle and allow the engine to idle.
While checking the tachometer, fully depress the accelerator pedal for 5 seconds, and then release it.*1
Repeat procedure *1 5 times.
- Result:
Result Proceed to No problems such as sluggishness or variations in the tachometer reading A Except above B
A
B
Clean the fuel filter case and replace the fuel filter element assembly.
- HINT:
-
Be sure to clean the inside of the fuel filter case as the injector assemblies may not operate properly if the fuel filter element assembly is installed with foreign matter remaining inside the fuel filter case.
- Result:
Proceed to NEXT
NEXT
Bleed the air from the fuel system.
Click hereEngine / Hybrid System>1GD-FTV FUEL>FUEL SYSTEM>ON-VEHICLE INSPECTION
- Result:
Proceed to NEXT
NEXT
Connect the GTS to the DLC3.
Start the engine and turn the GTS on.
Enter the following menus: Powertrain / Engine and ECT / Active Test / Test the Fuel Leak / Data List / Common Rail Pressure and Target Common Rail Pressure.
- Powertrain > Engine and ECT > Active Test
-
Active Test Display Test the Fuel Leak -
Data List Display Target Common Rail Pressure Common Rail Pressure - 50004 234 90 850,851
Take a snapshot with the GTS during the Active Test.
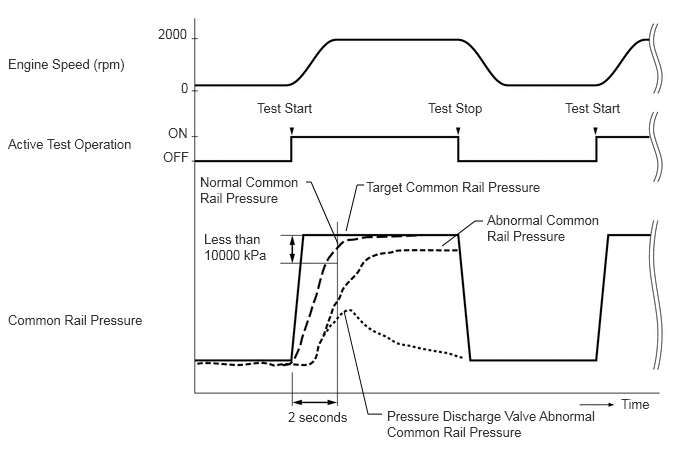
Measure the difference between the target fuel pressure (Target Common Rail Pressure) and the actual fuel pressure (Common Rail Pressure) when the "Test the Fuel Leak" Active Test is performed.
Click hereEngine / Hybrid System>1GD-FTV ENGINE CONTROL>ECD SYSTEM(w/ DPF)>DATA LIST / ACTIVE TEST
- HINT:
-
In order to obtain an exact measurement, perform the Active Test 5 times and measure the difference once each time the Active Test is performed.
- Standard:
The difference between the target fuel pressure and the actual fuel pressure 2 seconds after the Active Test starts is less than 10000 kPa.
- HINT:
- ·
"Target Common Rail Pressure" is the target fuel pressure controlled by the ECM.
·"Common Rail Pressure" is the actual fuel pressure.
- Result:
Result Proceed to The difference between the target fuel pressure and the actual fuel pressure 2 seconds after the Active Test starts is less than 10000 kPa A Except above B
A
B
- HINT:
-
Use this Active Test to determine the malfunctioning cylinder.
Connect the GTS to the DLC3.
Start the engine and turn the GTS on.
Enter the following menus: Powertrain / Engine and ECT / Active Test / Control the Select Cylinder Fuel Cut.
- Powertrain > Engine and ECT > Active Test
-
Tester Display Control the Select Cylinder Fuel Cut - 50004 234 235
- HINT:
- ·
If the engine idle speed does not change when an injector assembly is disabled, the cylinder being tested is malfunctioning. Record any malfunctioning cylinders.
·If the cylinder being tested is normal, there will be a significant change in idle speed when the fuel injection is stopped for that cylinder.
- Result:
Proceed to NEXT
NEXT
Remove the glow plug for all the cylinders.
Click hereEngine / Hybrid System>1GD-FTV STARTING>GLOW PLUG>REMOVAL
Visually check if there is fuel on the glow plugs.
- HINT:
- ·
If there is fuel on a glow plug, fuel may be leaking from an injector assembly.
·After replacing an injector assembly, make sure that the common rail pressure (fuel pressure) is within 5000 kPa (51.0 kgf/cm2, 725 psi) of the target fuel pressure while cranking the engine.
·If there is fuel on a glow plug, fuel may have mixed with the engine oil. Check the engine oil amount and whether the engine oil smells of diesel fuel. If the oil level is above the full line or the engine oil smells of diesel fuel, replace the engine oil.
Install the glow plug.
Click hereEngine / Hybrid System>1GD-FTV STARTING>GLOW PLUG>INSTALLATION
- Result:
Proceed to NEXT
NEXT
Replace the injector assembly of the malfunctioning cylinder.
Click hereEngine / Hybrid System>1GD-FTV FUEL>FUEL INJECTOR>REMOVAL
- NOTICE:
- ·
When replacing the injector assembly for a cylinder, always be sure to use a new No. 1 injection pipe sub-assembly and a new No. 2 injection pipe sub-assembly.
·Follow the procedure in the repair manual and temporarily install the No. 1 injection pipe sub-assembly, No. 2 injection pipe sub-assembly and No. 1 nozzle leakage pipe assembly, and then correctly position the injector assemblies. After that, tighten parts according to the torque specifications.
·If the installation procedure is not performed correctly, injector assemblies may become out of position, which may cause the injector assemblies to deteriorate, resulting in malfunctions.
·If an injector assembly deteriorates and malfunctions, other problems such as knocking, rough idle, etc. may occur.
·If an injector assembly becomes out of position, it is possible that the seal between the injector assembly and injection pipe sub-assembly may become incomplete, resulting in a fuel leak.
- Result:
Proceed to NEXT
NEXT
Bleed the air from the fuel system.
Click hereEngine / Hybrid System>1GD-FTV FUEL>FUEL SYSTEM>ON-VEHICLE INSPECTION
- Result:
Proceed to NEXT
NEXT
Register the injector compensation code.
Click hereEngine / Hybrid System>1GD-FTV ENGINE CONTROL>ECD SYSTEM(w/ DPF)>REGISTRATION
- Powertrain > Engine and ECT > Utility
-
Tester Display Injector Compensation - 50005 234 239
Perform the injector pilot quantity learning.
Click hereEngine / Hybrid System>1GD-FTV ENGINE CONTROL>ECD SYSTEM(w/ DPF)>REGISTRATION
- Powertrain > Engine and ECT > Utility
-
Tester Display Pilot Quantity Learning - 50005 234 235
- Result:
Proceed to NEXT
NEXT
Connect the GTS to the DLC3.
Turn the ignition switch to ON and turn the GTS on.
Enter the following menus: Powertrain / Engine and ECT / Data List / Engine Speed.
- Powertrain > Engine and ECT > Data List
-
Tester Display Engine Speed - 50003 234 9
Read the value while cranking and idling the engine.
- Standard:
GTS Display Engine Condition Specified Condition Engine Speed Cranking 50 to 400 rpm Idling with warm engine 800 to 900 rpm
- HINT:
-
The value should be the same as the actual engine speed and displayed with no interruption on the GTS.
- Result:
Proceed to OK NG
OK
NG
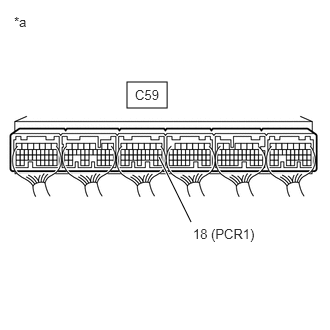
| *a | Component with harness connected
(ECM) |
Connect the positive (+) probe of an oscilloscope to the fuel pressure sensor input terminal of the ECM connector and the negative (-) probe to the body ground.
Turn the ignition switch to ON.
Check for any noise in the waveform when vibration is applied to the wire harness and connectors between the fuel pressure sensor and ECM.
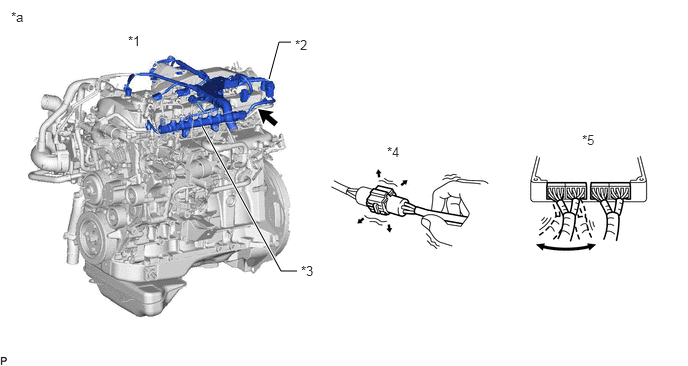
| *1 | Engine | *2 | Engine Wire |
| *3 | Common Rail Assembly (Fuel Pressure Sensor) | *4 | Wire to Wire |
| *5 | ECM | - | - |
| *a | Vibration Method (Reference) | - | - |
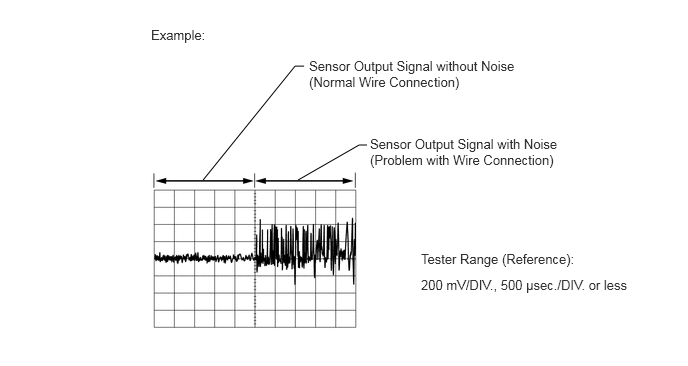
- Standard Voltage:
Tester Connection Condition Specified Condition C59-18 (PCR1) - Body ground Vibration is applied to the wire harness and connectors No noise in the waveform
- Result:
Result Proceed to MIL comes on or noise present in the waveform B Except above A
A
B
Check for intermittent problems.
Click hereEngine / Hybrid System>1GD-FTV ENGINE CONTROL>ECD SYSTEM(w/ DPF)>CHECK FOR INTERMITTENT PROBLEMS
- Result:
Proceed to NEXT
NEXT
Connect the GTS to the DLC3.
Turn the ignition switch to ON and turn the GTS on.
Enter the following menus: Powertrain / Engine and ECT / Trouble Codes.
Clear the DTCs.
- Powertrain > Engine and ECT > Clear DTCs
- 50002 234
Start the engine.
Warm up the engine (engine coolant temperature is 75°C (167°F) or higher).
Confirm that the shift lever is in neutral and securely apply the parking brake.
Fully depress the accelerator pedal for 5 seconds, and then release it. (*A)
Rev the engine to 3000 rpm and fully release the accelerator pedal immediately after the engine reaches 3000 rpm. (*B)
Repeat procedures (*A) and (*B) 5 times.
Enter the following menus: Powertrain / Engine and ECT / Trouble Codes
Read the DTCs.
- Powertrain > Engine and ECT > Trouble Codes
- 50001 234
- OK:
No DTCs are output.
- Result:
Proceed to NEXT
NEXT
Repair or replace the harness or connector.
- Result:
Proceed to NEXT
NEXT
| *a | Component with harness connected
(ECM) |
Connect the positive (+) probe of an oscilloscope to the fuel pressure sensor input terminal of the ECM connector and the negative (-) probe to the body ground.
Turn the ignition switch to ON.
Check for any noise in the waveform when vibration is applied to the wire harness and connectors between the fuel pressure sensor and ECM.
- Standard Voltage:
Tester Connection Condition Specified Condition C59-18 (PCR1) - Body ground Vibration is applied to the wire harness and connectors No noise in the waveform
- Result:
Result Proceed to MIL comes on or noise present in the waveform A Except above B
A
B
Replace the common rail assembly.
Click hereEngine / Hybrid System>1GD-FTV FUEL>COMMON RAIL>REMOVAL
- HINT:
-
Before replacing the common rail assembly, perform a wire harness inspection and if there are any problems with the wire harness, repair or replace it.
- Result:
Proceed to NEXT
NEXT
Bleed the air from the fuel system.
Click hereEngine / Hybrid System>1GD-FTV FUEL>FUEL SYSTEM>ON-VEHICLE INSPECTION
- Result:
Proceed to NEXT
NEXT
Replace the crankshaft position sensor.
Click hereEngine / Hybrid System>1GD-FTV ENGINE CONTROL>CRANKSHAFT POSITION SENSOR>REMOVAL
- HINT:
-
Before replacing the crankshaft position sensor, perform a wire harness inspection and if there are any problems with the wire harness, repair or replace it.
- Result:
Proceed to NEXT
NEXT