2TR-FBE ENGINE CONTROL SFI SYSTEM C1263 Ejector VSV Malfunction (High) C1264 Ejector VSV Malfunction (Low)
DESCRIPTION
The No. 1 vacuum switching valve assembly (ejector VSV) is installed on the throttle by-pass and controlled by the ECM to optimally apply vacuum to the brake booster assembly.
| DTC No. | Detection Item | DTC Detection Condition | Trouble Area | MIL | Memory |
|---|---|---|---|---|---|
| C1263 | Ejector VSV Malfunction (High) | Both of the following conditions are met for 3 seconds or more (1 trip detection logic):
(a) Ignition switch is ON. (b) Terminal voltage is LO (short to +B) when VSV operation command is on. |
·
Open or short in No. 1 vacuum switching valve assembly (ejector VSV) circuit ·
No. 1 vacuum switching valve assembly (ejector VSV) ·
ECM |
Does not come on | DTC stored |
| C1264 | Ejector VSV Malfunction (Low) | Both of the following conditions are met for 3 seconds or more (1 trip detection logic):
(a) Ignition switch is ON. (b) Terminal voltage is HI (open or short to ground) when VSV operation command is off. |
·
Open or short in No. 1 vacuum switching valve assembly (ejector VSV) circuit ·
No. 1 vacuum switching valve assembly (ejector VSV) ·
ECM |
Does not come on | DTC stored |
MONITOR DESCRIPTION
The ECM monitors the terminal voltage input from the No. 1 vacuum switching valve assembly (ejector VSV). If the voltage and No. 1 vacuum switching valve assembly (ejector VSV) operation command signals do not match, the ECM judges that there is a malfunction in the No. 1 vacuum switching valve assembly (ejector VSV) circuit and stores a DTC.
MONITOR STRATEGY
| Required Sensors/Components | NO. 1 vacuum switching valve assembly (ejector VSV) |
| Frequency of Operation | Continuous |
CONFIRMATION DRIVING PATTERN
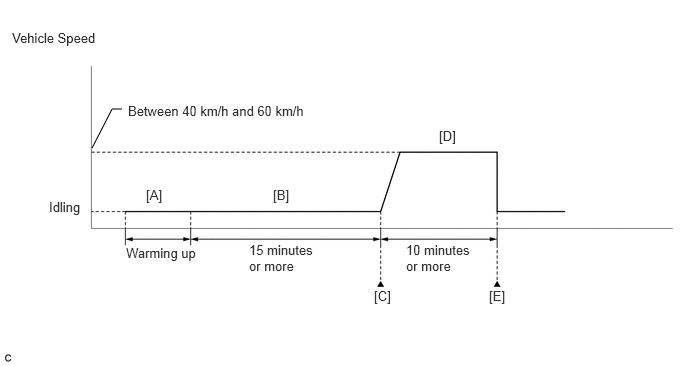
Connect the GTS to the DLC3.
Turn the ignition switch to ON and turn the GTS on.
Clear the DTCs (even if no DTCs are stored, perform the clear DTC procedure).
Turn the ignition switch off and wait for at least 30 seconds.
Turn the ignition switch to ON and turn the GTS on.
Start the engine and warm it up until the engine coolant temperature is 75°C (167°F) or higher [A].
- HINT:
-
The A/C switch and all accessory switches should be off.
Idle the engine for 15 minutes or more [B].
Enter the following menus: Powertrain / Engine and ECT / Trouble Codes [C].
Read the pending DTCs.
- HINT:
- ·
If a pending DTC is output, the system is malfunctioning.
·If a pending DTC is not output, perform the following procedure.
Enter the following menus: Powertrain / Engine and ECT / Utility / All Readiness.
Input the DTC: C1263 or C1264.
Check the DTC judgment result.
| GTS Display | Description |
|---|---|
| NORMAL | ·
DTC judgment completed ·
System normal |
| ABNORMAL | ·
DTC judgment completed ·
System abnormal |
| INCOMPLETE | ·
DTC judgment not completed ·
Perform driving pattern after confirming DTC enabling conditions |
| N/A | ·
Unable to perform DTC judgment ·
Number of DTCs which do not fulfill DTC preconditions has reached ECU memory limit |
- HINT:
- ·
If the judgment result shows NORMAL, the system is normal.
·If the judgment result shows ABNORMAL, the system has a malfunction.
·If the judgment result shows INCOMPLETE or N/A, perform steps [D] and [E].
Drive the vehicle at a constant speed between 40 and 60 km/h (25 and 37 mph) for 10 minutes or more [D].
- CAUTION:
-
When performing the confirmation driving pattern, obey all speed limits and traffic laws.
Check the DTC judgment result again [E].
WIRING DIAGRAM
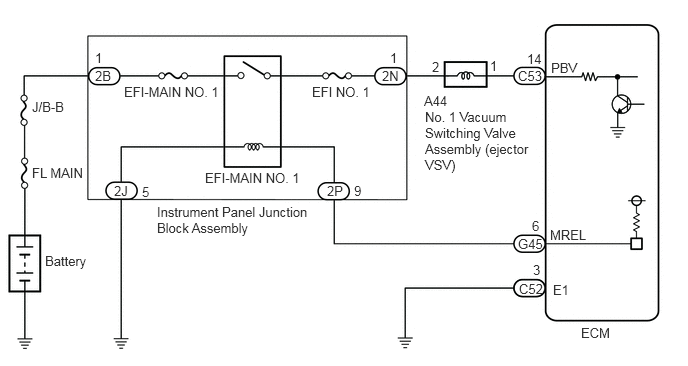
CAUTION / NOTICE / HINT
- NOTICE:
-
Inspect the fuses for circuits related to this system before performing the following procedure.
- HINT:
-
Read freeze frame data using the GTS. The ECM records vehicle and driving condition information as freeze frame data the moment a DTC is stored. When troubleshooting, freeze frame data can help determine if the vehicle was moving or stationary, if the engine was warmed up or not, if the air fuel ratio was lean or rich, and other data from the time the malfunction occurred.
PROCEDURE
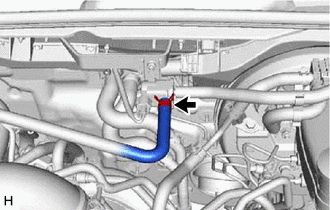
Disconnect the hose (connected to the air cleaner hose) of the No. 1 vacuum switching valve assembly (ejector VSV).
Connect the GTS to the DLC3.
Start the engine.
Turn the GTS on.
Enter the following menus: Powertrain / Engine and ECT / Active Test / Brake Ejector VSV Inspection.
- Powertrain > Engine and ECT > Active Test
-
Tester Display Brake Ejector VSV Inspection - 50004 234 249
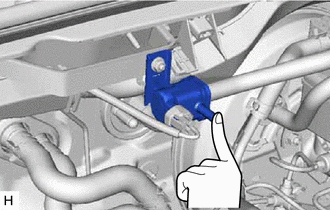
When the ejector VSV is operated using the GTS, check whether the port of the No. 1 vacuum switching valve assembly (ejector VSV) applies suction to your finger.
- OK:
GTS Operation Specified Condition ON No. 1 vacuum switching valve assembly (ejector VSV) port applies suction to finger OFF No. 1 vacuum switching valve assembly (ejector VSV) port applies no suction to finger
- Result:
Proceed to OK NG
OK
NG
Inspect the No. 1 vacuum switching valve assembly (ejector VSV).
Click hereBrake>BRAKE SYSTEM (OTHER)>VACUUM SWITCHING VALVE(for 2TR-FE, 2TR-FBE)>INSPECTION
- Result:
Proceed to OK NG
OK
NG
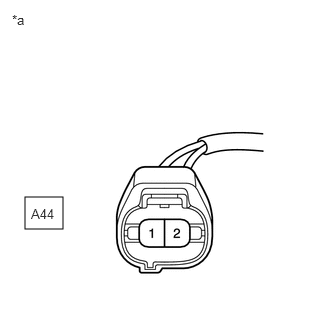
| *a | Front view of wire harness connector
(to No. 1 vacuum switching valve assembly (ejector VSV)) |
Disconnect the No. 1 vacuum switching valve assembly (ejector VSV) connector.
Turn the ignition switch to ON.
Measure the voltage according to the value(s) in the table below.
- Standard Voltage:
Tester Connection Condition Specified Condition A44-2 - Body ground Ignition switch ON 11 to 14 V
- Result:
Proceed to OK NG
OK
NG
Disconnect the No. 1 vacuum switching valve assembly (ejector VSV) connector.
Disconnect the ECM connector.
Measure the resistance according to the value(s) in the table below.
- Standard Resistance:
Tester Connection Condition Specified Condition A44-1 - C53-14 (PBV) Always Below 1 Ω A44-1 or C53-14 (PBV) - Body ground Always 10 kΩ or higher
- Result:
Proceed to OK NG
OK
NG
Disconnect the instrument panel junction block assembly connector.
Disconnect the No. 1 vacuum switching valve assembly (ejector VSV) connector.
Measure the resistance according to the value(s) in the table below.
- Standard Resistance:
Tester Connection Condition Specified Condition 2N-1 - A44-2 Always Below 1 Ω 2N-1 or A44-2 - Body ground Always 10 kΩ or higher
- Result:
Proceed to OK NG
OK
NG