2GD-FTV LUBRICATION OIL PUMP REMOVAL
CAUTION / NOTICE / HINT
The necessary procedures (adjustment, calibration, initialization, or registration) that must be performed after parts are removed, installed, or replaced during the engine assembly removal/installation are shown below.
| Replacement Part or Procedure | Necessary Procedures | Effects/Inoperative when not Performed | Link |
|---|---|---|---|
| Replacement of engine assembly | ·
Injector compensation code registration ·
Pilot quantity learning |
Engine starting | ( ) |
Clear Crank Time Compensation Data |
Engine starting | ()
|
|
| Replacement of injector assembly | ·
Injector compensation code registration ·
Pilot quantity learning |
Engine starting | ()
|
·
Replacement of diesel throttle body assembly ·
Replacement of electric EGR control valve assembly ·
Replacement of turbocharger sub-assembly ·
Replacement of turbocharger sub-assembly or turbocharger variable nozzle motor |
Perform initialization | - | ()
|
- NOTICE:
- ·
When replacing the parts in the following chart (A), replace the No. 1 injection pipe sub-assembly, No. 2 injection pipe sub-assembly and/or fuel inlet pipe sub-assembly with new ones.
Replaced Parts (A) Pipes Requiring New Replacement ·Injector assembly (including shuffling the injector assemblies between the cylinders)
·Common rail assembly
·Cylinder head sub-assembly
·No. 1 injection pipe sub-assembly
·No. 2 injection pipe sub-assembly
·Supply pump assembly
·Common rail assembly
·Cylinder block sub-assembly
·Cylinder head sub-assembly
·Cylinder head gasket
·Timing chain case assembly
Fuel inlet pipe sub-assembly
·After removing the No. 1 injection pipe sub-assembly, No. 2 injection pipe sub-assembly and/or fuel inlet pipe sub-assembly, clean them with a brush and compressed air.
·The injector assembly is a precision instrument. Do not use the injector assembly if it is struck or dropped.
·Make sure foreign matter does not enter the fuel path.
·The supply pump assembly is a precision instrument. Do not use the supply pump assembly if it is struck or dropped.
·Hold the supply pump assembly itself during removal and installation. Do not hold the pre-stroke control valve or fuel pipe, etc.
PROCEDURE

 1.REMOVE ENGINE ASSEMBLY
44763C
2.REMOVE NO. 2 HOSE TO HOSE TUBE
12632
3.REMOVE NO. 2 ENGINE COVER BRACKET
82121
4.REMOVE ENGINE WIRE
17363K
5.REMOVE INTERCOOLER AIR TUBE
26100G
6.REMOVE DIESEL THROTTLE BODY ASSEMBLY
16278
7.REMOVE NO. 2 WATER BY-PASS PIPE
12631A
8.REMOVE ENGINE COVER BRACKET
23265C
9.REMOVE GAS FILTER
89421C
10.REMOVE DIESEL TURBO PRESSURE SENSOR
25625
11.REMOVE EGR VALVE BRACKET
25612
12.REMOVE NO. 2 EGR PIPE
16206B
13.REMOVE NO. 3 WATER BY-PASS PIPE SUB-ASSEMBLY
27148A
14.REMOVE CONNECTING WIRE
25611A
15.REMOVE NO. 1 EGR PIPE SUB-ASSEMBLY
25804
16.REMOVE VACUUM CONTROL VALVE SET
16209
17.REMOVE NO. 4 WATER BY-PASS PIPE SUB-ASSEMBLY
25800
18.REMOVE NO. 1 EGR COOLER AND NO. 2 EGR VALVE ASSEMBLY WITH ELECTRIC EGR CONTROL VALVE ASSEMBLY
11409
19.REMOVE ENGINE OIL LEVEL DIPSTICK GUIDE
23812D
20.REMOVE NO. 2 FUEL PIPE
21.REMOVE WIRING HARNESS CLAMP BRACKET
17118
22.REMOVE MANIFOLD STAY
22803
23.REMOVE FUEL INJECTION PUMP COVER SUB-ASSEMBLY
23243B
24.REMOVE FUEL PUMP MOTOR WIRE
23273H
25.REMOVE NO. 2 FUEL HOSE
23271H
26.REMOVE NO. 1 FUEL HOSE
23804C
27.REMOVE FUEL INLET PIPE SUB-ASSEMBLY
23770
28.REMOVE NO. 2 NOZZLE LEAKAGE PIPE ASSEMBLY
17111
29.REMOVE INTAKE MANIFOLD
30.REMOVE WIRING HARNESS CLAMP BRACKET
23760
31.REMOVE NOZZLE LEAKAGE PIPE ASSEMBLY
32.REMOVE WIRING HARNESS CLAMP BRACKET
23701
33.REMOVE NO. 1 AND NO. 2 INJECTION PIPE SUB-ASSEMBLY
44781
34.REMOVE HOSE BRACKET
88431
35.REMOVE NO. 1 COMPRESSOR MOUNTING BRACKET
17167
36.REMOVE NO. 1 EXHAUST MANIFOLD HEAT INSULATOR
17271
37.REMOVE NO. 1 TURBO INSULATOR
38.REMOVE NO. 2 EXHAUST PIPE SUPPORT STAY
39.REMOVE EXHAUST PIPE SUPPORT STAY
25051
40.REMOVE EXHAUST MANIFOLD CONVERTER SUB-ASSEMBLY
12261
41.REMOVE PCV HOSE
16279
42.REMOVE NO. 3 WATER BY-PASS PIPE
16268
43.REMOVE NO. 1 WATER BY-PASS PIPE
16284
44.DISCONNECT NO. 1 AND NO. 2 TURBO WATER HOSE
17293
45.REMOVE TURBOCHARGER STAY
15474
46.REMOVE TURBO OIL OUTLET PIPE
15407
47.REMOVE TURBO OIL INLET PIPE SUB-ASSEMBLY
17201
48.REMOVE TURBOCHARGER SUB-ASSEMBLY
16207
49.REMOVE NO. 2 WATER BY-PASS PIPE SUB-ASSEMBLY
16304
50.REMOVE WATER OUTLET SUB-ASSEMBLY
16321
51.REMOVE WATER INLET
16331A
52.REMOVE THERMOSTAT
16603
53.REMOVE NO. 1 IDLER PULLEY SUB-ASSEMBLY
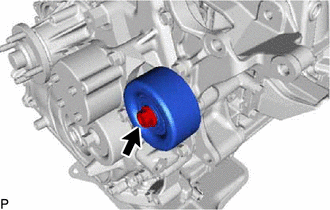
Remove the bolt and No. 1 idler pulley sub-assembly from the alternator bracket sub-assembly.
16620
54.REMOVE V-RIBBED BELT TENSIONER ASSEMBLY
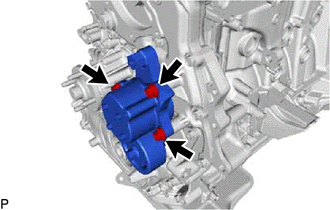
Remove the 3 bolts and V-ribbed belt tensioner assembly from the timing chain cover.
13471
55.REMOVE CRANKSHAFT PULLEY
12281A
56.REMOVE NO. 1 ENGINE HANGER
12501
57.REMOVE GENERATOR BRACKET SUB-ASSEMBLY
23670
58.REMOVE INJECTOR ASSEMBLY
23682
59.REMOVE NOZZLE HOLDER GASKET
11401Q
60.REMOVE CAMSHAFT POSITION SENSOR
11201
61.REMOVE CYLINDER HEAD COVER SUB-ASSEMBLY
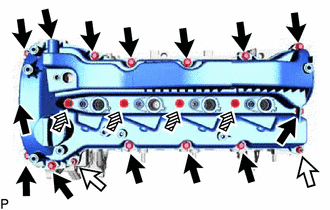

|
Bolt |

|
Nut |

|
Nozzle Holder Clamp Seat |
Remove the 14 bolts, 4 nozzle holder clamp seats, 2 nuts and cylinder head cover sub-assembly from the cylinder head sub-assembly.
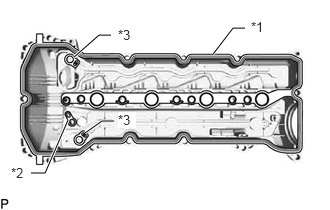
| *1 | Cylinder Head Cover Gasket |
| *2 | No. 2 Cylinder Head Cover Gasket |
| *3 | Camshaft Bearing Cap Oil Hole Gasket |
Remove the cylinder head cover gasket, No. 2 cylinder head cover gasket and 2 camshaft bearing cap oil hole gaskets from the cylinder head cover sub-assembly.
12144
62.REMOVE OIL PAN COVER SILENCER
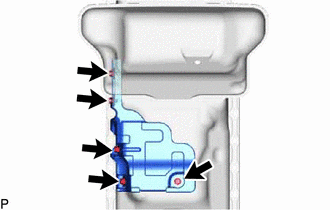
Remove the 5 bolts and oil pan cover silencer from the oil pan sub-assembly.
89491
63.REMOVE ENGINE OIL LEVEL SENSOR
12101
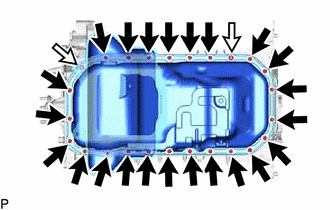
64.REMOVE OIL PAN SUB-ASSEMBLY
|
|
Bolt |
|
|
Nut |
Remove the 23 bolts and 2 nuts.
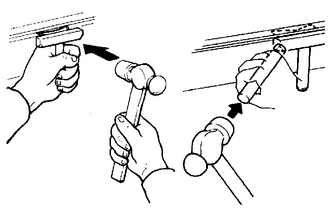
Insert the blade of an oil pan seal cutter between the oil pan sub-assembly and cylinder block sub-assembly, cut off the applied sealer and remove the oil pan sub-assembly.
- NOTICE:
- ·
Be careful not to damage the contact surfaces of the cylinder block sub-assembly and oil pan sub-assembly.
·Be careful not to damage the cylinder block sub-assembly flange.
16100
65.REMOVE ENGINE WATER PUMP ASSEMBLY
66.SET NO. 1 CYLINDER TO TDC/COMPRESSION
11324
67.REMOVE TIMING CHAIN COVER PLATE
22100
68.REMOVE SUPPLY PUMP ASSEMBLY
22815A
69.INSTALL INJECTION PUMP INSULATOR
11302
70.REMOVE TIMING CHAIN COVER SUB-ASSEMBLY
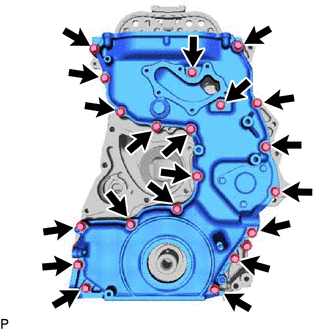
Remove the 20 bolts from the timing chain cover sub-assembly.
Using a screwdriver wrapped in protective tape, remove the timing chain cover sub-assembly by prying the points in the illustration.
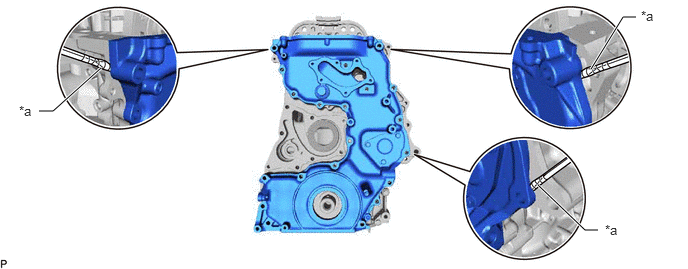
| *a | Protective Tape | - | - |
- NOTICE:
-
Do not damage the contacting surfaces of the timing chain cover sub-assembly and timing chain case assembly.
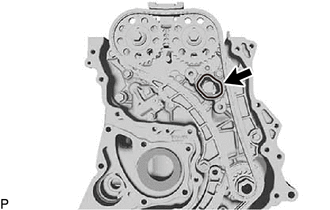
Remove the timing chain case gasket from the timing chain case assembly.
11303A
71.REMOVE FRONT CRANKSHAFT OIL SEAL
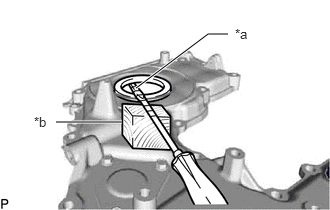
| *a | Protective Tape |
| *b | Wooden Block |
Using a screwdriver and wooden block, pull out the front crankshaft oil seal.
- NOTICE:
-
Do not damage the surface of the front crankshaft oil seal press fit hole.
72.INSPECT BACKLASH OF OIL PUMP GEAR TO OIL PUMP DRIVE GEAR
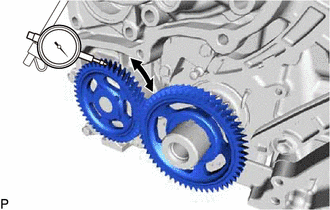
Using a dial indicator, measure the backlash.
- Standard gear backlash:
0.02 to 0.3 mm (0.000787 to 0.0118 in.)
- Maximum gear backlash:
0.42 mm (0.0165 in.)
If the gear backlash is more than the maximum, replace the timing chain case assembly or oil pump drive gear.
13519
73.REMOVE OIL PUMP DRIVE GEAR
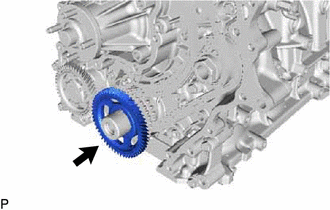
Remove the oil pump drive gear from the crankshaft.
13566B
74.REMOVE TIMING CHAIN GUIDE
13550
75.REMOVE NO. 2 CHAIN TENSIONER ASSEMBLY
76.REMOVE NO. 2 CHAIN TENSIONER SLIPPER
13562
77.REMOVE NO. 2 CHAIN VIBRATION DAMPER
13507
78.REMOVE NO. 2 CHAIN SUB-ASSEMBLY
13540
79.REMOVE NO. 1 CHAIN TENSIONER ASSEMBLY
13559
80.REMOVE NO. 1 CHAIN TENSIONER SLIPPER
13561
81.REMOVE NO. 1 CHAIN VIBRATION DAMPER
13506
82.REMOVE CRANKSHAFT TIMING SPROCKET, INJECTION PUMP DRIVE GEAR WITH NO. 1 CHAIN SUB-ASSEMBLY
13523
83.REMOVE CAMSHAFT TIMING SPROCKET
11310
84.REMOVE TIMING CHAIN CASE ASSEMBLY
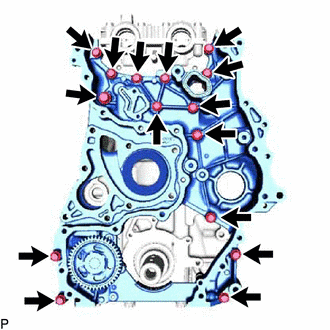
Remove the 15 bolts from the timing chain case assembly.
Using a screwdriver wrapped in protective tape, remove the timing chain case assembly by prying the points in the illustration.
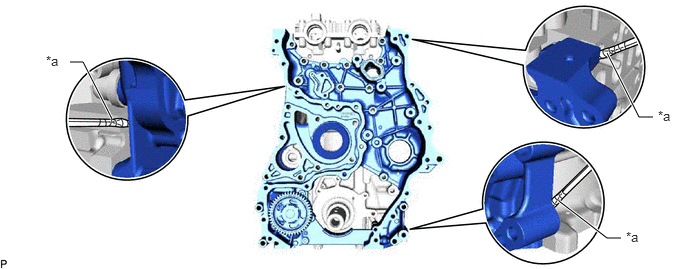
| *a | Protective Tape | - | - |
- NOTICE:
-
Do not damage the contacting surfaces of the timing chain case assembly, cylinder head sub-assembly and cylinder block sub-assembly.
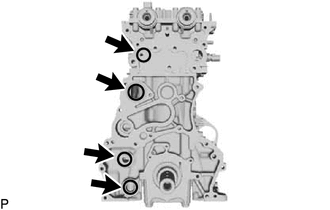
Remove the 4 O-rings from the cylinder head sub-assembly and cylinder block sub-assembly.