BRAKE CONTROL / DYNAMIC CONTROL SYSTEMS BRAKE ACTUATOR INSTALLATION
PROCEDURE

 1.INSTALL BRAKE ACTUATOR ASSEMBLY WITH BRACKET
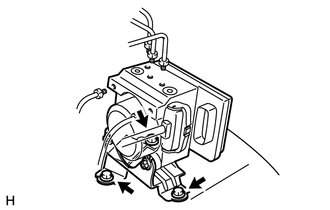
for LHD:
Install the actuator with brake actuator bracket with the 3 bolts.
- Torque:
- 19 N*m (194 kgf*cm, 14 ft.*lbf)
- NOTICE:
- ·
Tighten the 3 bolts uniformly in alphabetical order.
·Be careful not to damage the brake tubes.
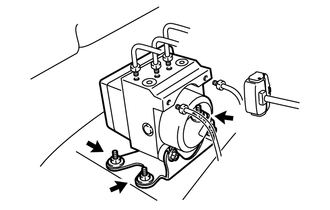
for RHD:
Install the brake actuator with brake actuator bracket with the 3 nuts.
- Torque:
- 19 N*m (194 kgf*cm, 14 ft.*lbf)
- NOTICE:
- ·
Tighten the 3 nuts uniformly in alphabetical order.
·Be careful not to damage the brake tubes.
Set each brake line in the correct position on the brake actuator as shown in the illustration.
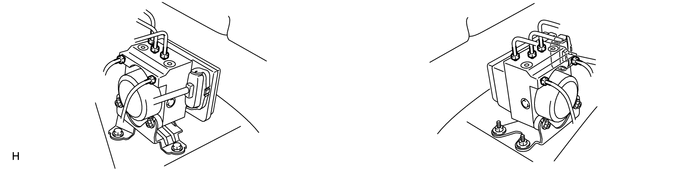
| *A | for LHD | *B | for RHD |
- HINT:
- ·
*1: to front wheel cylinder RH
·*2: to front wheel cylinder LH
·*3: to rear wheel cylinder
·*4: from master cylinder
Using a union nut wrench, connect the 5 brake lines to the correct locations on the actuator, as shown in the illustration
- Torque:
- 15 N*m (155 kgf*cm, 11 ft.*lbf)
- NOTICE:
-
Use the formula to calculate special torque values for situations where a union nut wrench is combined with a torque wrench (See page General>INTRODUCTION>REPAIR INSTRUCTION>PRECAUTION).
Attach the clip to the brake actuator bracket.
Connect the actuator connector.
2.CONNECT CABLE TO NEGATIVE BATTERY TERMINAL
- NOTICE:
-
When disconnecting the cable, some systems need to be initialized after the cable is reconnected (See page General>INTRODUCTION>REPAIR INSTRUCTION>INITIALIZATION).
3.BLEED BRAKE SYSTEM
4.BLEED AIR FROM CLUTCH LINE (for Manual Transmission)
5.CHECK BRAKE ACTUATOR WITH INTELLIGENT TESTER