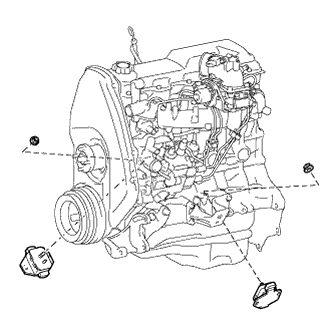
REMOVAL
Removal / installation · Vehicles built from Aug 2013
| 1. DISCONNECT CABLE FROM NEGATIVE BATTERY TERMINAL |

- NOTICE:
- After turning the ignition switch off, waiting time may be required before disconnecting the cable from the battery terminal. Therefore, make sure to read the disconnecting the cable from the battery terminal notice before proceeding with work (Click here).
- When disconnecting the cable, some systems need to be initialized after the cable is reconnected (Click here).
- After turning the ignition switch off, waiting time may be required before disconnecting the cable from the battery terminal. Therefore, make sure to read the disconnecting the cable from the battery terminal notice before proceeding with work (Click here).
| 2. REMOVE BATTERY HOLD DOWN CLAMP |
Remove the nut and disconnect the engine wire.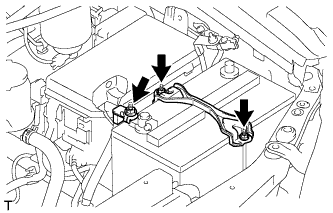

Remove the 2 nuts and battery hold down clamp.
| 3. REMOVE BATTERY |
| 4. REMOVE BATTERY TRAY |
| 5. REMOVE HOOD SUB-ASSEMBLY |
Disconnect the washer nozzle hose.
Remove the 8 bolts and hood.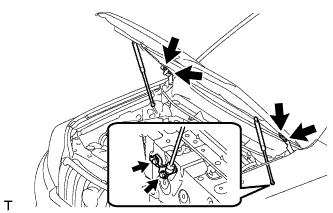
- NOTICE:
- If the hood support is detached from the ball joint, it become non-reusable. Therefore, do not detach the hood support from the ball joint unless replacing it.
| 6. REMOVE COWL TOP VENTILATOR LOUVER SUB-ASSEMBLY |
Remove the cowl top ventilator louver (Click here).
| 7. REMOVE UPPER RADIATOR SUPPORT SEAL |
Remove the 13 clips and upper radiator support seal.
| 8. REMOVE FRONT BUMPER COVER LOWER |
Remove the clip, 5 bolts and front bumper cover lower.
| 9. REMOVE NO. 1 ENGINE UNDER COVER SUB-ASSEMBLY |
Remove the 4 bolts.
Unhook the engine under cover from the vehicle body as shown in the illustration.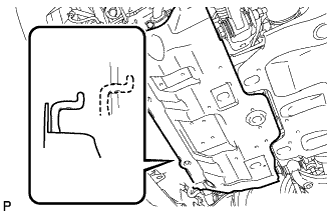
| 10. REMOVE TRANSMISSION UNDER COVER |
Remove the 2 bolts and transmission under cover.
| 11. REMOVE REAR ENGINE UNDER COVER ASSEMBLY |
Remove the 4 bolts and rear engine under cover.
| 12. DRAIN ENGINE COOLANT |
- CAUTION:
- Do not remove the radiator reservoir cap while the engine and radiator are still hot. Pressurized, hot engine coolant and steam may be released and cause serious burns.
Loosen the radiator drain cock plug.
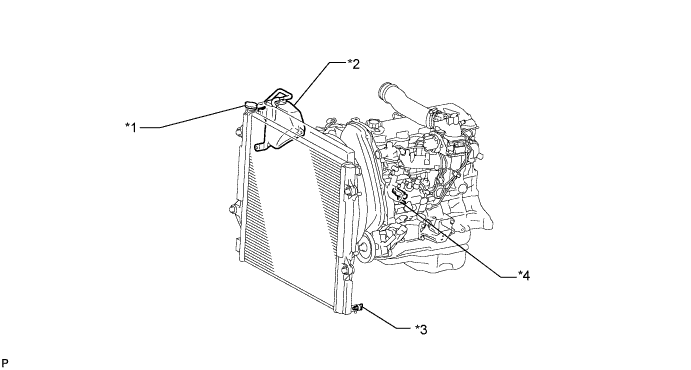
Text in Illustration *1
Radiator Cap
*2
Radiator Reservoir
*3
Radiator Drain Cock Plug
*4
Cylinder Block Drain Cock Plug
- HINT:
- Collect the coolant in a container and dispose of it according to the regulations in your area.
Drain the coolant by removing the radiator cap.
Loosen the cylinder block drain cock plug.
Loosen the cylinder block drain cock plug and drain the coolant from the engine.
- NOTICE:
- If coolant is not drained from the radiator drain cock plug, cylinder block drain cock plugs and radiator reservoir, clogging in the radiator or coolant leakage from the seal of the water pump may result.
| 13. DRAIN ENGINE OIL |
Remove the oil filler cap.
Remove the oil drain plug and gasket, and then drain the oil into a container.
Clean the drain plug and install it with a new gasket.
- Torque:
- 35 N*m{ 352 kgf*cm , 25 ft.*lbf }
| 14. REMOVE FRONT FENDER APRON SEAL RH |
Remove the 4 clips and fender apron seal.
| 15. REMOVE NO. 1 FRONT FENDER APRON TO FRAME SEAL RH |
Remove the 5 clips and frame seal.
| 16. REMOVE FRONT FENDER APRON SEAL LH |
Remove the 5 clips and fender apron seal.
| 17. REMOVE NO. 1 FRONT FENDER APRON TO FRAME SEAL LH |
Remove the 5 clips and frame seal.
| 18. REMOVE RESONATOR WITH AIR CLEANER CAP SUB-ASSEMBLY |
Disconnect the sensor connector.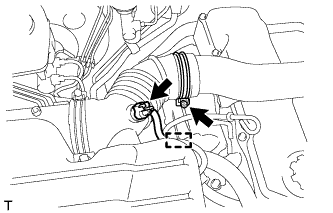
Detach the wire harness clamp.
Loosen the hose clamp and remove the resonator with air cleaner cap.
Detach the 4 hook clamps, and then remove the air cleaner cap and resonator with air cleaner cap.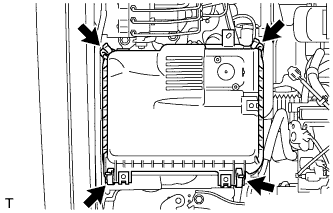
| 19. REMOVE AIR CLEANER FILTER ELEMENT SUB-ASSEMBLY |
| 20. REMOVE AIR CLEANER CASE ASSEMBLY |
Remove the 3 bolts and air cleaner case.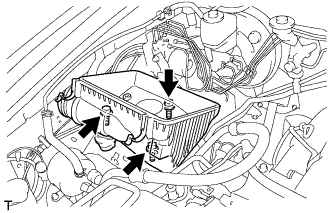
| 21. REMOVE FRONT BUMPER COVER |
Remove the 2 screws.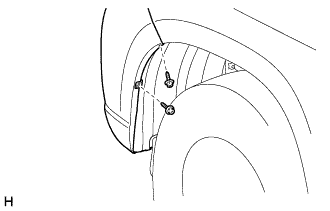
- HINT:
- Use the same procedure for the screws on the other side.
Remove the 2 screws.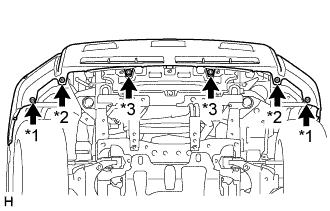
Text in Illustration *1
Screw
*2
Bolt A
*3
Bolt B
Remove the 2 bolts labeled A and 2 bolts labeled B.
Put protective tape around the front bumper cover.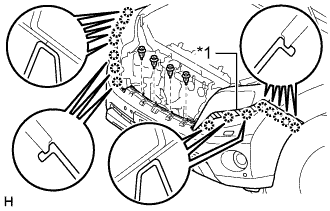
Text in Illustration *1
Protective Tape
Remove the 4 clips.
Detach the 16 claws and remove the front bumper cover.
- NOTICE:
- Do not hold the middle of the front bumper cover, as it may become reformed.
w/ TOYOTA Parking Assist-sensor System, w/ Fog Light:
Disconnect the 3 connectors.
w/ TOYOTA Parking Assist-sensor System, w/o Fog Light:
Disconnect the connector.
w/o TOYOTA Parking Assist-sensor System, w/ Fog Light:
Disconnect the 2 connectors.
w/ Headlight Cleaner System:
Disconnect the No. 1 headlight cleaner hose.
| 22. REMOVE FRONT UPPER BUMPER RETAINER |
Remove the 3 bolts and front bumper upper retainer.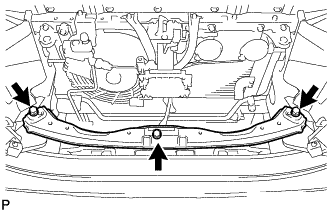
| 23. REMOVE RADIATOR SIDE DEFLECTOR LH |
Using a clip remover, detach the 3 claws and remove the clip. Then move the radiator side deflector LH so that the radiator can be removed in the step below.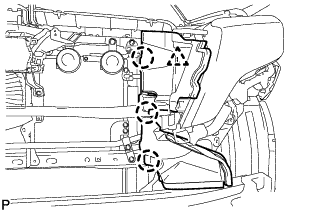
| 24. REMOVE RADIATOR SIDE DEFLECTOR RH |
Using a clip remover, detach the 3 claws and remove the clip. Then move the radiator side deflector RH so that the radiator can be removed in the step below.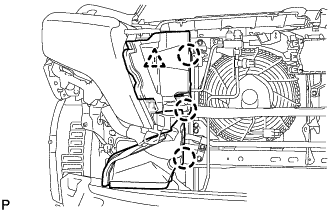
| 25. REMOVE NO. 1 RADIATOR HOSE |
Detach the clamp and remove the No. 1 radiator hose.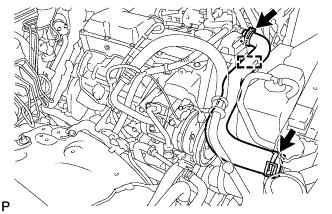
Remove the 2 nuts and hose clamp.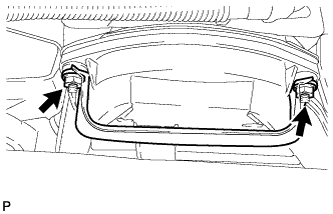
| 26. REMOVE NO. 2 RADIATOR HOSE |
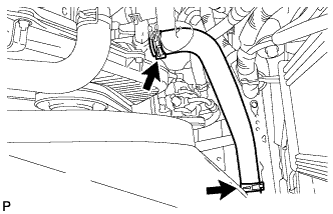 |
| 27. REMOVE FAN SHROUD |
Loosen the 4 nuts holding the fluid coupling fan.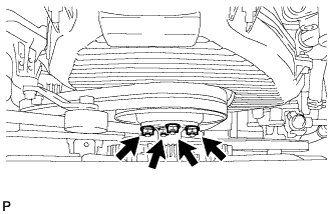
Remove the vane pump V belt and the fan and generator V belt (Click here).
Remove the 2 bolts holding the fan shroud.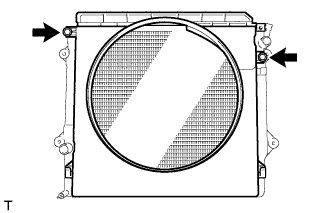
Remove the 4 nuts of the fluid coupling fan, and then remove the shroud together with the coupling fan.
- NOTICE:
- Be careful not to damage the radiator core.
Remove the fan pulley from the water pump.
| 28. REMOVE RADIATOR ASSEMBLY |
Remove the 4 bolts and radiator assembly from the radiator support.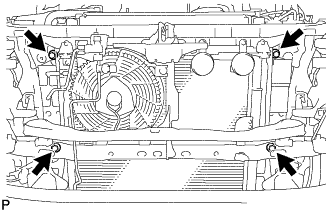
| 29. REMOVE INTAKE PIPE ASSEMBLY |
Loosen the hose clamp and remove the 2 bolts and intake pipe.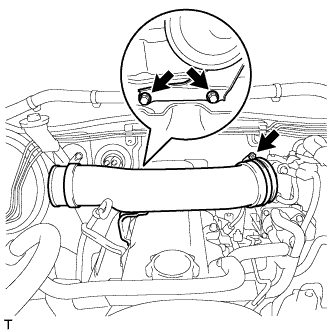
| 30. DISCONNECT COOLER COMPRESSOR ASSEMBLY |
Remove the 4 bolts and idle pulley bracket.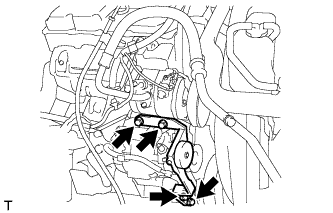
Disconnect the connector.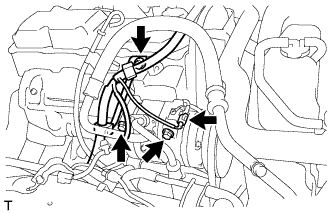
Remove the 3 bolts and disconnect the cooler compressor.
- HINT:
- It is not necessary to completely remove the cooler compressor. With the hoses connected to the compressor, hang the compressor on the vehicle body with a rope.
| 31. REMOVE GENERATOR ASSEMBLY |
Remove the terminal cap.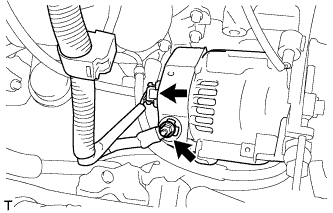
Remove the nut and generator wire.
Disconnect the generator connector.
Disconnect the vacuum pump hose.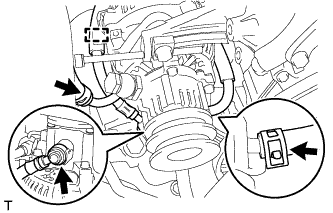
Remove the union bolt to disconnect the vacuum pump oil inlet hose and remove the 2 gaskets.
Detach the vacuum pump oil inlet hose from the cord clip.
Disconnect the vacuum pump oil outlet hose.
Remove the 2 bolts and generator.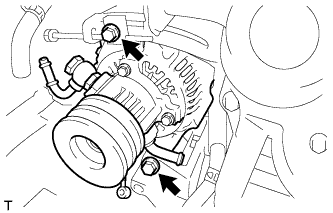
| 32. REMOVE GLOVE COMPARTMENT DOOR ASSEMBLY |
Remove the glove compartment door (Click here).
| 33. DISCONNECT ENGINE WIRE |
Remove the 3 bolts, detach the clamp and disconnect the engine wire.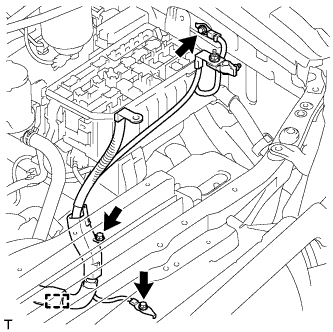
Remove the No. 1 relay block cover.
Remove the nut and detach the 2 claws.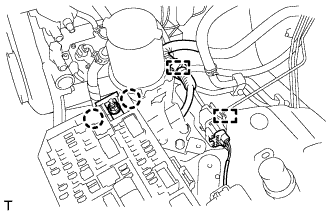
Disconnect the connector.
Detach the 2 clamps and disconnect the engine wire.
for LHD: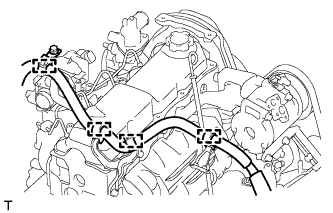
Detach the 4 clamps.
Detach the grommet from the wire harness support.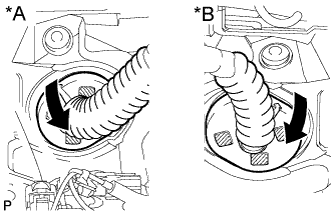
Text in Illustration *A
for LHD
*B
for RHD
Detach the 4 claws to remove the wire harness support from the vehicle, and then pull out the ECM connector to remove it from the vehicle.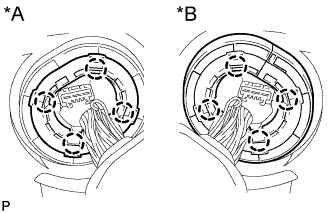
Text in Illustration *A
for LHD
*B
for RHD
Detach the clamp and disconnect the 5 connectors as shown in the illustration.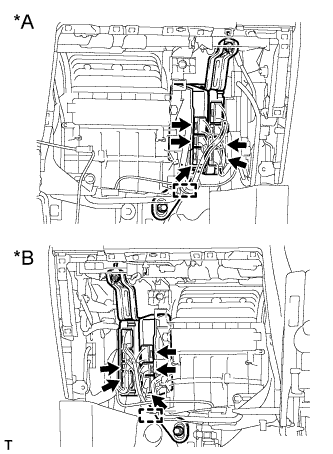
Text in Illustration *A
for LHD
*B
for RHD
| 34. REMOVE WIRING HARNESS CLAMP BRACKET (for LHD) |
Remove the bolt and wiring harness clamp bracket.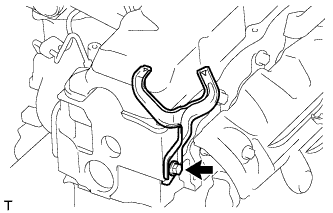
| 35. DISCONNECT HEATER WATER HOSE ASSEMBLY |
Remove the bolt and disconnect the heater water hoses.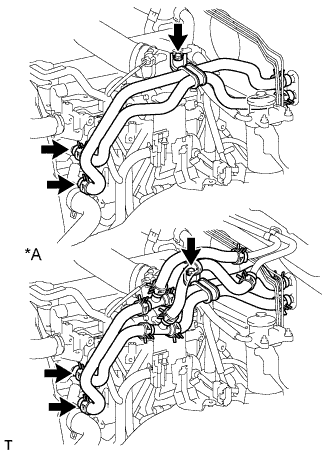
Text in Illustration *A
for Rear Heater
| 36. LOOSEN FUEL TANK CAP ASSEMBLY |
| 37. DRAIN FUEL |
Loosen the fuel filter drain plug and drain the fuel from the fuel filter.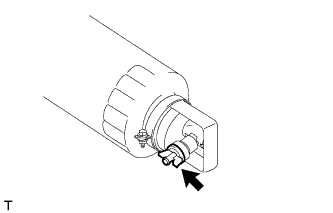
| 38. DISCONNECT FUEL HOSE |
Disconnect the 2 fuel hoses.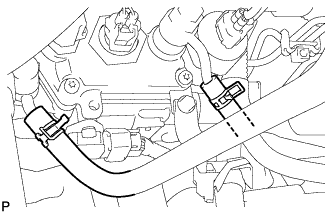
| 39. DISCONNECT VANE PUMP ASSEMBLY |
Using SST, hold the pulley and loosen the nut.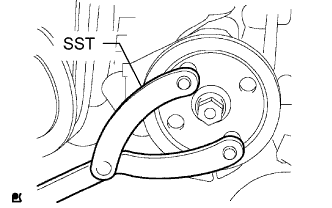
- SST
- 09960-10010
(09962-01000, 09963-01000)
Remove the nut and vane pump pulley from the vane pump shaft.
Remove the 2 bolts and nut and disconnect the vane pump.
- HINT:
- Disconnect the vane pump from the vehicle with the hoses connected, and hang it with a rope.
| 40. REMOVE CLUTCH RELEASE CYLINDER ASSEMBLY |
Remove the 2 bolts and disconnect the release cylinder.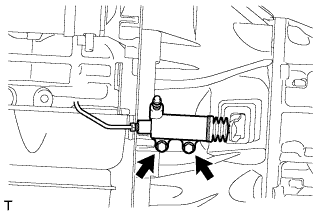
| 41. REMOVE STARTER ASSEMBLY |
Disconnect the starter connector.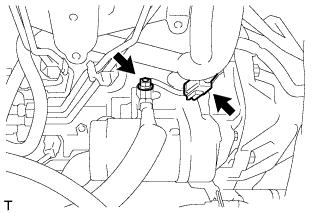
Remove the terminal cap.
Remove the nut and disconnect the starter wire.
Remove the nut, 2 bolts and starter assembly.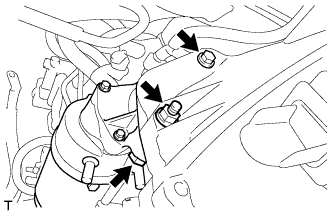
| 42. REMOVE OIL FILTER SUB-ASSEMBLY |
Using SST, remove the oil filter.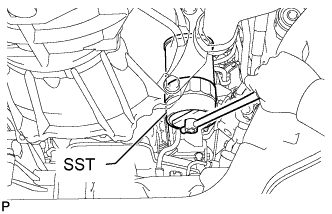
- SST
- 09228-44011
| 43. REMOVE FRONT EXHAUST PIPE ASSEMBLY |
Remove the bolt from the clamp.
Remove the 2 bolts and No. 1 exhaust pipe support bracket.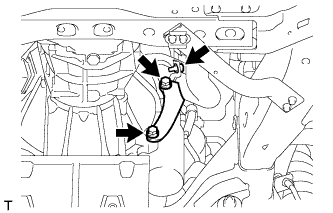
Remove the 3 nuts and front exhaust pipe.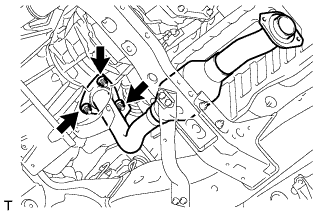
Remove the gasket.
| 44. REMOVE FRONT PROPELLER SHAFT ASSEMBLY |
Place matchmarks on the propeller shaft flange and differential.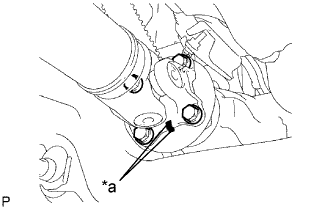
Text in Illustration *a
Matchmark
Remove the 4 nuts, 4 bolts, 4 washers and front propeller shaft assembly.
Place matchmarks on the propeller shaft flange and transfer flange.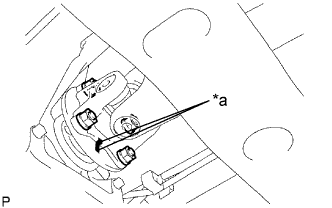
Text in Illustration *a
Matchmark
Remove the 4 nuts, 4 washers and front propeller shaft assembly.
| 45. REMOVE PROPELLER SHAFT ASSEMBLY |
Place matchmarks on the propeller shaft flange and transfer flange.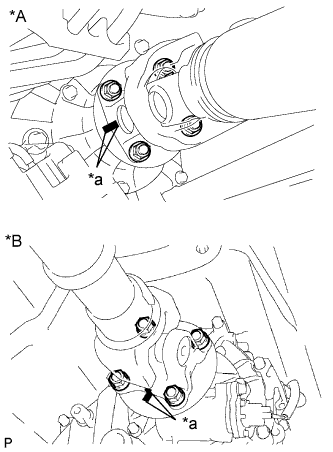
Text in Illustration *A
for 3 Door
*B
for 5 Door
*a
Matchmark
Remove the 4 nuts and 4 washers.
Place matchmarks on the propeller shaft flange and differential flange.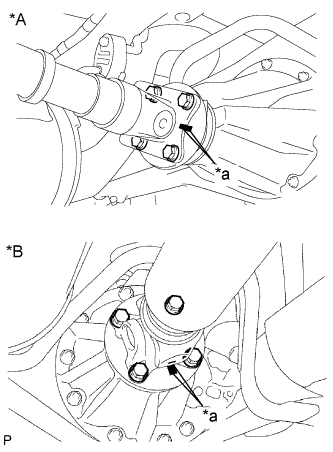
Text in Illustration *A
for 3 Door
*B
for 5 Door
*a
Matchmark
Remove the 4 nuts, 4 bolts and 4 washers.
Remove the propeller shaft.
| 46. REMOVE MANUAL TRANSMISSION ASSEMBLY |
Remove the manual transmission (Click here).
| 47. REMOVE REAR NO. 1 ENGINE MOUNTING INSULATOR |
- NOTICE:
- Perform this procedure when replacement of the engine mounting insulator is necessary.
Remove the 4 bolts and rear engine mounting insulator from the transmission.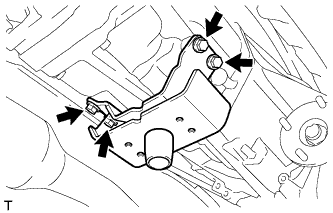
| 48. REMOVE CLUTCH COVER ASSEMBLY |
Place matchmarks on the clutch cover and flywheel.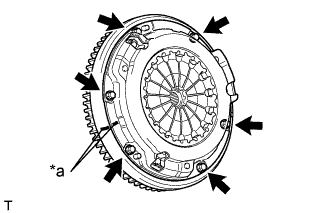
Text in Illustration *a
Matchmark
Loosen each set bolt one turn at a time until spring tension is released.
Remove the 6 set bolts and pull off the clutch cover.
- NOTICE:
- Do not drop the clutch disc.
| 49. REMOVE CLUTCH DISC ASSEMBLY |
- NOTICE:
- Keep the lining part of the clutch disc, the pressure plate and the surface of the flywheel away from oil and foreign matter.
| 50. REMOVE FLYWHEEL SUB-ASSEMBLY |
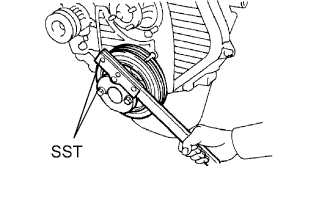 |
Using SST, hold the crankshaft.
- SST
- 09213-54015
(91651-60855)
09330-00021
Remove the 8 bolts and flywheel.
| 51. REMOVE REAR END PLATE |
Remove the 2 bolts and rear end plate.
| 52. REMOVE FLYWHEEL HOUSING DUST SEAL |
| 53. INSTALL ENGINE HANGER |
Install an engine hanger to each location shown in the illustration.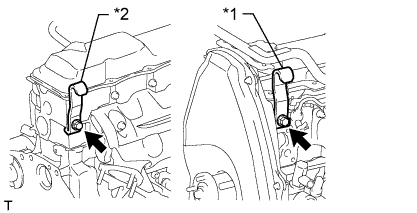
Text in Illustration *1
No. 1 Engine Hanger
*2
No. 2 Engine Hanger
- HINT:
No. 1 Engine Hanger
12281-54080
No. 2 Engine Hanger
12282-54070
Bolt (No. 1 Engine Hanger)
90119-10736
Bolt (No. 2 Engine Hanger)
91622-61022
- Torque:
- for No. 1 Engine Hanger:
- 59 N*m{ 602 kgf*cm , 44 ft.*lbf }
- for No. 2 Engine Hanger:
- 37 N*m{ 377 kgf*cm , 27 ft.*lbf }
- NOTICE:
- Install the engine hangers with new bolts.
| 54. REMOVE ENGINE ASSEMBLY |
Attach an engine sling device and hang the engine with a chain block.
Remove the 4 nuts and 4 bolts from the front engine mounting insulator LH and RH.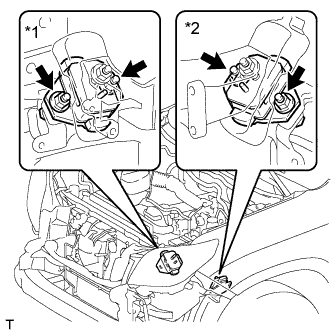
Text in Illustration *1
for RH Side
*2
for LH Side
Remove the engine by operating the engine sling device and chain block.
| 55. INSTALL ENGINE TO ENGINE STAND |
Install the engine to an engine stand with bolts.
Remove engine hanger.
| 56. REMOVE ENGINE WIRE |
Remove the engine wire from the engine.
| 57. REMOVE FRONT ENGINE MOUNTING INSULATOR |
Remove the 2 nuts and 2 front engine mounting insulators.