Driver Side Power Window does not Operate with Power Window Master Switch
Circuit diagnosis · Vehicles built from Aug 2014
Versions by build date: Aug 2013 – Jul 2014 from Aug 2014
DESCRIPTION
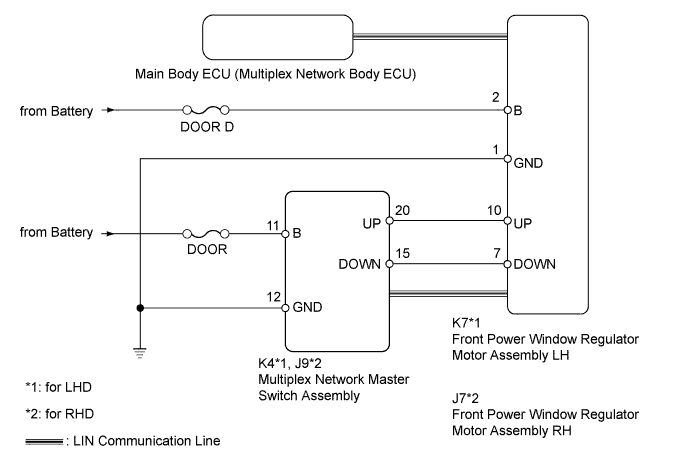
- If the manual up/down function does not operate, there may be a malfunction in the multiplex network master switch, power window regulator, harness or connector.
WIRING DIAGRAM

INSPECTION PROCEDURE
- NOTICE:
- Inspect the fuses for circuits related to this system before performing the following inspection procedure.
- HINT:
- Since the power window control system has functions that use LIN communication, first confirm that there is no malfunction in the communication system by inspecting the LIN communication functions in accordance with the "How to Proceed with Troubleshooting" procedures. Then, conduct the following inspection procedure.
| 1. CHECK FOR DTC (B2312) |

Check if DTC B2312 is output (Click here).
- OK:
- DTC B2312 is not output.
|
|
||||

| OK | |
 |
| 2. READ VALUE USING INTELLIGENT TESTER (MULTIPLEX NETWORK MASTER SWITCH) |
Use the Data List to check if the multiplex network master switch is functioning properly (Click here).
D-Door Motor Tester Display
Measurement Item/Range
Normal Condition
Diagnostic Note
D Door P/W Up SW
Driver side power window manual up signal / ON or OFF
ON: Driver side power window manual up switch operated
OFF: Driver side power window switch not operated
-
D Door P/W Down SW
Driver side power window manual down signal / ON or OFF
ON: Driver side power window manual down switch operated
OFF: Driver side power window switch not operated
-
- OK:
- On tester screen, each item changes between ON and OFF according to above chart.
|
|
||||

| OK | |
|
| 3. PERFORM ACTIVE TEST USING INTELLIGENT TESTER (POWER WINDOW) |
Select the Active Test, use the intelligent tester to generate a control command, and then check that power window regulator motor operates (Click here).
D-Door Motor Tester Display
Test Part
Control Range
Diagnostic Note
Power Window
Passenger side power window
OFF/UP/DOWN
-
- OK:
- The power window regulator motor operates normally.
Result Result
Proceed to
OK
A
NG (for LHD)
B
NG (for RHD)
C
|
|
||||
|
|
||||
| OK | ||
 |
||
| ||
| 4. CHECK HARNESS AND CONNECTOR (MULTIPLEX NETWORK MASTER SWITCH ASSEMBLY - BATTERY AND BODY GROUND) |
Disconnect the K4*1 or J9*2 multiplex network master switch connector.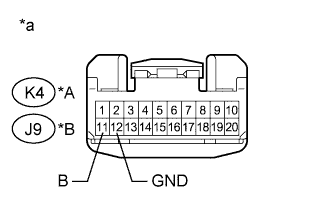
- *1: for LHD
- *2: for RHD
- *1: for LHD
Measure the voltage according to the value(s) in the table below.
- Standard Voltage:
for LHD: Tester Connection
Condition
Specified Condition
K4-11 (B) - Body ground
Always
11 to 14 V
for RHD: Tester Connection
Condition
Specified Condition
J9-11 (B) - Body ground
Always
11 to 14 V
Measure the resistance according to the value(s) in the table below.
- Standard Resistance:
for LHD: Tester Connection
Condition
Specified Condition
K4-12 (GND) - Body ground
Always
Below 1 Ω
for RHD: Tester Connection
Condition
Specified Condition
J9-12 (GND) - Body ground
Always
Below 1 Ω
| *A |
for LHD |
| *B |
for RHD |
| *a |
Front view of wire harness connector (to Multiplex Network Master Switch Assembly) |
|
|
||||
| OK | |
|
| 5. CHECK HARNESS AND CONNECTOR (FRONT POWER WINDOW REGULATOR MOTOR ASSEMBLY - BATTERY AND BODY GROUND) |
Disconnect the K7*1 or J7*2 power window regulator motor connector.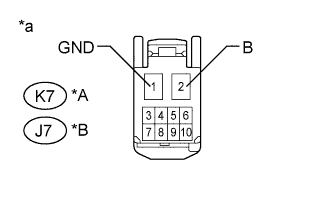
- *1: for LHD
- *2: for RHD
- *1: for LHD
Measure the voltage according to the value(s) in the table below.
- Standard Voltage:
for LHD: Tester Connection
Condition
Specified Condition
K7-2 (B) - Body ground
Always
11 to 14 V
for RHD: Tester Connection
Condition
Specified Condition
J7-2 (B) - Body ground
Always
11 to 14 V
Measure the resistance according to the value(s) in the table below.
- Standard Resistance:
for LHD: Tester Connection
Condition
Specified Condition
K7-1 (GND) - Body ground
Always
Below 1 Ω
for RHD: Tester Connection
Condition
Specified Condition
J7-1 (GND) - Body ground
Always
Below 1 Ω
| *A |
for LHD |
| *B |
for RHD |
| *a |
Front view of wire harness connector (to Front Power Window Regulator Motor Assembly) |
|
|
||||
| OK | |
|
| 6. CHECK HARNESS AND CONNECTOR (MULTIPLEX NETWORK MASTER SWITCH ASSEMBLY - FRONT POWER WINDOW REGULATOR MOTOR ASSEMBLY) |
- *1: for LHD
- *2: for RHD
Disconnect the K4*1 or J9*2 multiplex network master switch connector.
Disconnect the K7*1 or J7*2 power window regulator motor connector.
Measure the resistance according to the value(s) in the table below.
- Standard Resistance:
for LHD: Tester Connection
Condition
Specified Condition
K4-20 (UP) - K7-10 (UP)
Always
Below 1 Ω
K4-15 (DOWN) - K7-7 (DOWN)
Always
Below 1 Ω
K4-20 (UP) - Body ground
Always
10 kΩ or higher
K4-15 (DOWN) - Body ground
Always
10 kΩ or higher
for RHD: Tester Connection
Condition
Specified Condition
J9-20 (UP) - J7-10 (UP)
Always
Below 1 Ω
J9-15 (DOWN) - J7-7 (DOWN)
Always
Below 1 Ω
J9-20 (UP) - Body ground
Always
10 kΩ or higher
J9-15 (DOWN) - Body ground
Always
10 kΩ or higher
Result Result
Proceed to
OK (for LHD)
A
OK (for RHD)
B
NG
C
|
|
||||
|
|
||||
| A | |
|
| 7. INSPECT FRONT POWER WINDOW REGULATOR MOTOR ASSEMBLY LH |
Remove the front power window regulator motor LH (Click here).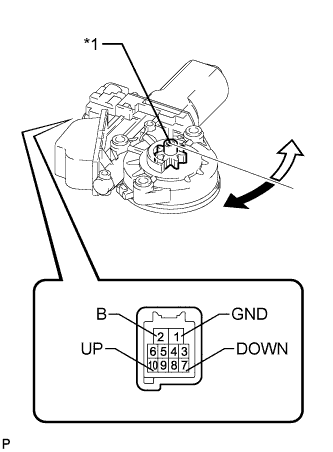
Check that the window regulator motor moves smoothly as follows.
- NOTICE:
- Do not apply positive (+) battery voltage to any terminal other than terminal 2 (B) to avoid damaging the pulse sensor inside the motor.
- Do not apply positive (+) battery voltage to any terminal other than terminal 2 (B) to avoid damaging the pulse sensor inside the motor.
- Reset the power window regulator motor (initialize the pulse sensor) after installing the power window regulator motor to the door.
- Reset the power window regulator motor (initialize the pulse sensor) after installing the power window regulator motor to the door.
- OK:
Measurement Condition
Specified Condition
- Connect the positive (+) battery terminal to terminal 2 (B), and connect the negative (-) battery terminal to terminal 1 (GND), and keep them connected for 3 seconds or more.
- With terminals 2 (B) and 1 (GND) connected to the battery, connect the negative (-) battery terminal to terminal 10 (UP).
- Disconnect and reconnect the negative (-) battery terminal to terminal 10 (UP) within 1 second.
Motor gear rotates clockwise (Up)
- Connect the positive (+) battery terminal to terminal 2 (B), and connect the negative (-) battery terminal to terminal 1 (GND), and keep them connected for 3 seconds or more.
- With terminals 2 (B) and 1 (GND) connected to the battery, connect the negative (-) battery terminal to terminal 7 (DOWN).
- Disconnect and reconnect the negative (-) battery terminal to terminal 7 (DOWN) within 1 second.
Motor gear rotates counterclockwise (Down)
- Connect the positive (+) battery terminal to terminal 2 (B), and connect the negative (-) battery terminal to terminal 1 (GND), and keep them connected for 3 seconds or more.
Text in Illustration *1
Motor Gear

Clockwise

Counterclockwise
|
|
||||
| OK | ||
|
||
| ||
| 8. INSPECT FRONT POWER WINDOW REGULATOR MOTOR ASSEMBLY RH |
Remove the front power window regulator motor RH (Click here).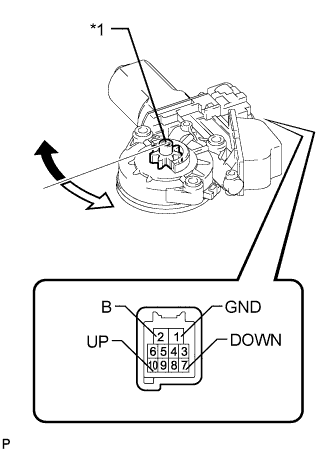
Check that the window regulator moves smoothly as follows.
- NOTICE:
- Do not apply positive (+) battery voltage to any terminal other than terminal 2 (B) to avoid damaging the pulse sensor inside the motor.
- Do not apply positive (+) battery voltage to any terminal other than terminal 2 (B) to avoid damaging the pulse sensor inside the motor.
- Reset the power window regulator motor (initialize the pulse sensor) after installing the power window regulator motor to the door.
- Reset the power window regulator motor (initialize the pulse sensor) after installing the power window regulator motor to the door.
- OK:
Measurement Condition
Specified Condition
- Connect the positive (+) battery terminal to terminal 2 (B), and connect the negative (-) battery terminal to terminal 1 (GND), and keep them connected for 3 seconds or more.
- With terminals 2 (B) and 1 (GND) connected to the battery, connect the negative (-) battery terminal to terminal 10 (UP).
- Disconnect and reconnect the negative (-) battery terminal to terminal 10 (UP) within 1 second.
Motor gear rotates counterclockwise (Up)
- Connect the positive (+) battery terminal to terminal 2 (B), and connect the negative (-) battery terminal to terminal 1 (GND), and keep them connected for 3 seconds or more.
- With terminals 2 (B) and 1 (GND) connected to the battery, connect the negative (-) battery terminal to terminal 7 (DOWN).
- Disconnect and reconnect the negative (-) battery terminal to terminal 7 (DOWN) within 1 second.
Motor gear rotates clockwise (Down)
- Connect the positive (+) battery terminal to terminal 2 (B), and connect the negative (-) battery terminal to terminal 1 (GND), and keep them connected for 3 seconds or more.
Text in Illustration *1
Motor Gear
Clockwise
Counterclockwise
|
|
||||
| OK | ||
|
||
| ||