C1422 Master Cylinder Pressure Sensor Zero Point High Malfunction
Diagnostic trouble codes · Vehicles built from Aug 2014
Versions by build date: Aug 2013 – Jul 2014 from Aug 2014
DESCRIPTION
Refer to DTCs C1421, C1423 and C1424 (Click here).| DTC Code |
DTC Detection Condition |
Trouble Area |
| C1422 |
When the stop light switch is off, the PMC terminal voltage is higher than 0.86 V for 5 seconds or more while the vehicle is being driven at a speed of 3 km/h (2mph) or more. |
|
WIRING DIAGRAM
Refer to DTC C1425 (Click here).INSPECTION PROCEDURE
- NOTICE:
- When replacing the skid control ECU (brake actuator assembly), perform calibration (Click here).
- Inspect the fuses for circuits related to this system before performing the following inspection procedure.
- When replacing the skid control ECU (brake actuator assembly), perform calibration (Click here).
- HINT:
- When DTC C1425 is output together with DTC C1422, inspect and repair the trouble areas indicated by DTC C1425 first (Click here).
| 1. READ VALUE USING INTELLIGENT TESTER (STOP LIGHT SW) |

Turn the ignition switch off
Connect the intelligent tester to the DLC3.
Turn the ignition switch to ON.
Turn the intelligent tester on.
Enter the following menus: Chassis / ABS/VSC/TRC / Data List.
ABS/VSC/TRC Tester Display
Measurement Item/Range
Normal Condition
Diagnostic Note
Stop Light SW
Stop light switch/ON or OFF
ON: Brake pedal depressed
OFF: Brake pedal released
-
Check that the stop light switch display observed on the intelligent tester changes according to the brake pedal operation.
- OK:
- The intelligent tester displays ON or OFF according to brake pedal operation.
|
|
||||

| OK | |
 |
| 2. CHECK BRAKE PEDAL AND STOP LIGHT SWITCH ASSEMBLY INSTALLATION |
Turn the ignition switch off.
Check the brake pedal height and stop light switch assembly installation (Click here).
- OK:
- The brake pedal height and stop light switch assembly installation are normal.
|
|
||||

| OK | |
|
| 3. RECONFIRM DTC |
Clear the DTCs (Click here).
Start the engine.
Drive the vehicle at a speed of 40 km/h (25 mph) or more and perform a braking test (decelerate the vehicle by depressing the brake pedal).
Check if the same DTC is output (Click here).
Result Result
Proceed to
DTC C1422 is not output
A
DTC C1422 is output
B
|
|
||||
| A | ||
 |
||
| ||
| 4. CHECK TERMINAL VOLTAGE AND RESISTANCE (STOP LIGHT SWITCH ASSEMBLY POWER SOURCE TERMINAL) |
Make sure that there is no looseness in the locking part and connecting part of the connectors.
Disconnect the A85 stop light switch assembly connector.
Measure the voltage according to the value(s) in the table below.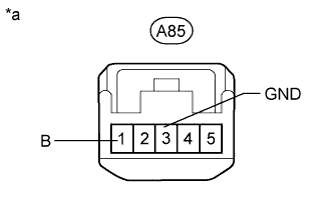

- Standard Voltage:
Tester Connection
Condition
Specified Condition
A85-1(B) - Body ground
Always
11 to 14 V
Text in Illustration *a
Front view of wire harness connector
(to Stop Light Switch Assembly)
Measure the resistance according to the value(s) in the table below.
- Standard Resistance:
Tester Connection
Condition
Specified Condition
A85-3 (GND) - Body ground
Always
Below 1 Ω
|
|
||||
| OK | |
|
| 5. CHECK TERMINAL VOLTAGE (STP) |
Make sure that there is no looseness at the locking parts and connecting parts of the connectors.
Disconnect the A6 skid control ECU (brake actuator assembly) connector.
Measure the voltage according to the value(s) in the table below.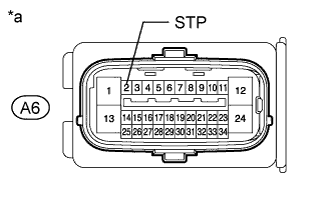
- Standard Voltage:
Tester Connection
Condition
Specified Condition
A6-2 (STP) - Body ground
Brake pedal depressed
8 to 14 V
Brake pedal released
Below 1.5 V
Text in Illustration *a
Front view of wire harness connector
(to Skid Control ECU [Brake Actuator Assembly])
|
|
||||
| OK | ||
|
||
| ||
| 6. CHECK HARNESS AND CONNECTOR (STOP LIGHT SWITCH ASSEMBLY- BRAKE ACTUATOR ASSEMBLY) |
Disconnect the A85 stop light switch assembly connector.
Disconnect the A6 skid control ECU (brake actuator assembly) connector.
Measure the resistance according to the value(s) in the table below.
- Standard Resistance:
Tester Connection
Condition
Specified Condition
A85-2 (L) - A6-2 (STP)
Always
Below 1 Ω
A85-2 (L) or A6-2 (STP) - Body ground
Always
10 kΩ or higher
|
|
||||
| OK | ||
|
||
| ||