DESCRIPTION
Refer to DTC 19 (1) (Click here).
DTC No.
|
DTC Detection Condition
|
Trouble Area
|
19 (2)
|
Either of the ECM sensors has completed learning, and the voltage difference of the No. 1 and No. 2 sensors is more than 1.2 V or less than 0.4 V.
|
- Open or short in accelerator pedal position sensor circuit
- Accelerator pedal position sensor
- ECM
|
One of the following continues for more than 2.0 seconds.
- The voltage difference of the No. 1 and No. 2 sensors is not within the specified range.
- VPA2 is 4.9 V or higher.
- Accelerator idling specified voltages of No. 1 and No. 2 are below 0.04 V.
|
WIRING DIAGRAM
Refer to DTC 19 (1) (Click here).INSPECTION PROCEDURE
- HINT:
- Read freeze frame data using the intelligent tester. Freeze frame data records the engine condition when malfunctions are detected. When troubleshooting, freeze frame data can help determine if the vehicle was moving or stationary, if the engine was warmed up or not, and other data from the time the malfunction occurred.
When using intelligent tester:
| 1. READ VALUE USING INTELLIGENT TESTER (ACCELERATOR POSITION)
|
 |
- Connect the intelligent tester to the DLC3.
Turn the ignition switch to ON.
Enter the following menus: Powertrain / Engine and ECT / Data List / Accel Position.
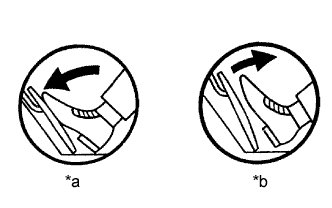
Check that the value displayed on the intelligent tester changes when repeatedly depressing and releasing the accelerator pedal.
- OK:
- Value changes.
Text in Illustration
*a
|
Depressed
|
*b
|
Released
|
|
NG |
 |
|
|
|
| OK |
|
 |
|
|
| 2. CHECK HARNESS AND CONNECTOR (ECM - ACCELERATOR PEDAL POSITION SENSOR)
|
|
Disconnect the accelerator pedal position sensor connector.
Disconnect the ECM connector.
Measure the resistance according to the value(s) in the table below.
- Standard Resistance (Check for Open):
Tester Connection
|
Condition
|
Specified Condition
|
A19-1 (VCP2) - C102-1 (VC)
|
Always
|
Below 1 Ω
|
A19-2 (EPA2) - C102-9 (E2)
|
Always
|
Below 1 Ω
|
A19-3 (VPA2) - G62-12 (VPA2)
|
Always
|
Below 1 Ω
|
A19-4 (VCPA) - G62-6 (VCPA)
|
Always
|
Below 1 Ω
|
A19-5 (EPA) - G62-4 (EPA)
|
Always
|
Below 1 Ω
|
A19-6 (VPA) - G62-5 (VPA)
|
Always
|
Below 1 Ω
|
- Standard Resistance (Check for Short):
Tester Connection
|
Condition
|
Specified Condition
|
A19-1 (VCP2) or C102-1 (VC) - Body ground
|
Always
|
10 kΩ or higher
|
A19-2 (EPA2) or C102-9 (E2) - Body ground
|
Always
|
10 kΩ or higher
|
A19-3 (VPA2) or G62-12 (VPA2) - Body ground
|
Always
|
10 kΩ or higher
|
A19-4 (VCPA) or G62-6 (VCPA) - Body ground
|
Always
|
10 kΩ or higher
|
A19-5 (EPA) or G62-4 (EPA) - Body ground
|
Always
|
10 kΩ or higher
|
A19-6 (VPA) or G62-5 (VPA) - Body ground
|
Always
|
10 kΩ or higher
|
Reconnect the accelerator pedal position sensor connector.
Reconnect the ECM connector.
|
NG |
 |
|
| REPAIR OR REPLACE HARNESS OR CONNECTOR |
|
|
| OK |
|
|
|
| REPLACE ACCELERATOR PEDAL ROD ASSEMBLY (Click here)
|
|
When not using intelligent tester:
| 1. CHECK ECM (VPA, VPA2 VOLTAGE) |
|
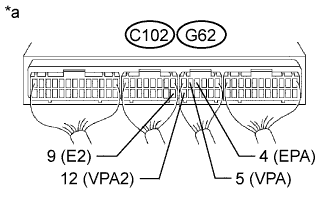
- Turn the ignition switch to ON.
Measure the voltage according to the value(s) in the table below.
- Standard Voltage:
Accelerator Pedal Released
Tester Connection
|
Switch Condition
|
Specified Condition
|
G62-5 (VPA) - G62-4 (EPA)
|
Ignition switch ON
|
0.5 to 1.1 V
|
G62-12 (VPA2) - C102-9 (E2)
|
Ignition switch ON
|
1.2 to 2.0 V
|
Accelerator Pedal Depressed
Tester Connection
|
Switch Condition
|
Specified Condition
|
G62-5 (VPA) - G62-4 (EPA)
|
Ignition switch ON
|
2.6 to 4.5 V
|
G62-12 (VPA2) - C102-9 (E2)
|
Ignition switch ON
|
3.4 to 5.3 V
|
Text in Illustration
*a
|
Component with harness connected
(ECM)
|
|
NG |
|
|
|
|
| OK |
|
|
|
|
| 2. CHECK HARNESS AND CONNECTOR (ECM - ACCELERATOR PEDAL POSITION SENSOR)
|
|
Disconnect the accelerator pedal position sensor connector.
Disconnect the ECM connector.
Measure the resistance according to the value(s) in the table below.
- Standard Resistance (Check for Open):
Tester Connection
|
Condition
|
Specified Condition
|
A19-1 (VCP2) - C102-1 (VC)
|
Always
|
Below 1 Ω
|
A19-2 (EPA2) - C102-9 (E2)
|
Always
|
Below 1 Ω
|
A19-3 (VPA2) - G62-12 (VPA2)
|
Always
|
Below 1 Ω
|
A19-4 (VCPA) - G62-6 (VCPA)
|
Always
|
Below 1 Ω
|
A19-5 (EPA) - G62-4 (EPA)
|
Always
|
Below 1 Ω
|
A19-6 (VPA) - G62-5 (VPA)
|
Always
|
Below 1 Ω
|
- Standard Resistance (Check for Short):
Tester Connection
|
Condition
|
Specified Condition
|
A19-1 (VCP2) or C102-1 (VC) - Body ground
|
Always
|
10 kΩ or higher
|
A19-2 (EPA2) or C102-9 (E2) - Body ground
|
Always
|
10 kΩ or higher
|
A19-3 (VPA2) or G62-12 (VPA2) - Body ground
|
Always
|
10 kΩ or higher
|
A19-4 (VCPA) or G62-6 (VCPA) - Body ground
|
Always
|
10 kΩ or higher
|
A19-5 (EPA) or G62-4 (EPA) - Body ground
|
Always
|
10 kΩ or higher
|
A19-6 (VPA) or G62-5 (VPA) - Body ground
|
Always
|
10 kΩ or higher
|
Reconnect the accelerator pedal position sensor connector.
Reconnect the ECM connector.
|
NG |
|
|
| REPAIR OR REPLACE HARNESS OR CONNECTOR |
|
|
| OK |
|
|
|
| REPLACE ACCELERATOR PEDAL ROD ASSEMBLY (Click here)
|
|