INSTALLATION
Removal / installation · Vehicles built from Aug 2013
| 1. INSTALL FAN AND GENERATOR V BELT |

Install the V belt.
While tightening bolt A, adjust the tension of the V belt.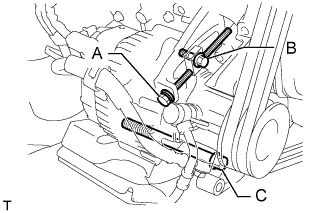

Tighten bolts B and C.
- Torque:
- for bolt C:
- 69 N*m{ 704 kgf*cm , 51 ft.*lbf }
- for bolt B:
- 18 N*m{ 184 kgf*cm , 13 ft.*lbf }
Check the tension of the V belt (Click here).
| 2. INSTALL COOLER COMPRESSOR V BELT |
Install the V belt.
While tightening bolt B, adjust the tension of the V belt.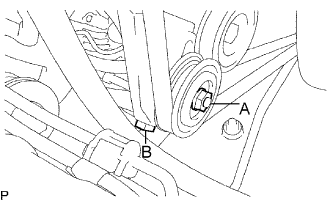
Tighten nut A.
- Torque:
- 39 N*m{ 400 kgf*cm , 29 ft.*lbf }
Check the tension of the V belt (Click here).
| 3. INSTALL VANE PUMP V BELT |
Install the V belt.
Using a bar, adjust the tension of the V belt.
Tighten bolt A and nut B.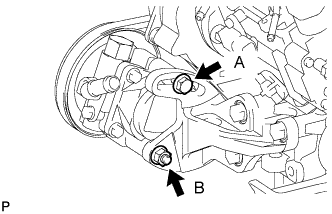
- Torque:
- for bolt:
- 48 N*m{ 489 kgf*cm , 35 ft.*lbf }
- for nut :
- 64 N*m{ 653 kgf*cm , 47 ft.*lbf }
Check the tension of the V belt (Click here).
| 4. INSTALL AIR CLEANER CASE ASSEMBLY |
Install the air cleaner case with the 3 bolts.
- Torque:
- 12 N*m{ 122 kgf*cm , 9 ft.*lbf }
| 5. INSTALL AIR CLEANER FILTER ELEMENT SUB-ASSEMBLY |
| 6. INSTALL RESONATOR WITH AIR CLEANER CAP SUB-ASSEMBLY |
Insert the hinge part of the air cleaner cap and hose into the air cleaner case, and then attach the 4 hook clamps.
Connect the air cleaner cap sub-assembly with the clamp.
- Torque:
- 5.0 N*m{ 51 kgf*cm , 44 in.*lbf }
Attach the wire harness clamp.
Connect the 2 clamps and connector.
| 7. INSTALL FRONT FENDER APRON SEAL RH |
Install the front fender apron seal with the 4 clips.
| 8. INSTALL NO. 1 ENGINE UNDER COVER SUB-ASSEMBLY |
Hook the engine under cover to the vehicle body as shown in the illustration.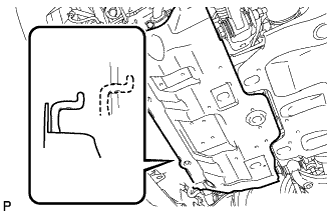
Install the 4 bolts.
- Torque:
- 29 N*m{ 296 kgf*cm , 21 ft.*lbf }
| 9. INSTALL FRONT BUMPER COVER LOWER |
Install the front bumper cover lower with the 5 bolts and clip.
- Torque:
- 8.0 N*m{ 82 kgf*cm , 71 in.*lbf }