C1256 Accumulator Low Pressure
Diagnostic trouble codes · Vehicles built from Aug 2014
Versions by build date: Aug 2013 – Jul 2014 from Aug 2014
DESCRIPTION
Refer to DTC C1254 (Click here).| DTC Code |
DTC Detection Condition |
Trouble Area |
| C1256 |
The fluid pressure inside the accumulator is below the standard value. |
|
INSPECTION PROCEDURE
- NOTICE:
- When replacing the master cylinder solenoid, perform calibration (Click here).
- HINT:
- When DTC C1251, C1253, or C1254 is output together with DTC C1256 inspect and repair the trouble area indicated by DTC C1251, C1253, or C1254 first.
| 1. RECONFIRM DTC |

Clear the DTCs (Click here).
Turn the ignition switch off.
Depress the brake pedal 20 times or more.
Turn the ignition switch to ON.
Wait for 99 seconds.
Check if the same DTC is output (Click here).
Result Result
Proceed to
DTC is output
A
DTC is not output
B
- HINT:
- Excessive brake pedal operation results in abnormal accumulator pressure consumption. This is normal.
|
|
||||

| A | |
 |
| 2. INSPECT HYDRAULIC BRAKE BOOSTER ASSEMBLY FUNCTION |
Inspect brake booster pump power supply system function.
Turn the ignition switch off.
Depress the brake pedal 20 times or more to release the pressure in the accumulator.
- HINT:
- When the pressure is released, the brake pedal stroke becomes longer.
Check that the brake fluid level is at the MAX level.
Chock the 4 wheels and release the parking brake.
Turn the ignition switch to ON and measure the brake booster pump operating time (the time from when the brake booster pump starts operating until it stops).
- OK:
- 20 to 80 seconds
Start the engine after the brake boost pump stops.
Check that the ABS warning light and slip indicator light are not illuminated.
Turn off the engine, and then turn the ignition switch to ON.
Check that the brake boost pump operates and then stops when the brake pedal is depressed 4 or 5 times.
Depress the brake pedal 4 or 5 times and measure the brake booster pump operating time (the time from when the brake booster pump starts operating until it stops).
- OK:
- 2 to 11 seconds
Check that the brake warning light illuminates and the buzzer sounds when the brake pedal is fully depressed continuously 15 to 20 times.
- NOTICE:
- Wait 120 seconds or more after turning the ignition switch to ON before performing this inspection.
Check brake booster operation.
Turn the ignition switch off.
Depress the brake pedal 20 times or more to release the pressure in the accumulator.
- HINT:
- When the pressure is released, the brake pedal stroke becomes longer.
Depress the brake pedal, start the engine, and check the change in the brake pedal height.
- OK:
- The brake pedal moves slightly inward.
Inspect brake master cylinder fluid pressure change (for LHD: Click here, for RHD: Click here).
|
|
||||

| OK | |
|
| 3. READ VALUE USING INTELLIGENT TESTER (ACCUMULATOR SENSOR) |
Connect the intelligent tester to the DLC3.
Turn the ignition switch to ON.
Turn the intelligent tester on.
Enter the following menus: Chassis / ABS/VSC/TRC / Data List.
| Tester Display |
Measurement Item/Range |
Normal Condition |
Diagnostic Note |
| Accumulator Sensor |
Accumulator pressure sensor reading/ Min.: 0.00 V, Max.: 5.00 V |
3.58 to 5 V |
If the value is constant regardless of the pump operation, an accumulator pressure sensor malfunction is suspected. |
Check that the accumulator output value is normal.
- OK:
- Accumulator pressure sensor value is normal.
Result Result
Proceed to
OK
A
NG (for LHD)
B
NG (for RHD)
C
|
|
||||
|
|
||||
| A | |
|
| 4. RECONFIRM DTC |
Clear the DTCs (Click here).
Check if the same DTC is output (Click here).
Result Result
Proceed to
DTC is not output
A
DTC is output (for LHD)
B
DTC is output (for RHD)
C
|
|
||||
|
|
||||
| A | ||
 |
||
| ||
| 5. INSPECT BRAKE BOOSTER PUMP ASSEMBLY |
Remove the hydraulic brake booster assembly (for LHD: Click here, for RHD: Click here).
Using a screwdriver, remove the 2 screws and pull out the wire harness from the master cylinder solenoid.
Measure the resistance according to the value(s) in the table below.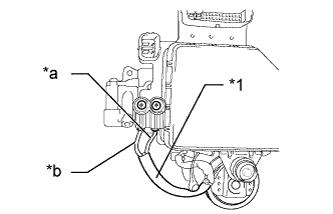

- Standard Resistance:
Tester Connection
Condition
Specified Condition
Red wire terminal - Black wire terminal
Always
Below 2 Ω
Text in Illustration *1
Pump motor wire harness
*a
Red wire
*b
Black wire
Install the pump motor wire harness to the master cylinder solenoid with the 2 screws.
- Torque:
- 2.9 N*m{ 30 kgf*cm , 26 in.*lbf }
| Result |
Proceed to |
| OK (for LHD) |
A |
| OK (for RHD) |
B |
| NG (for LHD) |
C |
| NG (for RHD) |
D |
|
|
||||
|
|
||||
|
|
||||
| A | ||
|
||
| ||