Glass Hatch Opener System does not Operate
Circuit diagnosis · Vehicles built from Aug 2014
Versions by build date: Aug 2013 – Jul 2014 from Aug 2014
DESCRIPTION
The glass hatch opener system enables the back door glass to be opened when the glass hatch opener switch is pressed.WIRING DIAGRAM
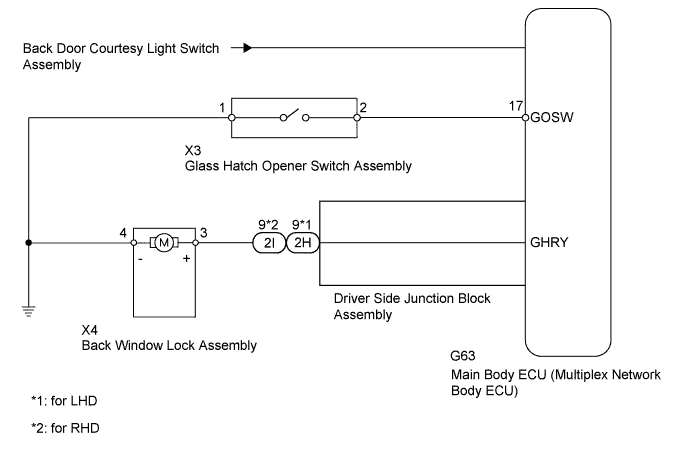

INSPECTION PROCEDURE
- NOTICE:
- Inspect the fuses for circuits related to this system before performing the following inspection procedure.
| 1. CHECK LIGHTING SYSTEM (BACK DOOR COURTESY LIGHT SWITCH ASSEMBLY) |

Use the Data List to check if the back door courtesy light switch is functioning properly (Click here).
Main Body Tester Display
Measurement Item/Range
Normal Condition
Diagnostic Note
Back Door Courtesy SW
Back door courtesy switch signal / ON or OFF
ON: Back door open
OFF: Back door closed
-
- OK:
- On the tester screen, item changes between ON and OFF according to above chart.
|
|
||||

| OK | |
 |
| 2. SYSTEM CHECK |
Confirm that the vehicle is equipped with the entry and start system.
Result Result
Proceed to
w/ Entry and Start System
A
w/o Entry and Start System
B
|
|
||||

| A | |
|
| 3. CHECK ENTRY AND START SYSTEM (for Entry Function) |
When the back door entry lock switch is operated, check that the glass hatch opens.
- OK:
- The back door entry lock function operates normally.
|
|
||||
| OK | |
|
| 4. READ VALUE USING INTELLIGENT TESTER (GLASS HATCH OPENER SWITCH) |
Use the Data List to check if the glass hatch opener switch is functioning properly (Click here).
Main Body Tester Display
Measurement Item/Range
Normal Condition
Diagnostic Note
Glass Hatch Opener Switch
Glass hatch opener switch signal / ON or OFF
ON: Glass hatch opener switch operated
OFF: Glass hatch opener switch not operated
-
Result Result
Proceed to
Glass hatch opener switch does not operate
A
Glass hatch opener switch operates
B
|
|
||||
| A | |
|
| 5. INSPECT GLASS HATCH OPENER SWITCH ASSEMBLY |
Remove the glass hatch opener switch (Click here).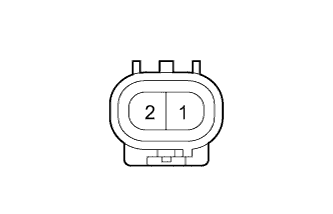
Measure the resistance according to the value(s) in the table below.
- Standard Resistance:
Tester Connection
Switch Condition
Specified Condition
1 - 2
Switch not pushed
10 kΩ or higher
1 - 2
Switch pushed
Below 1 Ω
|
|
||||
| OK | |
|
| 6. CHECK HARNESS AND CONNECTOR (GLASS HATCH OPENER SWITCH ASSEMBLY - MAIN BODY ECU AND BODY GROUND) |
Disconnect the X3 glass hatch opener switch connector.
Remove the main body ECU (Click here).
Measure the resistance according to the value(s) in the table below.
- Standard Resistance:
Tester Connection
Condition
Specified Condition
X3-2 - G63-17 (GOSW)
Always
Below 1 Ω
X3-1 - Body ground
Always
Below 1 Ω
X3-2 - Body ground
Always
10 kΩ or higher
|
|
||||
| OK | ||
 |
||
| ||
| 7. PERFORM ACTIVE TEST USING INTELLIGENT TESTER (GLASS HATCH OPEN) |
Using the intelligent tester, perform the Active Test (Click here).
Main Body Tester Display
Test Part
Control Range
Diagnostic Note
Glass Hatch Open
Operate Glass Hatch
ON/OFF
-
- OK:
- The glass hatch is opened.
|
|
||||
| OK | ||
|
||
| ||
| 8. INSPECT BACK WINDOW LOCK ASSEMBLY |
Remove the back window lock (Click here).
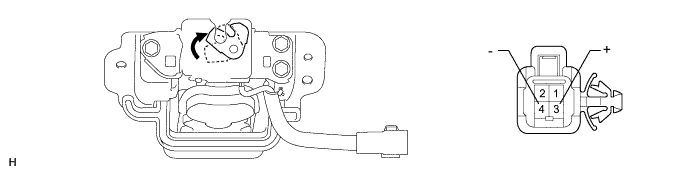
Text in Illustration 
Moves to Open Position
-
-
Move the back window lock to the lock position.
Apply battery voltage and check the operation of the window door lock motor.
- Standard Resistance:
Measurement Condition
Specified Condition
Battery positive (+) - Terminal 3 (+)
Opens
Battery negative (-) - Terminal 4 (-)
|
|
||||
| OK | |
|
| 9. CHECK HARNESS AND CONNECTOR (BACK WINDOW LOCK ASSEMBLY - MAIN BODY ECU AND BODY GROUND) |
Disconnect the X4 back window lock connector.
Disconnect the 2I*1 or 2H*2 main body ECU connector.
- *1: for LHD
- *2: for RHD
- *1: for LHD
Measure the resistance according to the value(s) in the table below.
- Standard Resistance:
- for LHD:
Tester Connection
Condition
Specified Condition
X4-3 (+) - 2I-9 (GHRY)
Always
Below 1 Ω
X4-4 (-) - Body ground
Always
Below 1 Ω
X4-3 (+) - Body ground
Always
10 kΩ or higher
- for RHD:
Tester Connection
Condition
Specified Condition
X4-3 (+) - 2H-9 (GHRY)
Always
Below 1 Ω
X4-4 (-) - Body ground
Always
Below 1 Ω
X4-3 (+) - Body ground
Always
10 kΩ or higher
|
|
||||
| OK | |
|
| 10. CHECK MAIN BODY ECU |
Temporarily replace the main body ECU with a new or normally functioning one (Click here).
Check that the glass hatch opener function operates normally.
- OK:
- The glass hatch opener function operates normally.
|
|
||||
| OK | ||
|
||
| ||