Diagnosis Circuit
Circuit diagnosis · Vehicles built from Aug 2014
Versions by build date: Aug 2013 – Jul 2014 from Aug 2014
DESCRIPTION
DTC output mode is set by connecting terminals TC and CG of the DLC3.DTCs are output by the blinking of the SRS warning light.
- HINT:
- When each warning light continues blinking, a ground short in the wiring of terminal TC of the DLC3 or an internal ground short in each ECU is suspected.
- A DTC output mode signal is transmitted through the CAN communication system to each ECU including the center airbag sensor. Thus, when all systems do not enter DTC output mode, there may be an ECM malfunction.
- When each warning light continues blinking, a ground short in the wiring of terminal TC of the DLC3 or an internal ground short in each ECU is suspected.
WIRING DIAGRAM
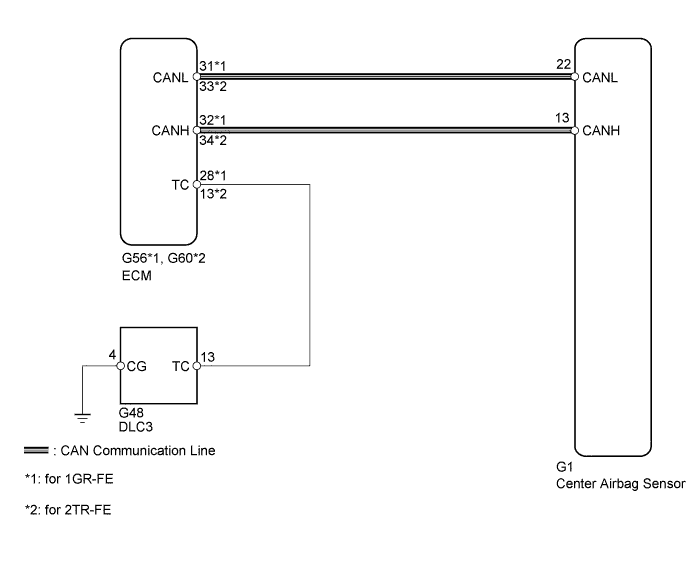

INSPECTION PROCEDURE
- NOTICE:
- After turning the ignition switch off, waiting time may be required before disconnecting the cable from the battery terminal. Therefore, make sure to read the disconnecting the cable from the battery terminal notice before proceeding with work (Click here).
- When disconnecting the cable from the negative (-) battery terminal while performing repairs, some systems need to be initialized after the cable is reconnected (Click here).
- After turning the ignition switch off, waiting time may be required before disconnecting the cable from the battery terminal. Therefore, make sure to read the disconnecting the cable from the battery terminal notice before proceeding with work (Click here).
| 1. CHECK CAN COMMUNICATION SYSTEM |

Check if a CAN communication system DTC is output.
Result Result
Proceed to
DTCs are output (for LHD with Entry and Start System)
A
DTCs are output (for LHD without Entry and Start System)
B
DTCs are output (for RHD with Entry and Start System)
C
DTCs are output (for RHD without Entry and Start System)
D
DTC is not output
E
|
|
||||
|
|
||||
|
|
||||
|
|
||||

| E | |
 |
| 2. CHECK HARNESS AND CONNECTOR (DLC3 - ECM) |
- *1: for 1GR-FE
- *2: for 2TR-FE
Turn the ignition switch off.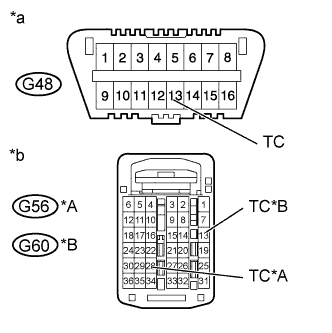
Disconnect the G56*1, G60*2 connector from the ECM.
Measure the resistance according to the value(s) in the table below.
- Standard Resistance:
Tester Connection
Condition
Specified Condition
G48-13 (TC) - G56-28 (TC)*1
Always
Below 1 Ω
G48-13 (TC) - G60-13 (TC)*2
Always
Below 1 Ω
Text in Illustration *A
for 1GR-FE
*B
for 2TR-FE
*a
Front view of DLC3
*b
Front view of wire harness connector
(to ECM)
|
|
||||
| OK | |
|
| 3. CHECK HARNESS AND CONNECTOR (DLC3 - BODY GROUND) |
Measure the resistance according to the value(s) in the table below.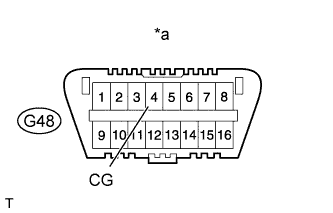
- Standard Resistance:
Tester Connection
Condition
Specified Condition
G48-4 (CG) - Body ground
Always
Below 1 Ω
Text in Illustration *a
Front view of DLC3
|
|
||||
| OK | |
|
| 4. CHECK HARNESS AND CONNECTOR (ECM - BODY GROUND) |
- *1: for 1GR-FE
- *2: for 2TR-FE
Measure the resistance according to the value(s) in the table below.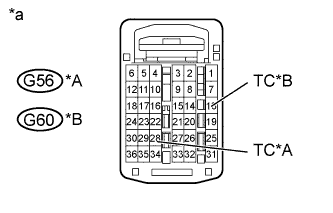
- Standard Resistance:
Tester Connection
Condition
Specified Condition
G56-28 (TC)*1 - Body ground
Always
1 MΩ or higher
G60-13 (TC)*2 - Body ground
Always
1 MΩ or higher
Text in Illustration *A
for 1GR-FE
*B
for 2TR-FE
*a
Front view of wire harness connector
(to ECM)
|
|
||||
| OK | ||
 |
||
| ||