Headlight Cleaner Motor and Relay Circuit
Circuit diagnosis · Vehicles built from Aug 2014
Versions by build date: Aug 2013 – Jul 2014 from Aug 2014
DESCRIPTION
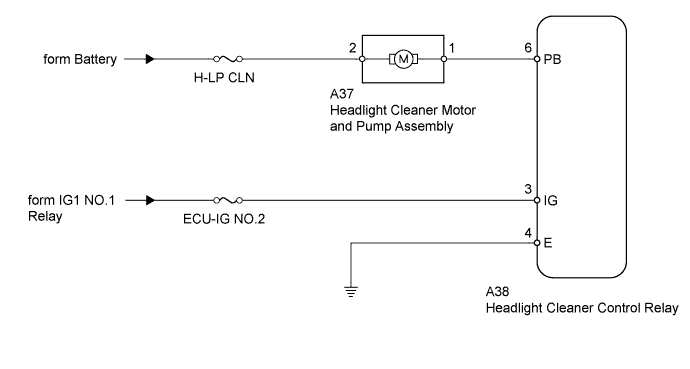
This circuit provides power to the headlight cleaner control relay.The headlight cleaner control relay sends the signal from the headlight cleaner switch assembly, etc. to the headlight cleaner motor and pump assembly to operate the headlight cleaner system.
WIRING DIAGRAM

INSPECTION PROCEDURE
- NOTICE:
- Inspect the fuses for circuits related to this system before performing the following inspection procedure.
| 1. PERFORM ACTIVE TEST USING INTELLIGENT TESTER (HEADLIGHT CLEANER OPERATION) |

Using the intelligent tester, perform the Active Test (Click here).
Main Body Tester Display
Test Part
Control Range
Diagnostic Note
Head Light Cleaner
Headlight cleaner operation
ON/OFF
-
- HINT:
- The headlight cleaner system only operates when the front wiper washer switch (windshield wiper switch) is turned on the first time. After that, the headlight cleaner system cannot be operated with the front wiper washer switch (windshield wiper switch) until the ignition switch is turned off and then turned to ON.
- OK:
- Headlight cleaner operates.
|
|
||||

| OK | ||
 |
||
| ||
| 2. INSPECT HEADLIGHT CLEANER MOTOR AND PUMP ASSEMBLY |
Remove the headlight cleaner motor (Click here).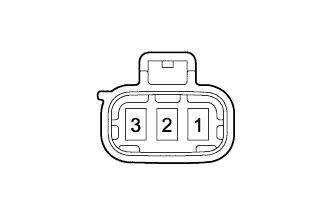
Apply battery voltage to the headlight cleaner motor and check the operation of the headlight cleaner motor.
- OK:
Measurement Condition
Specified Condition
Battery positive (+) → 2
Battery negative (-) → 1
Headlight cleaner motor operation is normal
|
|
||||

| OK | |
 |
| 3. CHECK HARNESS AND CONNECTOR (HEADLIGHT CLEANER MOTOR AND PUMP ASSEMBLY - BATTERY) |
Disconnect the A37 headlight cleaner motor connector.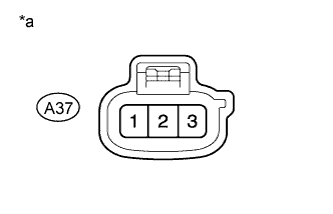
Measure the voltage according to the value(s) in the table below.
- Standard Voltage:
Tester Connection
Condition
Specified Condition
A37-2 - Body ground
Always
11 to 14 V
Text in Illustration *a
Front view of wire harness connector
(to Headlight Cleaner Motor and Pump Assembly)
|
|
||||
| OK | |
|
| 4. CHECK HARNESS AND CONNECTOR (HEADLIGHT CLEANER CONTROL RELAY - BATTERY AND BODY GROUND) |
Disconnect the A38 headlight cleaner control relay connector.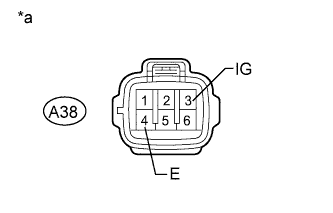
Measure the voltage according to the value(s) in the table below.
- Standard Voltage:
Tester Connection
Switch Condition
Specified Condition
A38-3 (IG) - Body ground
Ignition switch ON
11 to 14 V
A38-3 (IG) - Body ground
Ignition switch off
Below 1 V
Measure the resistance according to the value(s) in the table below.
- Standard Resistance:
Tester Connection
Condition
Specified Condition
A38-4 (E) - Body ground
Always
Below 1 Ω
| *a |
Front view of wire harness connector (to Headlight Cleaner Control Relay) |
|
|
||||
| OK | |
|
| 5. CHECK HARNESS AND CONNECTOR (HEADLIGHT CLEANER MOTOR AND PUMP ASSEMBLY - HEADLIGHT CLEANER CONTROL RELAY) |
Disconnect the A38 headlight cleaner control relay connector.
Disconnect the A37 headlight cleaner motor connector.
Measure the resistance according to the value(s) in the table below.
- Standard Resistance:
Tester Connection
Condition
Specified Condition
A37-1 - A38-6 (PB)
Always
Below 1 Ω
A38-6 (PB) - Body ground
Always
10 kΩ or higher
|
|
||||
| OK | ||
|
||
| ||