2013-2015 Land Cruiser Prado · Service Manual Engine / Hybrid System

Active Control Engine Mount System

Circuit diagnosis · Vehicles built from Aug 2014

Versions by build date: Aug 2013 – Jul 2014 from Aug 2014

DESCRIPTION

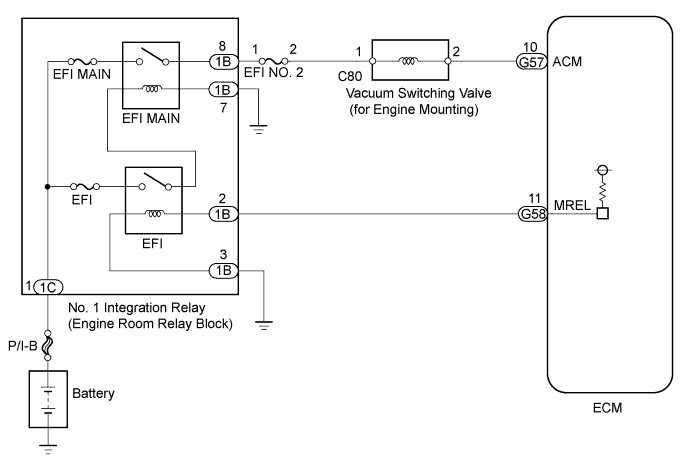
The Active Control Engine Mount (ACM) system decreases engine vibration at low engine speed using the VSV for engine mount. The VSV is controlled by a pulse signal transmitted to the VSV from the ECM. The frequency of this pulse signal is matched to the engine speed to decrease engine vibration.

WIRING DIAGRAM

A249247E11

INSPECTION PROCEDURE

NOTICE:
  1. Inspect the fuses of circuits related to this system before performing the following inspection procedure.
  2. After replacing the ECM, the new ECM needs registration (Click here) and initialization (Click here).
  3. After replacing the fuel supply pump assembly, the ECM needs initialization (Click here).
  4. After replacing an injector assembly, the ECM needs registration (Click here).


1. PERFORM ACTIVE TEST USING INTELLIGENT TESTER
  1. Warm up the engine.

  1. Connect the intelligent tester to the DLC3.

  1. Move the shift lever to N or P.

  1. Enter the following menus: Powertrain / Engine and ECT / Active Test / Control the ACM Inhibit.

  1. Hold the top part of the steering wheel, and turn the Active Test from OFF to ON. Check the engine vibration.
    Result 
    Engine Vibration
    Proceed to
    Increases
    A
    Does not increase
    B


A
CHECK FOR INTERMITTENT PROBLEMS (Click here)
B


2. CHECK VACUUM HOSE
  1. Check if the vacuum hose cap is missing, if the hose is damaged, and if the air and vacuum hoses have looseness, disconnection or blockage.

    OK:
    Vacuum hose cap is not missing and hoses are normal.


NG
REPLACE VACUUM HOSE
OK


3. INSPECT VSV FOR ENGINE MOUNT
  1. Inspect the VSV for engine mount (Click here).


NG
REPLACE VSV FOR ENGINE MOUNT
OK


4. CHECK HARNESS AND CONNECTOR (VSV FOR ENGINE MOUNT - ECM, EFI NO. 2 FUSE - VSV FOR ENGINE MOUNT)
  1. Disconnect the VSV for engine mount connector.

  1. Disconnect the ECM connector.

  1. Measure the resistance according to the value(s) in the table below.

    Standard Resistance (Check for Open):
    Tester Connection
    Condition
    Specified Condition
    C80-2 - C57-10 (ACM)
    Always
    Below 1 Ω


    Standard Resistance (Check for Short):
    Tester Connection
    Condition
    Specified Condition
    C80-2 or C57-10 (ACM) - Body ground
    Always
    10 kΩ or higher

  1. Remove the EFI NO. 2 fuse from the engine room relay block.

  1. Measure the resistance according to the value(s) in the table below.

    Standard Resistance:
    Tester Connection
    Condition
    Specified Condition
    EFI NO. 2 fuse (2) - C80-1
    Always
    Below 1 Ω

  1. Reconnect the VSV for engine mount connector.

  1. Reconnect the ECM connector.

  1. Reinstall the EFI NO. 2 fuse.


NG
REPAIR OR REPLACE HARNESS OR CONNECTOR
OK


5. INSPECT ENGINE MOUNTING INSULATOR FRONT
  1. Inspect the engine mounting insulator front.


NG
REPLACE ENGINE MOUNTING INSULATOR FRONT (Click here)
OK

REPLACE ECM (Click here)


← Active Control Engine Mount System (Aug 2013 – Jul 2014)Turbocharger Oil Leak and White Smoke (Aug 2013 – Jul 2014) →