2013-2015 Land Cruiser Prado · Service Manual Steering

REMOVAL

Removal / installation · Vehicles built from Aug 2014

Versions by build date: Aug 2013 – Jul 2014 from Aug 2014

CAUTION:
Some of these service operations affect the SRS airbag system. Read the precautionary notices concerning the SRS airbag system before servicing the steering wheel (Click here).

HINT:
  1. Use the same procedure for RHD and LHD vehicles.
  2. The procedure listed below is for LHD vehicles.


1. DISCONNECT CABLE FROM NEGATIVE BATTERY TERMINAL

CAUTION:
Wait at least 90 seconds after disconnecting the cable from the negative (-) battery terminal to disable the SRS system.

NOTICE:
  1. After turning the ignition switch off, waiting time may be required before disconnecting the cable from the battery terminal. Therefore, make sure to read the disconnecting the cable from the battery terminal notice before proceeding with work (Click here).
  2. When disconnecting the cable, some systems need to be initialized after the cable is reconnected (Click here).


2. PLACE FRONT WHEELS FACING STRAIGHT AHEAD

3. REMOVE FRONT WHEEL LH

4. REMOVE STEERING WHEEL ASSEMBLY
(Click here)

5. REMOVE STEERING COLUMN LOWER COVER

  1. C215845
    Remove the 2 screws.

  1. Detach the 2 claws and remove the steering column lower cover.


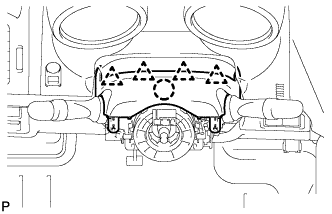
6. REMOVE STEERING COLUMN UPPER COVER

  1. C218241
    Detach the 4 clips.

  1. Detach the claw and remove the steering column upper cover.


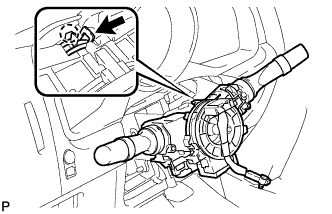
7. REMOVE COMBINATION SWITCH ASSEMBLY WITH SPIRAL CABLE SUB-ASSEMBLY
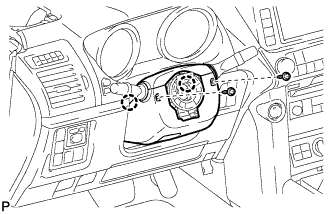
  1. Disconnect the connectors from the combination switch with spiral cable.

  1. C218014
    Use pliers to hold the clamp and raise the claw with a screwdriver. Then remove the combination switch assembly with spiral cable sub-assembly from the steering column assembly.

8. REMOVE TRANSPONDER KEY AMPLIFIER (w/ Transponder Key)
(Click here)

9. REMOVE INSTRUMENT LOWER PANEL FINISH PANEL SUB-ASSEMBLY (w/o Knee Airbag)
(Click here)

10. REMOVE NO. 1 INSTRUMENT LOWER PANEL AIRBAG ASSEMBLY (w/ Knee Airbag)
(Click here)

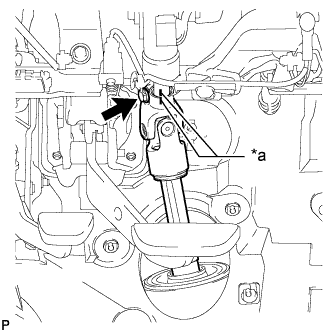
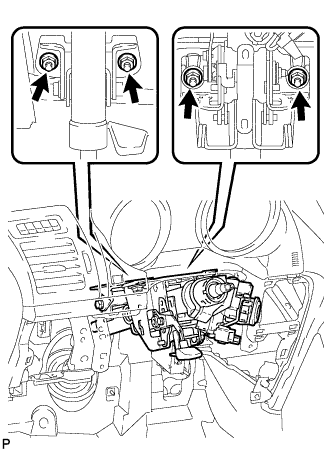
11. REMOVE STEERING COLUMN ASSEMBLY
  1. Detach the claws and remove the wire harness protector and wire harness.

  1. C217163E01
    Put matchmarks on the steering intermediate shaft and steering column.
    Text in Illustration 
    *a
    Matchmark

  1. Remove the bolt.

  1. C215849
    Remove the 4 nuts and steering column.


12. REMOVE NO. 1 FRONT FENDER APRON TO FRAME SEAL LH

  1. A223334
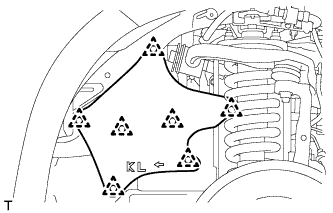
    w/ KDSS:
    Remove the 7 clips and fender apron seal.

  1. A223333
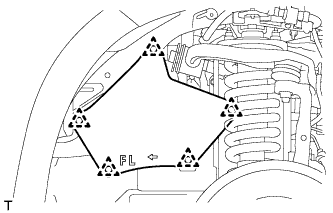
    w/o KDSS:
    Remove the 5 clips and fender apron seal.


13. DISCONNECT STEERING INTERMEDIATE SHAFT ASSEMBLY

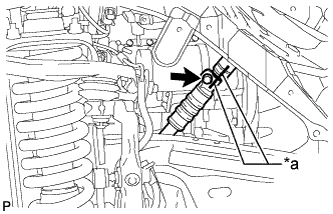
  1. C215850E01
    Put matchmarks on the steering intermediate shaft and No. 2 steering intermediate shaft.
    Text in Illustration 
    *a
    Matchmark

  1. Remove the bolt, and then pull out the intermediate shaft toward the inside of the vehicle.


14. REMOVE NO. 1 STEERING COLUMN HOLE COVER SUB-ASSEMBLY

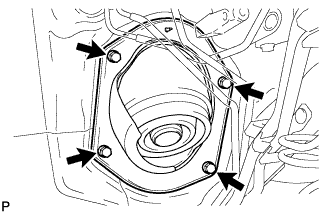
  1. C215852
    Remove the 4 bolts and steering column hole cover from the vehicle.


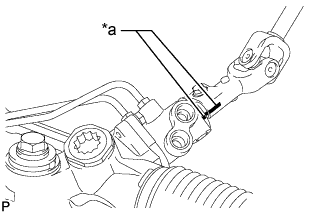
15. DISCONNECT NO. 2 STEERING INTERMEDIATE SHAFT SUB-ASSEMBLY

  1. C215851E01
    Put matchmarks on the No. 2 steering intermediate shaft and power steering gear.
    Text in Illustration 
    *a
    Matchmark

  1. Remove the bolt and No. 2 steering intermediate shaft from the power steering gear.

← REMOVAL (Aug 2013 – Jul 2014)DISASSEMBLY (from Aug 2013) →