REASSEMBLY
Removal / installation · Vehicles built from Aug 2013
| 1.
INSTALL STEERING RACK END SUB-ASSEMBLY |
 |
Temporarily install the 2 steering rack ends to the steering rack.
Fill up the ball joints of the steering rack ends with MP grease.
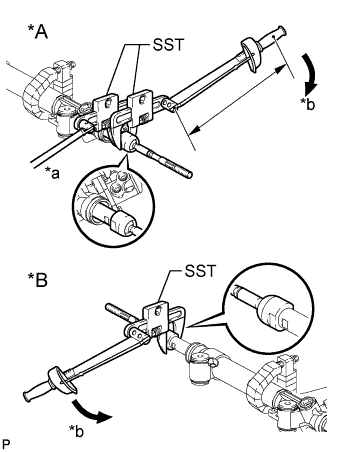
- Using SST, install the steering rack end (RH side) to the steering rack.
- SST
- 09922-10010
-
Torque:
- without SST:
- 105 N*m{
1071 kgf*cm
, 77 ft.*lbf
}
- with SST:
- 77 N*m{
784 kgf*cm
, 57 ft.*lbf
}
Text in Illustration
*A
|
LH Side
|
*B
|
RH Side
|
*a
|
Hold
|
*b
|
Turn
|
- HINT:
- Rotate SST in the direction shown in the illustration.
- Use a torque wrench with a fulcrum length of 400 mm (15.7 in.).
Using SST and a wrench, install the steering rack end (LH side) to the steering rack.
- SST
- 09922-10010
-
Torque:
- without SST:
- 105 N*m{
1071 kgf*cm
, 77 ft.*lbf
}
- with SST:
- 77 N*m{
784 kgf*cm
, 57 ft.*lbf
}
- HINT:
- Rotate SST in the direction shown in the illustration.
- Use a torque wrench with a fulcrum length of 400 mm (15.7 in.).
| 2.
INSTALL NO. 2 STEERING RACK BOOT |
|
Apply silicon grease to the inside of the small opening of the boot.
Install the 2 boots to the groove on the rack housing.
| 3.
INSTALL NO. 1 STEERING RACK BOOT |
|
- HINT:
- Use the same procedures described for the No. 2 boot.
| 4.
INSTALL STEERING RACK BOOT CLAMP RH |
|
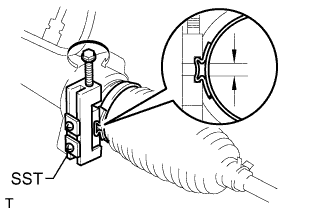
- Using SST, install a new boot clamp as shown in the illustration.
- SST
- 09521-24010
- Standard clearance:
- 3.0 mm (0.118 in.) or less
- NOTICE:
- Be careful not to damage the boot.
| 5.
INSTALL STEERING RACK BOOT CLAMP LH |
|
- HINT:
- Use the same procedures described for the RH side.
| 6.
INSTALL STEERING RACK BOOT CLIP RH |
|
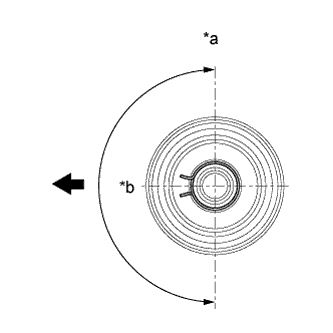
- Using pliers, install the boot clip.
Text in Illustration
*a
|
Upward
|
*b
|
180°
|
 
|
Front of Vehicle
|
- NOTICE:
- Make sure that the claws of the clip are positioned within the area shown in the illustration.
| 7.
INSTALL STEERING RACK BOOT CLIP LH |
|
- HINT:
- Use the same procedures described for the RH side.
| 8.
INSTALL STEERING GEAR OUTLET RETURN TUBE |
|
Using a union nut wrench, install the return tube to the steering gear.
-
Torque:
- 25 N*m{
255 kgf*cm
, 18 ft.*lbf
}
- HINT:
- Use the formula to calculate special torque values for situations where a union nut wrench is combined with a torque wrench (Click here).
| 9.
INSTALL TURN PRESSURE TUBE |
|
Apply steering fluid to 2 new O-rings. Using a union nut wrench, install the 2 O-rings and turn pressure tube LH.
-
Torque:
- 13 N*m{
127 kgf*cm
, 9 ft.*lbf
}
- HINT:
- Use the formula to calculate special torque values for situations where a union nut wrench is combined with a torque wrench (Click here).
Apply steering fluid to 2 new O-rings. Using a union nut wrench, install the 2 O-rings and turn pressure tube RH.
-
Torque:
- 13 N*m{
127 kgf*cm
, 9 ft.*lbf
}
- HINT:
- Use the formula to calculate special torque values for situations where a union nut wrench is combined with a torque wrench (Click here).
| 10.
INSTALL TIE ROD END SUB-ASSEMBLY LH |
|
Align the matchmarks of the tie rod and rack end, and temporarily install the tie rod with the lock nut.
- HINT:
- After adjusting toe-in, tighten the lock nut.
-
Torque:
- 88 N*m{
897 kgf*cm
, 65 ft.*lbf
}
| 11.
INSTALL TIE ROD END SUB-ASSEMBLY RH |
|
- HINT:
- Use the same procedures described for the LH side.