INSTALLATION
Removal / installation · Vehicles built from Aug 2013
| 1. INSTALL DIFFERENTIAL PRESSURE SENSOR ASSEMBLY |

Install 2 new clips, the No. 6 exhaust pipe air hose and No. 7 exhaust pipe air hose to the differential pressure sensor.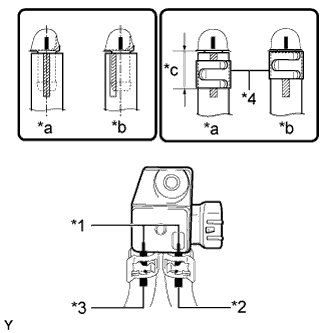

- NOTICE:
- Connect the air hoses so that the painted marks of the air hose are as shown in the illustration.
- Make sure the clip is as shown in the illustration.
- Connect the air hoses so that the painted marks of the air hose are as shown in the illustration.
Text in Illustration *1
Marking
*2
White Paint Mark
*3
Yellow Paint Mark
*4
Clip
*a
Correct
*b
Incorrect
*c
14.3 mm (0.562 in.) or less
Install the differential pressure sensor with the nut.
- Torque:
- 5.0 N*m{ 51 kgf*cm , 44 in.*lbf }
| 2. INSTALL SENSOR BRACKET (for Manual Transmission) |
Install the sensor bracket with the bolt.
- Torque:
- 24 N*m{ 245 kgf*cm , 18 ft.*lbf }
Connect the sensor connector and attach the clamp.
| 3. INSTALL NO. 1 SENSOR BRACKET (for Automatic Transmission) |
Install the sensor bracket with the bolt.
- Torque:
- 24 N*m{ 245 kgf*cm , 18 ft.*lbf }
Install the No. 1 sensor bracket with the bolt and nut.
- Torque:
- 8.0 N*m{ 82 kgf*cm , 71 in.*lbf }
Attach the 4 clamps and connect the sensor connector.
| 4. INSTALL NO. 1 FRONT FLOOR HEAT INSULATOR |
Install the No. 1 front floor heat insulator with the 3 nuts.
- Torque:
- 5.0 N*m{ 51 kgf*cm , 44 in.*lbf }
| 5. INSTALL FRONT EXHAUST PIPE ASSEMBLY |