Circuit diagnosis · Vehicles built Aug 2013 – Jul 2014
Versions by build date: Aug 2013 – Jul 2014from Aug 2014
DESCRIPTION
When the engine switch is pushed with the key in the cabin, the power management control ECU receives signals to switch the power source mode.
WIRING DIAGRAM
Refer to "Power Source Mode does not Change to on (IG and ACC)" (Click here).
INSPECTION PROCEDURE
NOTICE:
When using the intelligent tester with the engine switch off to troubleshoot: Connect the intelligent tester to the vehicle and turn a courtesy light switch on and off at 1.5 second intervals until communication between the intelligent tester and vehicle begins.
Before performing the inspection, check that there are no problems related to the CAN communication system and LIN communication system.
Inspect the fuses for circuits related to this system before performing the following inspection procedure.
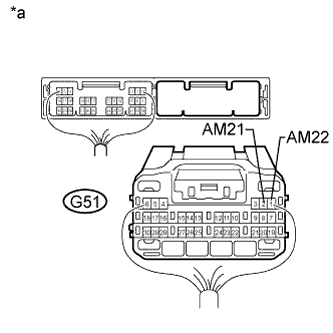
1. CHECK HARNESS AND CONNECTOR (BATTERY - POWER MANAGEMENT CONTROL ECU)
Disconnect the G51 power management control ECU connector.
Measure the voltage according to the value(s) in the table below.
Standard Voltage:
Tester Connection
Condition
Specified Condition
G51-2 (AM21) - Body ground
Always
9.5 to 14 V
G51-1 (AM22) - Body ground
Text in Illustration
*a
Rear view of wire harness connector (to Power Management Control ECU)
NG
REPAIR OR REPLACE HARNESS OR CONNECTOR
OK
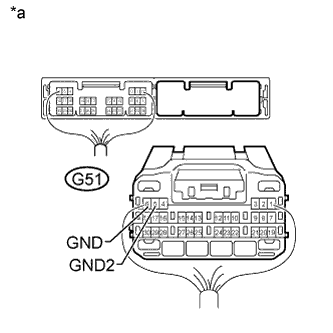
2. CHECK HARNESS AND CONNECTOR (POWER MANAGEMENT CONTROL ECU - BODY GROUND)
Disconnect the G51 power management control ECU connector.
Measure the resistance according to the value(s) in the table below.
Standard Resistance:
Tester Connection
Condition
Specified Condition
G51-6 (GND) - Body ground
Always
Below 1 Ω
G51-5 (GND2) - Body ground
Text in Illustration
*a
Rear view of wire harness connector (to Power Management Control ECU)
NG
REPAIR OR REPLACE HARNESS OR CONNECTOR
OK
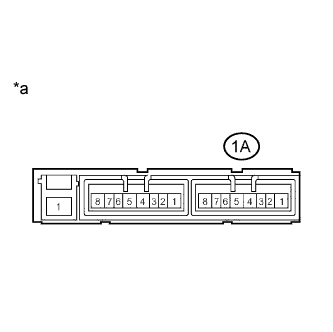
3. INSPECT NO. 1 INTEGRATION RELAY (IG2 RELAY)
Remove the No. 1 integration relay.
Measure the resistance according to the value(s) in the table below.
Standard Resistance:
Tester Connection
Condition
Specified Condition
1A-1 - 1A-3
20°C (68°F)
255 to 387 Ω
Text in Illustration
*a
Component without harness connected (No. 1 Integration Relay)
NG
REPLACE NO. 1 INTEGRATION RELAY
OK
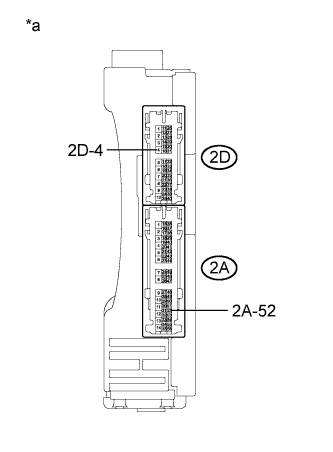
4. INSPECT DRIVER SIDE JUNCTION BLOCK ASSEMBLY (IG1 NO. 1, IG1 NO. 2 AND IG1 NO. 3 RELAYS)
Remove the driver side junction block assembly.
Measure the resistance according to the value(s) in the table below.
Standard Resistance:
Tester Connection
Condition
Specified Condition
2A-52 - 2D-4
20°C (68°F)
101.25 to 123.75 Ω
Text in Illustration
*a
Component without harness connected (Driver Side Junction Block Assembly)
NG
REPLACE MAIN BODY ECU (DRIVER SIDE JUNCTION BLOCK ASSEMBLY)
OK
5. CHECK HARNESS AND CONNECTOR (POWER MANAGEMENT CONTROL ECU - DRIVER SIDE JUNCTION BLOCK ASSEMBLY)
Disconnect the G51 power management control ECU connector.
Disconnect the 2A driver side junction block assembly connector.
Measure the resistance according to the value(s) in the table below.
Standard Resistance:
Tester Connection
Condition
Specified Condition
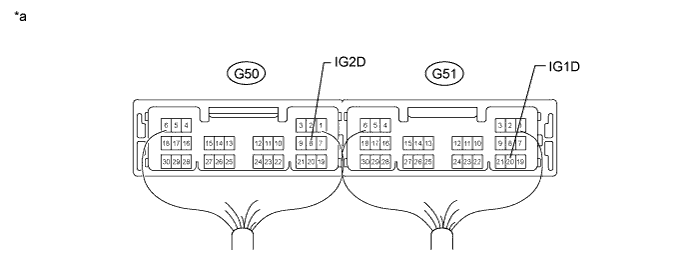
G51-20 (IG1D) - 2A-52
Always
Below 1 Ω
G51-20 (IG1D) - Body ground
Always
10 kΩ or higher
NG
REPAIR OR REPLACE HARNESS OR CONNECTOR
OK
6. CHECK HARNESS AND CONNECTOR (DRIVER SIDE JUNCTION BLOCK ASSEMBLY - BODY GROUND)
Disconnect the 2D driver side junction block assembly connector.
Measure the resistance according to the value(s) in the table below.
Standard Resistance:
Tester Connection
Condition
Specified Condition
2D-4 - Body ground
Always
Below 1 Ω
NG
REPAIR OR REPLACE HARNESS OR CONNECTOR
OK
7. CHECK HARNESS AND CONNECTOR (POWER MANAGEMENT CONTROL ECU - NO. 1 INTEGRATION RELAY)
Disconnect the G50 power management control ECU connector.
Disconnect the 1A No. 1 integration relay connector.
Measure the resistance according to the value(s) in the table below.
Standard Resistance:
Tester Connection
Condition
Specified Condition
G50-8 (IG2D) - 1A-1
Always
Below 1 Ω
G50-8 (IG2D) - Body ground
Always
10 kΩ or higher
NG
REPAIR OR REPLACE HARNESS OR CONNECTOR
OK
8. CHECK HARNESS AND CONNECTOR (NO. 1 INTEGRATION RELAY - BODY GROUND)
Disconnect the 1A No. 1 integration relay connector.
Measure the resistance according to the value(s) in the table below.
Standard Resistance:
Tester Connection
Condition
Specified Condition
1A-3 - Body ground
Always
Below 1 Ω
NG
REPAIR OR REPLACE HARNESS OR CONNECTOR
OK
9. CHECK POWER MANAGEMENT CONTROL ECU
Install the No. 1 integration relay.
Install the driver side junction block assembly.
Connect the power management control ECU connectors.
Text in Illustration
*a
Component with harness connected (Power Management Control ECU)
-
-
Measure the voltage according to the value(s) in the table below.
Standard Voltage:
Tester Connection
Switch Condition
Specified Condition
G50-8 (IG2D) - Body ground
Engine switch off
Below 1 V
Engine switch on (IG)
((Voltage at terminal AM21 or AM22) minus 2.0 V) or higher
G51-20 (IG1D) - Body ground
Engine switch off
Below 1 V
Engine switch on (IG)
((Voltage at terminal AM21 or AM22) minus 2.0 V) or higher