INSTALLATION
Removal / installation · Vehicles built from Aug 2014
Versions by build date: Aug 2013 – Jul 2014 from Aug 2014
- CAUTION:
- Wear protective gloves. Sharp areas on the parts may injure your hands.
- HINT:
- Use the same procedure for RHD and LHD vehicles.
- The procedure listed below is for LHD vehicles.
- Use the same procedure for the RH and LH sides.
- The procedure listed below is for the LH side. (for Manual Seat, Power Seat)
- The procedure listed below is for the RH side. (for Walk in Seat Type)
- Use the same procedure for RHD and LHD vehicles.
| 1. INSTALL FRONT SEAT SIDE AIRBAG ASSEMBLY |

- CAUTION:
- The nuts must not be reused.
- Make sure that the separate type front seatback spring assembly is not deformed. If it is, replace it with a new one.
- The nuts must not be reused.
- HINT:
- Use the same procedure for the RH and LH sides.
Install the front seat side airbag assembly with 2 new nuts.
- Torque:
- 5.5 N*m{ 56 kgf*cm , 49 in.*lbf }
Attach the 2 clamps.
| 2. INSTALL SEPARATE TYPE FRONT SEATBACK COVER WITH PAD |
- HINT:
- Use the same procedure for the RH and LH sides.
Temporarily install the separate type front seatback cover with pad.
Attach the 4 claws to install the 2 front seat headrest supports.
Install the front seatback cover bracket with the nut.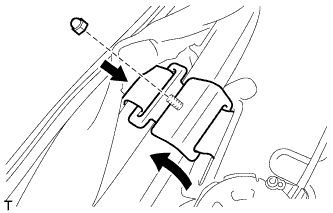

- Torque:
- 5.5 N*m{ 56 kgf*cm , 49 in.*lbf }
- NOTICE:
- For vehicles with side airbags, the side airbags may not be activated normally unless the front seatback cover is securely installed.
- Check that the strap is not twisted after installing the bracket.
- Install the bracket securely.
- For vehicles with side airbags, the side airbags may not be activated normally unless the front seatback cover is securely installed.
Close the 2 fasteners, and then close the seatback cover.
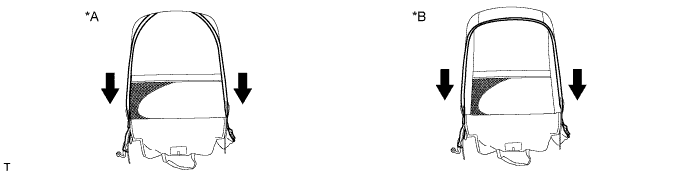
Text in Illustration *A
for Cloth Seat
*B
for Leather Seat
Using hog ring pliers, install 3 new hog rings.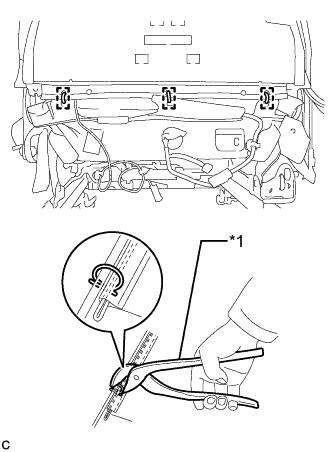
Text in Illustration *1
Hog Ring Pliers
- NOTICE:
- Be sure to securely install the hog rings as shown in the illustration.
w/ Seat Heater System:
Connect the seat heater connector and attach the wire harness clamp.
| 3. CONNECT FRONT SEAT SIDE AIRBAG ASSEMBLY |
for Manual Seat, Power Seat:
Connect the airbag wire harness.
Attach the fastening tape and close the cover.
Attach the 3 airbag wire harness clamps.
Attach the claw and connect the airbag connector.
for Walk in Seat Type:
Connect the airbag wire harness.
Attach the fastening tape and close the cover.
Attach the 4 airbag wire harness clamps.
Attach the claw and connect the airbag connector.
Install the rubber band to the seat cushion spring.
| 4. INSTALL FRONT SEAT ASSEMBLY |
for Power Seat: (Click here)
for Walk in Seat Type: (Click here)
| 5. INSTALL SEAT TRACK COVER LH |
for Power Seat: (Click here)
| 6. INSTALL INNER SEAT TRACK BRACKET COVER LH |
for Power Seat: (Click here)
| 7. INSTALL FRONT SEAT OUTER TRACK BRACKET COVER LH |
for Power Seat: (Click here)
| 8. INSTALL FRONT SEAT INNER TRACK BRACKET COVER LH |
for Power Seat: (Click here)
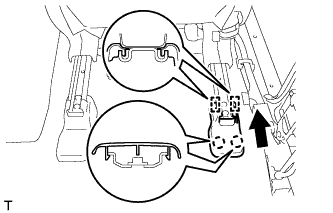
| 9. INSTALL SEAT TRACK COVER RH (for Walk in Seat Type) |
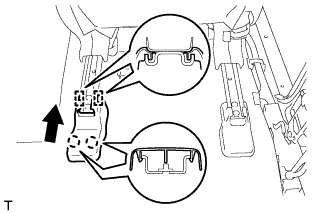 |
Move the cover in the direction of the arrow to attach the 2 guides.
Attach the 2 claws to install the cover.
| 10. INSTALL INNER SEAT TRACK BRACKET COVER RH (for Walk in Seat Type) |
 |
Move the cover in the direction of the arrow to attach the 2 guides.
Attach the 2 claws to install the cover.
| 11. INSTALL FRONT SEAT OUTER TRACK BRACKET COVER RH (for Walk in Seat Type) |
Operate the seat track adjusting handle to move the seat to the rearmost position.
Move the cover in the direction of the arrow to attach the guide.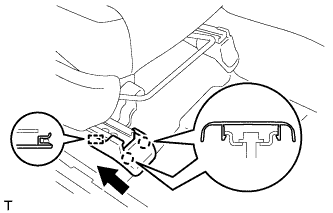
Attach the 2 claws to install the cover.
| 12. INSTALL FRONT SEAT INNER TRACK BRACKET COVER RH (for Walk in Seat Type) |
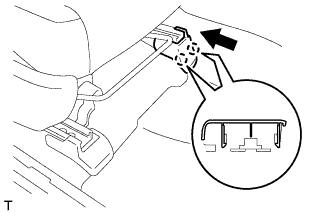 |
Attach the 2 claws to install the cover.
| 13. INSTALL FRONT SEAT HEADREST ASSEMBLY |
for Power Seat: (Click here)
for Walk in Seat Type: (Click here)
| 14. CONNECT CABLE TO NEGATIVE BATTERY TERMINAL |
- NOTICE:
- When disconnecting the cable, some systems need to be initialized after the cable is reconnected (Click here).
| 15. CHECK SRS WARNING LIGHT |
Check the SRS warning light (Click here).
| 16. INSPECT FRONT SEAT ASSEMBLY |
for Power Seat: (Click here)
for Walk in Seat Type: (Click here)