REASSEMBLY
Removal / installation · Vehicles built from Aug 2013
- CAUTION:
- Wear protective gloves. Sharp areas on the parts may injure your hands.
- HINT:
- Use the same procedure for RHD and LHD vehicles.
- The procedure listed below is for LHD vehicles.
- A bolt without a torque specification is shown in the standard bolt chart (Click here).
- Use the same procedure for RHD and LHD vehicles.
| 1. INSTALL REAR SEAT TRACK ADJUSTING HANDLE LH |

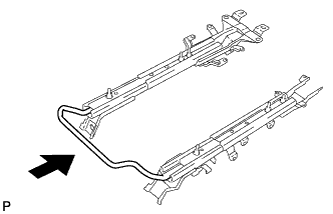  |
Install the rear seat track adjusting handle LH.
- HINT:
- Make sure the handle is straight when installing it, and check that it is centered.
| 2. INSTALL REAR SEAT CUSHION FRAME SUB-ASSEMBLY LH |
Install the rear seat cushion frame sub-assembly LH with the 6 nuts.
- Torque:
- 32 N*m{ 326 kgf*cm , 24 ft.*lbf }
| 3. INSTALL REAR SEATBACK FRAME SUB-ASSEMBLY LH |
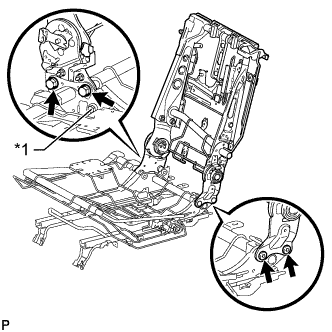 |
Temporarily install the rear seatback frame sub-assembly LH with the 2 bolts and 2 "TORX" bolts.
Install the bolt to the bolt hole for the outer belt.
Text in Illustration *1
Outer Belt Installation Bolt
Using a T45 "TORX" socket wrench, tighten the 2 "TORX" bolts.
- Torque:
- 42 N*m{ 428 kgf*cm , 31 ft.*lbf }
Tighten the 2 bolts.
- Torque:
- 42 N*m{ 428 kgf*cm , 31 ft.*lbf }
Remove the bolt from the bolt hole for the outer belt.
| 4. INSTALL REAR SEAT WIRE LH (w/ Seat Heater System) |
Attach the clamp to install the rear seat wire LH to the rear seat cushion frame sub-assembly LH.
Attach the claw to connect the rear seat wire connector to the rear seat upper track rail sub-assembly LH.
| 5. INSTALL SEAT HEATER CONTROL SUB-ASSEMBLY (w/ Seat Heater System) |
Attach the 2 clamps to install the seat heater control sub-assembly.
Connect the connector.
| 6. INSTALL REAR BACK LOCK CONTROL LEVER SUB-ASSEMBLY LH |
Install the rear back lock control lever sub-assembly LH with the 2 nuts.
- Torque:
- 18 N*m{ 184 kgf*cm , 13 ft.*lbf }
| 7. INSTALL REAR NO. 2 SEAT RECLINING CONTROL CABLE |
Install the rear No. 2 seat reclining control cable to the seat frame.
Attach the 3 cable clamps and connect the cable.
| 8. INSTALL REAR SEAT RECLINING CONTROL CABLE |
Install the rear seat reclining control cable to the seat frame.
Attach the 3 cable clamps and connect the rear seat reclining control cable.
Install 4 new cable ties.
| 9. INSTALL NO. 1 SEAT 3 POINT TYPE BELT ASSEMBLY LH |
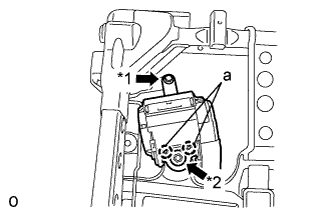 |
- NOTICE:
- When installing the retractor, make sure the claws of the vehicle (labeled "a" in the illustration) only contact the installation areas of the retractor.
Align the claws with the seat belt positioning holes and install the retractor of the seat belt with the nut and bolt as shown in the illustration.
- HINT:
- First install the bolt, and then install the nut.
- Torque:
- for bolt:
- 7.5 N*m{ 76 kgf*cm , 66 in.*lbf }
- for nut:
- 42 N*m{ 428 kgf*cm , 31 ft.*lbf }
Text in Illustration *1
Bolt
*2
Nut
| 10. INSTALL REAR SEAT SHOULDER BELT GUIDE |
Attach the guide and claw to install the rear seat shoulder belt guide.
| 11. INSTALL REAR SEAT CUSHION SPRING DAMPER |
Install the rear seat cushion spring damper with the 2 nuts.
| 12. INSTALL REAR SEAT RECLINING COVER INNER LH |
Attach the guide and claw to install the rear seat reclining cover inner LH.
| 13. INSTALL CAP |
Attach the 2 claws to install the cap.
| 14. INSTALL REAR SEAT REAR CUSHION MOULDING LH |
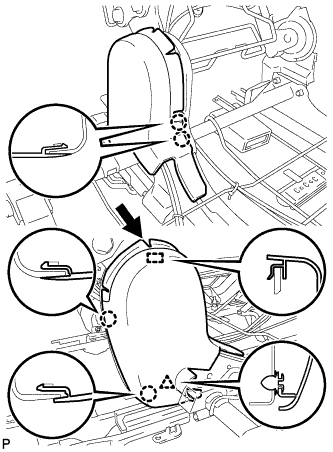 |
Move the rear seat rear cushion moulding LH in the direction of the arrow to attach the guide.
Attach the 4 claws and clip to install the rear seat rear cushion moulding LH.
| 15. INSTALL RECLINING ADJUSTER INSIDE COVER LH |
Attach the 2 claws to install the reclining adjuster inside cover LH.
Install the 2 screws.
| 16. INSTALL REAR SEAT INNER RECLINING COVER LH |
Attach the guide and install the rear seat inner reclining cover LH with the 2 screws.
| 17. INSTALL REAR SEATBACK EDGE PROTECTOR |
Install the rear seatback edge protector to the rear seatback frame sub-assembly LH.
| 18. INSTALL REAR SEATBACK HEATER ASSEMBLY (w/ Seat Heater System) |
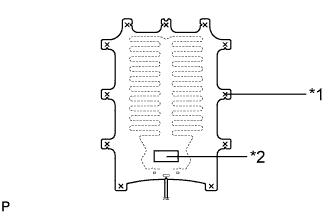 |
Set the rear seatback heater assembly in place with the name stamp side facing the separate type rear seatback cover.
Text in Illustration *1
Tack Pin
*2
Name Stamp
Install the rear seatback heater assembly with 11 new tack pins.
| 19. INSTALL SEPARATE TYPE REAR SEATBACK COVER |
Set the separate type rear seatback cover in place.
Using hog ring pliers, install the separate type rear seatback cover to the separate type rear seatback pad with 8 new hog rings.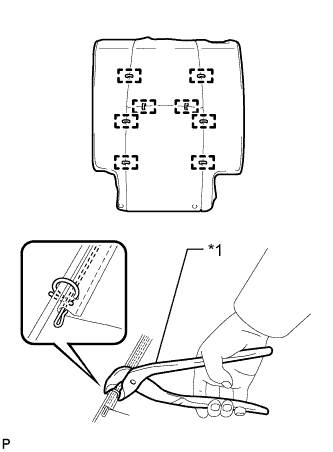
Text in Illustration *1
Hog Ring Pliers
- NOTICE:
- Be careful not to damage the separate type rear seatback cover.
- Be sure to securely install the hog rings as shown in the illustration while preventing wrinkles from forming on the separate type rear seatback cover.
- Be careful not to damage the separate type rear seatback cover.
w/ Seat Heater System: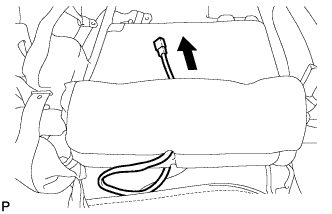
Connect the rear seatback heater assembly wire harness to the separate type rear seatback pad.
| 20. INSTALL SEATBACK COVER WITH PAD |
w/ Seat Heater System:
Install the wire harness as shown in the illustration.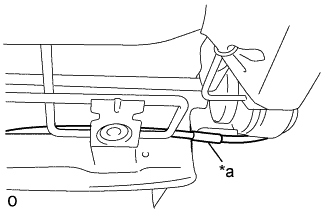
Text in Illustration *a
Paint Mark
Connect the outer belt to the seatback cover with pad.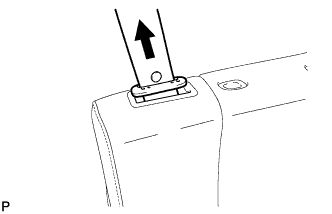
Attach the hooks.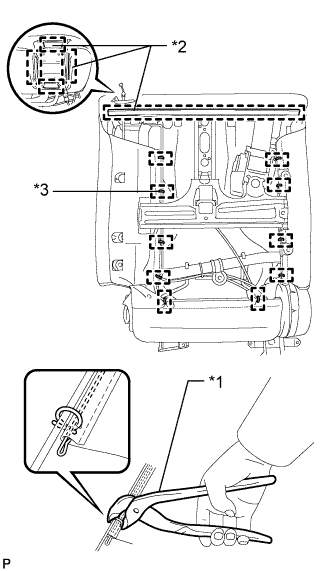
Text in Illustration *1
Hog Ring Pliers
*2
Hook
*3
Hog Ring
Using hog ring pliers, install the seatback cover with pad with 10 new hog rings.
- NOTICE:
- Be careful not to damage the separate type rear seatback cover.
- Be sure to securely install the hog rings as shown in the illustration while preventing wrinkles from forming on the separate type rear seatback cover.
- Be careful not to damage the separate type rear seatback cover.
| 21. INSTALL REAR NO. 1 SEAT HEADREST SUPPORT ASSEMBLY |
Attach the 4 claws to install the 2 rear No. 1 seat headrest support assemblies.
| 22. INSTALL REAR SEATBACK BOARD CARPET ASSEMBLY LH |
Attach the 7 clips to install the rear seatback board carpet assembly LH.
| 23. INSTALL REAR SEATBACK COVER |
Attach the 4 claws to install the rear seatback cover.
| 24. INSTALL REAR SEAT SHOULDER BELT COVER |
Connect the outer belt to the rear seat shoulder belt cover.
Attach the 2 guides and 2 claws to install the rear seat shoulder belt cover.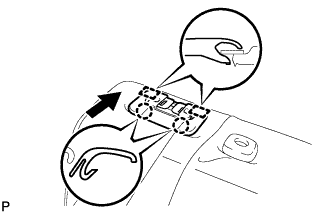
| 25. INSTALL SEAT BELT ANCHOR COVER CAP |
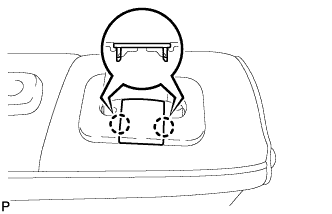 |
Attach the 2 claws to install the seat belt anchor cover cap.
| 26. INSTALL REAR SEAT LOCK CONTROL LEVER SUB-ASSEMBLY LH |
Connect the cable in the order shown in the illustration to install the rear seat lock control lever sub-assembly LH.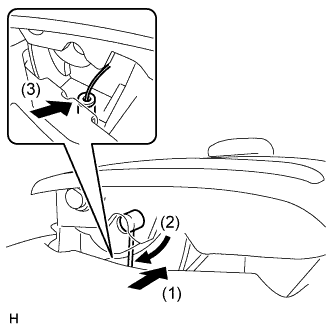
Install the 2 screws.
| 27. INSTALL RECLINING ADJUSTER KNOB CAP LH |
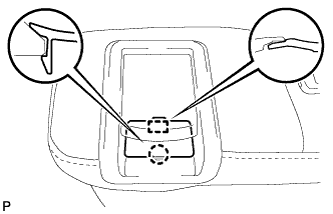 |
Attach the guide and claw to install the reclining adjuster knob cap LH.
| 28. INSTALL REAR NO. 1 SEAT INNER BELT ASSEMBLY LH |
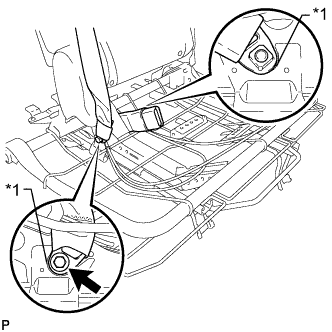 |
Install the rear No. 1 seat inner belt assembly LH and connect the rear No. 1 seat 3 point type belt assembly LH with the bolt.
- Torque:
- 42 N*m{ 428 kgf*cm , 31 ft.*lbf }
- NOTICE:
- Do not allow the anchor parts of the rear No. 1 seat 3 point type belt assembly LH and rear No. 1 seat inner belt assembly LH to overlap the protruding parts of the seat cushion frame.
Text in Illustration *1
Protruding Part
| 29. INSTALL CENTER NO. 2 SEATBACK COVER |
Install the center No. 2 seatback cover with the 3 screws.
| 30. INSTALL COAT HOOK CAP |
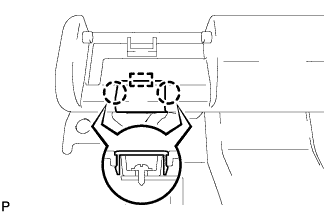 |
Attach the guide and 2 claws to install the coat hook cap.
| 31. INSTALL FOLD SEATBACK WIRE |
Attach the 2 claws to install the fold seatback wire.
| 32. INSTALL REAR NO. 1 SEAT LOCK CONTROL LEVER |
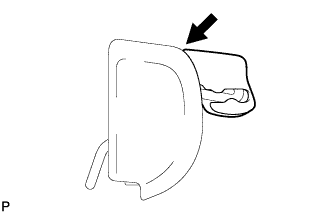 |
Install the rear No. 1 seat lock control lever as shown in the illustration.
| 33. INSTALL REAR SEAT LOCK ASSEMBLY LH |
Install the rear seat lock assembly LH with the 2 bolts.
- Torque:
- 21 N*m{ 214 kgf*cm , 15 ft.*lbf }
Attach the clamp to connect the wire.
| 34. INSTALL NO. 1 SEATBACK COVER |
Attach the guide.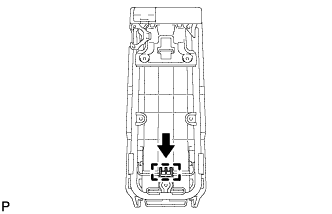
Attach the 2 claws to install the No. 1 seatback cover.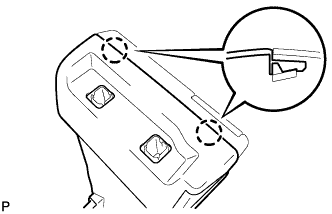
| 35. INSTALL REAR SEAT HEADREST SUPPORT |
Attach the 4 claws to install the 2 rear seat headrest supports.
| 36. INSTALL SEAT ARMREST COVER |
Install the seat armrest cover to the pad.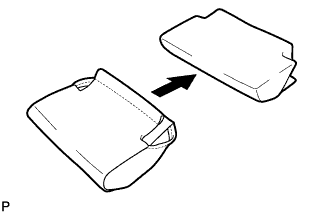
Install the seat armrest cover with pad.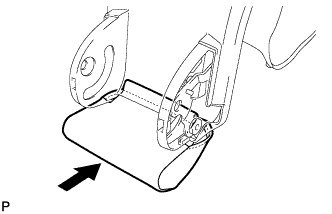
Attach the hooks.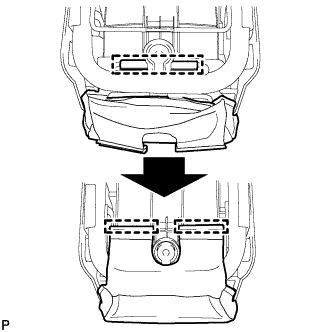
| 37. INSTALL REAR SEATBACK BOARD SUB-ASSEMBLY |
Attach the 5 clips to install the rear seatback board sub-assembly.
| 38. INSTALL REAR SEATBACK LOCK COVER |
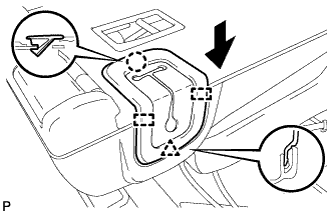 |
Move the rear seatback lock cover in the direction of the arrow to attach the clip and 2 guides.
Attach the claw.
| 39. INSTALL REAR SEATBACK COVER |
Attach the 4 claws to install the rear seatback cover.
| 40. INSTALL REAR SEAT CENTER ARMREST CUP HOLDER SUB-ASSEMBLY |
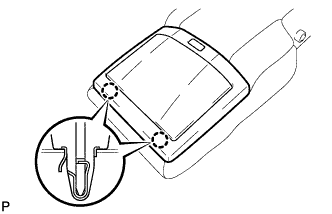 |
Attach the 2 claws to install the rear seat center armrest cup holder sub-assembly.
Install the 2 screws.
| 41. INSTALL REAR SEAT CENTER ARMREST ASSEMBLY |
Install the rear seat center armrest assembly as shown in the illustration.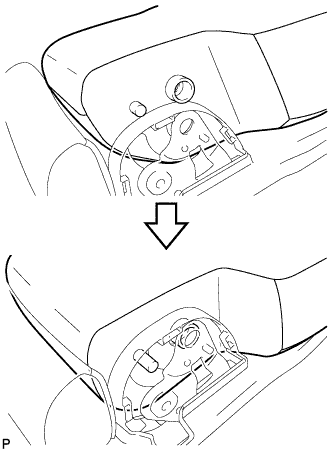
Install the armrest support with the nut.
Using a T45 "TORX" socket wrench, install the rear seat center armrest assembly and 2 bushes with the 2 "TORX" bolts.
- Torque:
- 21 N*m{ 214 kgf*cm , 15 ft.*lbf }
| 42. INSTALL REAR SEATBACK STAY COVER RH |
Attach the guide and 3 claws to install the rear seatback stay cover RH.
| 43. INSTALL REAR SEATBACK STAY COVER LH |
Attach the guide and 3 claws to install the rear seatback stay cover LH.
| 44. INSTALL REAR SEAT RECLINING BRACKET RH |
Using a T45 "TORX" socket wrench, install the rear seat reclining bracket RH and bush with the "TORX" bolt.
- Torque:
- 21 N*m{ 214 kgf*cm , 15 ft.*lbf }
| 45. INSTALL REAR SEAT RECLINING BRACKET LH |
Using a T45 "TORX" socket wrench, install the rear seat reclining bracket LH and bush with the "TORX" bolt.
- Torque:
- 21 N*m{ 214 kgf*cm , 15 ft.*lbf }
| 46. INSTALL CENTER SEAT HINGE COVER |
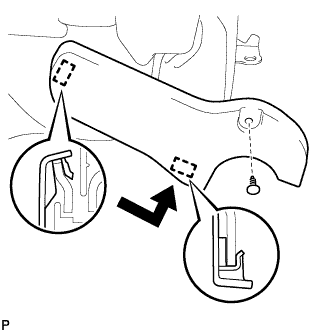 |
Attach the 2 guides and install the center seat hinge cover with the clip.
| 47. INSTALL REAR SEAT CENTER HEADREST ASSEMBLY |
Install the rear seat center headrest assembly.
| 48. INSTALL CENTER SEATBACK ASSEMBLY |
Install the center seatback assembly with the 2 bolts.
- Torque:
- 21 N*m{ 214 kgf*cm , 15 ft.*lbf }
| 49. INSTALL REAR SEAT CUSHION EDGE PROTECTOR |
Install the rear seat cushion edge protector to the cushion spring.
| 50. INSTALL REAR SEAT CUSHION HEATER ASSEMBLY (w/ Seat Heater System) |
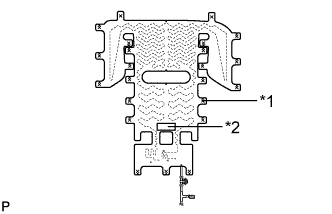 |
Set the rear seat cushion heater assembly in place with the name stamp side facing the separate type rear seat cushion cover.
Text in Illustration *1
Tack Pin
*2
Name Stamp
Install the rear seat cushion heater assembly with 23 new tack pins.
| 51. INSTALL SEPARATE TYPE REAR SEAT CUSHION COVER |
Set the separate type rear seat cushion cover in place.
Using hog ring pliers, install the separate type rear seat cushion cover to the separate type rear seat cushion pad with 14 new hog rings.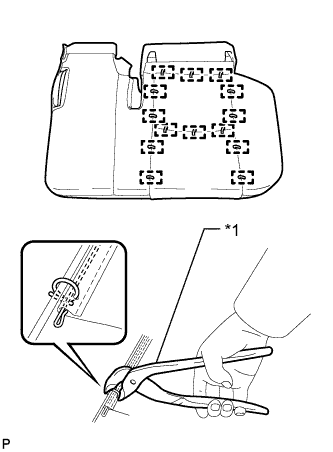
Text in Illustration *1
Hog Ring Pliers
- NOTICE:
- Be careful not to damage the separate type rear seat cushion cover.
- Be sure to securely install the hog rings as shown in the illustration while preventing wrinkles from forming on the separate type rear seat cushion cover.
- Be careful not to damage the separate type rear seat cushion cover.
| 52. INSTALL REAR NO. 2 SEAT PROTECTOR |
Install the 2 rear No. 2 seat protectors to the separate type rear seat cushion pad.
| 53. INSTALL SEAT CUSHION COVER WITH PAD |
Attach the hook.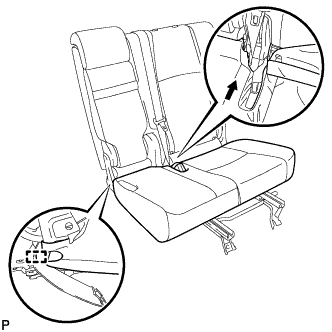
Attach the hooks to install the seat cushion cover with pad.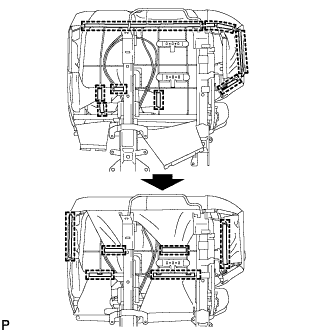
w/ Seat Heater System:
Pass the wire harness as shown in the illustration.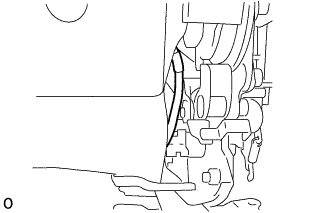
Connect the 2 rear seat heater connectors.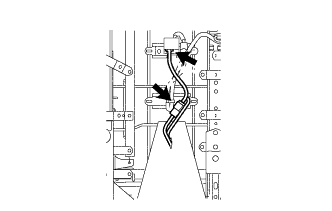
| 54. INSTALL REAR SEATBACK LOCK STRIKER COVER LH |
Attach the 3 clips to install the rear seatback lock striker cover LH.
| 55. INSTALL REAR SEAT CUSHION MOULDING LH |
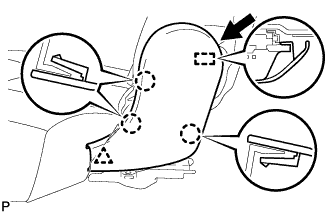 |
Move the rear seat cushion moulding LH in the direction of the arrow to attach the guide.
Attach the 3 claws and clip to install the rear seat cushion moulding LH.
| 56. INSTALL CENTER SEAT HINGE COVER LH |
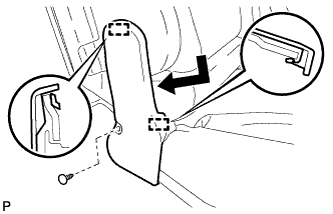 |
Attach the 2 guides and install the center seat hinge cover LH with the clip.
| 57. INSTALL RECLINING ADJUSTER RELEASE HANDLE LH |
Install the reclining adjuster release handle LH with the 3 screws.
| 58. INSTALL REAR SEAT UPPER RECLINING COVER LH |
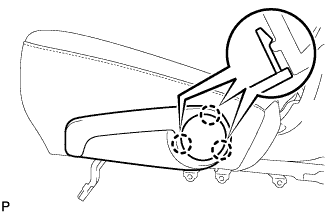 |
Attach the 3 claws to install the rear seat upper reclining cover LH.