Removal / installation · Vehicles built from Aug 2013
1.
INSTALL EXHAUST MANIFOLD
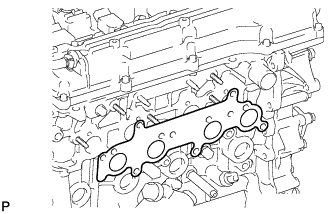
Install a new gasket.
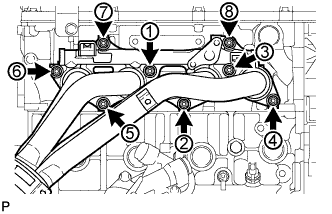
Install the exhaust manifold with 8 new nuts in the order shown in the illustration.
Torque:
36 N*m{
367 kgf*cm
, 27 ft.*lbf
}
2.
INSTALL MANIFOLD STAY
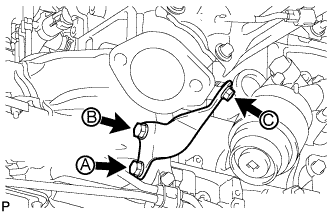
Install the manifold stay with the 3 bolts.
Torque:
for bolt A:
71 N*m{
724 kgf*cm
, 52 ft.*lbf
}
for bolt B:
44 N*m{
449 kgf*cm
, 32 ft.*lbf
}
for bolt C:
30 N*m{
360 kgf*cm
, 22 ft.*lbf
}
3.
INSTALL FRONT EXHAUST PIPE ASSEMBLY
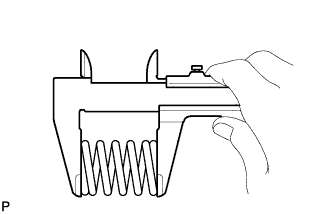
Using a vernier caliper, measure the free length of the compression spring.
Minimum free length:
41.5 mm (1.63 in.)
If the free length is less than the minimum, replace the compression spring.
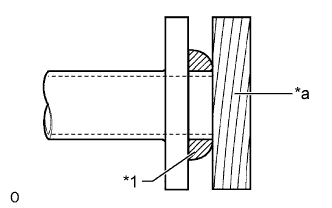
Using a plastic-faced hammer and wooden block, tap in a new gasket until its surface is flush with the exhaust manifold.
Text in Illustration
*1
Gasket
*a
Wooden Block
NOTICE:
Be sure to install the gasket so that it faces the correct direction.
Do not reuse the gasket.
Do not damage the gasket.
When connecting the exhaust pipe, do not push in the gasket with the exhaust pipe.
Install a new gasket.
Connect the front exhaust pipe assembly to the exhaust pipe support.
Install the front exhaust pipe assembly to the exhaust manifold with the 2 compression springs and 2 bolts. Alternately tighten the bolts in several passes.
Torque:
43 N*m{
438 kgf*cm
, 32 ft.*lbf
}
Connect the front exhaust pipe assembly to the center exhaust pipe assembly with the 2 bolts.
Torque:
48 N*m{
489 kgf*cm
, 35 ft.*lbf
}
Connect the air fuel ratio sensor connector and attach the wire harness clamp.
Connect the heated oxygen sensor connector and attach the wire harness clamp.
4.
INSTALL FRONT FENDER APRON SEAL RH
Install the front fender apron seal RH with the 5 clips.