U1002 Lost Communication with Gateway Module
Diagnostic trouble codes · Vehicles built from Aug 2014
Versions by build date: Aug 2013 – Jul 2014 from Aug 2014
DESCRIPTION
- The network gateway ECU stores this DTC when no signals can be received from the ECUs that have been memorized as those connected to the CAN V2 bus.
- When the network gateway ECU receives a response signal from the ECUs connected to the CAN V2 bus, the network gateway ECU recognizes and memorizes that the ECU is connected to the CAN V2 bus. Based on this memorized data, the network gateway ECU monitors for malfunctions in the ECUs connected to the CAN V2 bus when communicating with those ECUs. If the network gateway ECU cannot receive response signals from the ECUs that have been memorized as those connected to the CAN V2 bus, the network gateway ECU determines that a malfunction exists.
- If 2 or more DTCs are output during the DTC check, one side of the CAN branch wire may be open (one side of the CANH [CAN branch wire]/CANL [CAN branch wire] of the ECU and/or sensor is open).
| DTC Code |
DTC Detection Condition |
Trouble Area |
| U1002 |
Lost communication with the gateway module. |
|
- For vehicles with a TOYOTA parking assist-sensor system (for 4 sensor type).
WIRING DIAGRAM
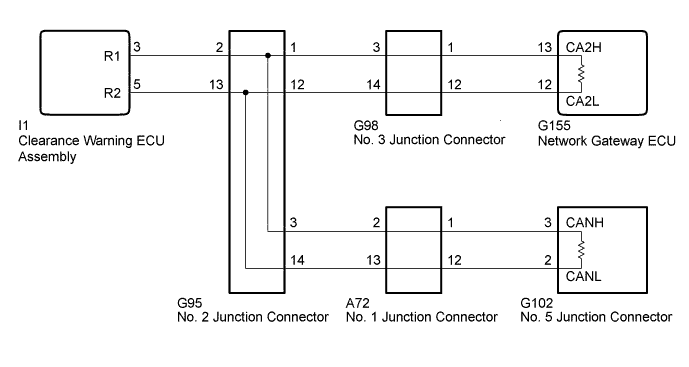

INSPECTION PROCEDURE
- HINT:
- Operating the ignition switch, any switches or any doors triggers related ECU and sensor communication with the CAN, which causes resistance variation.
| 1. DISCONNECT CABLE FROM NEGATIVE BATTERY TERMINAL |

Disconnect the cable from the negative (-) battery terminal before measuring the resistances of the CAN main wire and the CAN branch wire.
- CAUTION:
- Wait at least 90 seconds after disconnecting the cable from the negative (-) battery terminal to disable the airbag system.
- NOTICE:
- After turning the ignition switch off, waiting time may be required before disconnecting the cable from the battery terminal. Therefore, make sure to read the disconnecting the cable from the battery terminal notice before proceeding with work (Click here).
- When disconnecting the cable, some systems need to be initialized after the cable is reconnected (Click here).
- After turning the ignition switch off, waiting time may be required before disconnecting the cable from the battery terminal. Therefore, make sure to read the disconnecting the cable from the battery terminal notice before proceeding with work (Click here).
| NEXT | |
 |
| 2. CHECK CAN BUS WIRE (CHECK CAN MAIN WIRE FOR DISCONNECTION, CHECK BUS LINE FOR SHORT) |
Measure the resistance according to the value(s) in the table below.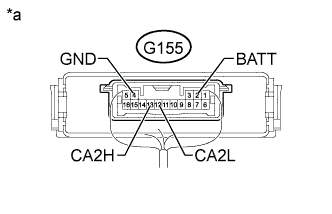
- Standard Resistance:
Tester Connection
Switch Condition
Specified Condition
Resistance: Malfunction
G155-13 (CA2H) - G155-12 (CA2L)
Ignition switch off
54 to 69 Ω
Below 53 Ω: Short in line
G155-13 (CA2H) - G155-12 (CA2L)
Ignition switch off
54 to 69 Ω
Higher than 70 Ω: Open in CAN main bus line
G155-13 (CA2H) - G155-2 (BATT)
Ignition switch off
6 kΩ or higher
Below 6 kΩ: +B short
G155-12 (CA2L) - G155-2 (BATT)
Ignition switch off
6 kΩ or higher
Below 6 kΩ: +B short
G155-13 (CA2H) - G155-4 (GND)
Ignition switch off
200 Ω or higher
Below 200 Ω: Ground short
G155-12 (CA2L) - G155-4 (GND)
Ignition switch off
200 Ω or higher
Below 200 Ω: Ground short
Text in Illustration *a
Component with harness connected
(Network Gateway ECU)
Result Result
Proceed to
NG - Open in CAN main bus line
A
NG - Short in line
- +B short
- GND short
B
OK
C
|
|
||||
|
|
||||

| A | |
|
| 3. CHECK FOR OPEN IN CAN BUS WIRE (NO. 2 JUNCTION CONNECTOR - NETWORK GATEWAY ECU) |
Disconnect the G95 No. 2 junction connector.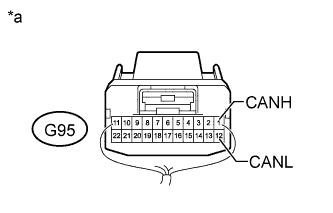
Measure the resistance according to the value(s) in the table below.
- Standard Resistance:
Tester Connection
Switch Condition
Specified Condition
G95-1 (CANH) - G95-12 (CANL)
Ignition switch off
108 to 132 Ω
Text in Illustration *a
Rear view of wire harness connector
(to No. 2 Junction Connector)
|
|
||||
| OK | |
|
| 4. CHECK FOR OPEN IN CAN BUS WIRE (NO. 2 JUNCTION CONNECTOR - NO. 5 JUNCTION CONNECTOR) |
Measure the resistance according to the value(s) in the table below.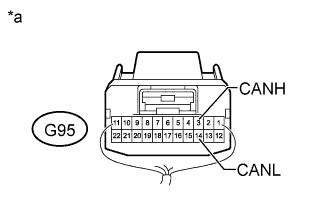
- Standard Resistance:
Tester Connection
Switch Condition
Specified Condition
G95-3 (CANH) - G95-14 (CANL)
Ignition switch off
108 to 132 Ω
Text in Illustration *a
Rear view of wire harness connector
(to No. 2 Junction Connector)
|
|
||||
| OK | ||
 |
||
| ||
| 5. CONNECT CONNECTOR |
Reconnect the G95 No. 2 junction connector.
| NEXT | |
|
| 6. CHECK FOR OPEN IN CAN BUS WIRE (NO. 3 JUNCTION CONNECTOR - NETWORK GATEWAY ECU) |
Disconnect the G98 No. 3 junction connector.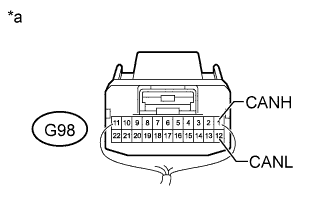
Measure the resistance according to the value(s) in the table below.
- Standard Resistance:
Tester Connection
Switch Condition
Specified Condition
G98-1 (CANH) - G98-12 (CANL)
Ignition switch off
108 to 132 Ω
Text in Illustration *a
Rear view of wire harness connector
(to No. 3 Junction Connector)
|
|
||||
| OK | |
|
| 7. CHECK FOR OPEN IN CAN BUS WIRE (NO. 3 JUNCTION CONNECTOR - NO. 2 JUNCTION CONNECTOR) |
Measure the resistance according to the value(s) in the table below.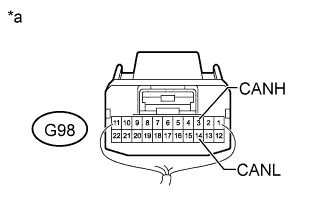
- Standard Resistance:
Tester Connection
Switch Condition
Specified Condition
G98-3 (CANH) - G98-14 (CANL)
Ignition switch off
108 to 132 Ω
Text in Illustration *a
Rear view of wire harness connector
(to No. 3 Junction Connector)
|
|
||||

| OK | ||
|
||
| ||
| 8. CONNECT CONNECTOR |
Reconnect the G98 No. 3 junction connector.
| NEXT | |
|
| 9. CHECK FOR OPEN IN CAN BUS WIRE (NETWORK GATEWAY ECU) |
Disconnect the G155 network gateway ECU connector.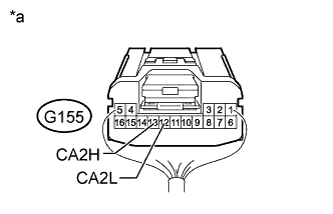
Measure the resistance according to the value(s) in the table below.
- Standard Resistance:
Tester Connection
Switch Condition
Specified Condition
G155-13 (CA2H) - G155- 12 (CA2L)
Ignition switch off
108 to 132 Ω
Text in Illustration *a
Rear view of wire harness connector
(to Network Gateway ECU)
|
|
||||
| OK | ||
|
||
| ||
| 10. CONNECT CONNECTOR |
Reconnect the G95 No. 2 junction connector.
| NEXT | |
|
| 11. CHECK FOR OPEN IN CAN BUS WIRE (NO. 1 JUNCTION CONNECTOR - NO. 5 JUNCTION CONNECTOR) |
Disconnect the A72 No. 1 junction connector.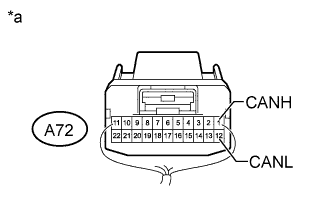
Measure the resistance according to the value(s) in the table below.
- Standard Resistance:
Tester Connection
Switch Condition
Specified Condition
A72-1 (CANH) - A72-12 (CANL)
Ignition switch off
108 to 132 Ω
Text in Illustration *a
Rear view of wire harness connector
(to No. 1 Junction Connector)
|
|
||||
| OK | |
|
| 12. CHECK FOR OPEN IN CAN BUS WIRE (NO. 1 JUNCTION CONNECTOR - NO. 2 JUNCTION CONNECTOR) |
Measure the resistance according to the value(s) in the table below.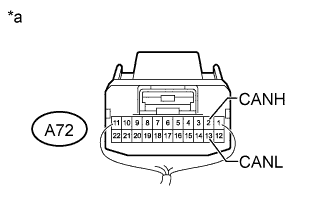
- Standard Resistance:
Tester Connection
Switch Condition
Specified Condition
A72-2 (CANH) - A72-13 (CANL)
Ignition switch off
108 to 132 Ω
Text in Illustration *a
Rear view of wire harness connector
(to No. 1 Junction Connector)
|
|
||||
| OK | ||
|
||
| ||
| 13. CONNECT CONNECTOR |
Reconnect the A72 No. 1 junction connector.
| NEXT | |
|
| 14. CHECK FOR OPEN IN CAN BUS WIRE (NO. 5 JUNCTION CONNECTOR) |
Disconnect the G102 No. 5 junction connector.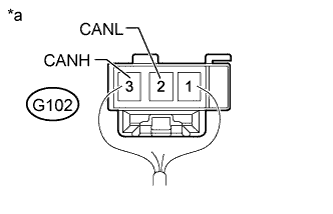
Measure the resistance according to the value(s) in the table below.
- Standard Resistance:
Tester Connection
Switch Condition
Specified Condition
G102-3 (CANH) - G102-2 (CANL)
Ignition switch off
108 to 132 Ω
Text in Illustration *a
Rear view of wire harness connector
(to No. 5 Junction Connector)
|
|
||||
| OK | ||
|
||
| ||
| 15. CHECK FOR SHORT IN CAN BUS WIRES (NO. 1 JUNCTION CONNECTOR SIDE) |
Disconnect the A72 No. 1 junction connector.
Measure the resistance according to the value(s) in the table below.
- Standard Resistance:
Tester Connection
Switch Condition
Specified Condition
G155-13 (CA2H) - G155-12 (CA2L)
Ignition switch off
108 to 132 Ω
G155-13 (CA2H) - G155-4 (GND)
Ignition switch off
200 Ω or higher
G155-12 (CA2L) - G155-4 (GND)
Ignition switch off
200 Ω or higher
G155-13 (CA2H) - G155-2 (BATT)
Ignition switch off
6 kΩ or higher
G155-12 (CA2L) - G155-2 (BATT)
Ignition switch off
6 kΩ or higher
Text in Illustration *a
Component with harness connected
(Network Gateway ECU)
|
|
||||
| OK | |
|
| 16. CHECK FOR SHORT IN CAN BUS WIRES (NO. 1 JUNCTION CONNECTOR - NO. 5 JUNCTION CONNECTOR) |
Measure the resistance according to the value(s) in the table below.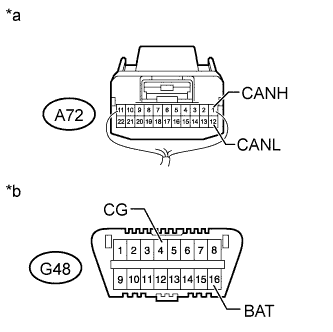
- Standard Resistance:
Tester Connection
Switch Condition
Specified Condition
A72-1 (CANH) - A72-12 (CANL)
Ignition switch off
108 to 132 Ω
A72-1 (CANH) - G48-4 (CG)
Ignition switch off
200 Ω or higher
A72-12 (CANL) - G48-4 (CG)
Ignition switch off
200 Ω or higher
A72-1 (CANH) - G48-16 (BAT)
Ignition switch off
6 kΩ or higher
A72-12 (CANL) - G48-16 (BAT)
Ignition switch off
6 kΩ or higher
Text in Illustration *a
Rear view of wire harness connector
(to No. 1 Junction Connector)
*b
Front view of DLC3
|
|
||||
| OK | ||
|
||
| ||
| 17. CONNECT CONNECTOR |
Reconnect the A72 No. 1 junction connector.
| NEXT | |
|
| 18. CHECK FOR SHORT IN CAN BUS WIRES (NO. 5 JUNCTION CONNECTOR) |
Disconnect the G102 No. 5 junction connector.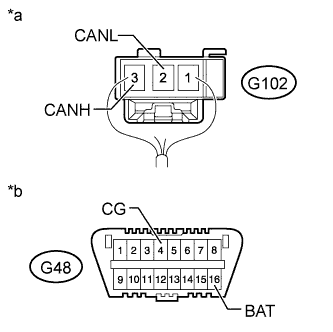
Measure the resistance according to the value(s) in the table below.
- Standard Resistance:
Tester Connection
Switch Condition
Specified Condition
G102-3 (CANH) - G102-2 (CANL)
Ignition switch off
108 to 132 Ω
G102-3 (CANH) - G48-4 (CG)
Ignition switch off
200 Ω or higher
G102-2 (CANL) - G48-4 (CG)
Ignition switch off
200 Ω or higher
G102-3 (CANH) - G48-16 (BAT)
Ignition switch off
6 kΩ or higher
G102-2 (CANL) - G48-16 (BAT)
Ignition switch off
6 kΩ or higher
Text in Illustration *a
Rear view of wire harness connector
(to No. 5 Junction Connector)
*b
Front view of DLC3
|
|
||||
| OK | ||
|
||
| ||
| 19. CONNECT CONNECTOR |
Reconnect the A72 No. 1 junction connector.
| NEXT | |
|
| 20. CHECK FOR SHORT IN CAN BUS WIRES (NO. 2 JUNCTION CONNECTOR - NO. 1 JUNCTION CONNECTOR) |
Disconnect the G95 No. 2 junction connector.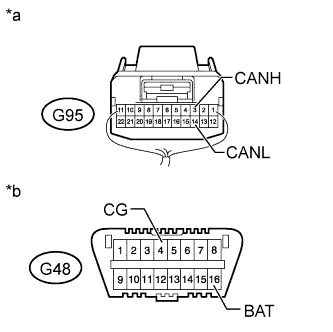
Measure the resistance according to the value(s) in the table below.
- Standard Resistance:
Tester Connection
Switch Condition
Specified Condition
G95-3 (CANH) - G95-14 (CANL)
Ignition switch off
108 to 132 Ω
G95-3 (CANH) - G48-4 (CG)
Ignition switch off
200 Ω or higher
G95-14 (CANL) - G48-4 (CG)
Ignition switch off
200 Ω or higher
G95-3 (CANH) - G48-16 (BAT)
Ignition switch off
6 kΩ or higher
G95-14 (CANL) - G48-16 (BAT)
Ignition switch off
6 kΩ or higher
Text in Illustration *a
Rear view of wire harness connector
(to No. 2 Junction Connector)
*b
Front view of DLC3
|
|
||||
| OK | |
|
| 21. CHECK FOR SHORT IN CAN BUS WIRES (NO. 2 JUNCTION CONNECTOR SIDE) |
Measure the resistance according to the value(s) in the table below.
- Standard Resistance:
Tester Connection
Switch Condition
Specified Condition
G155-13 (CA2H) - G155-12 (CA2L)
Ignition switch off
108 to 132 Ω
G155-13 (CA2H) - G155-4 (GND)
Ignition switch off
200 Ω or higher
G155-12 (CA2L) - G155-4 (GND)
Ignition switch off
200 Ω or higher
G155-13 (CA2H) - G155-2 (BATT)
Ignition switch off
6 kΩ or higher
G155-12 (CA2L) - G155-2 (BATT)
Ignition switch off
6 kΩ or higher
Text in Illustration *a
Component with harness connected
(Network Gateway ECU)
|
|
||||
| OK | |
|
| 22. CHECK FOR SHORT IN CAN BUS WIRES (NO. 2 JUNCTION CONNECTOR - CLEARANCE WARNING ECU ASSEMBLY) |
Measure the resistance according to the value(s) in the table below.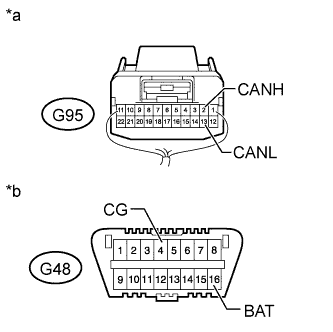
- Standard Resistance:
Tester Connection
Switch Condition
Specified Condition
G95-2 (CANH) - G95-13 (CANL)
Ignition switch off
200 Ω or higher
G95-2 (CANH) - G48-4 (CG)
Ignition switch off
200 Ω or higher
G95-13 (CANL) - G48-4 (CG)
Ignition switch off
200 Ω or higher
G95-2 (CANH) - G48-16 (BAT)
Ignition switch off
6 kΩ or higher
G95-13 (CANL) - G48-16 (BAT)
Ignition switch off
6 kΩ or higher
Text in Illustration *a
Rear view of wire harness connector
(to No. 2 Junction Connector)
*b
Front view of DLC3
|
|
||||
| OK | ||
|
||
| ||
| 23. CONNECT CONNECTOR |
Reconnect the G95 No. 2 junction connector.
| NEXT | |
|
| 24. CHECK FOR SHORT IN CAN BUS WIRES (CLEARANCE WARNING ECU ASSEMBLY) |
Disconnect the I1 clearance warning ECU assembly connector.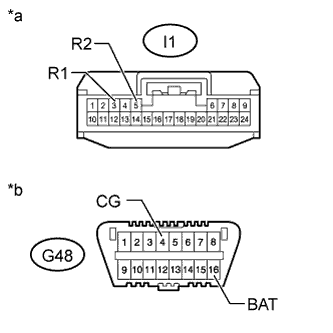
Measure the resistance according to the value(s) in the table below.
- Standard Resistance:
Tester Connection
Switch Condition
Specified Condition
I1-3 (R1) - I1-5 (R2)
Ignition switch off
54 to 69 Ω
I1-3 (R1) - G48-4 (CG)
Ignition switch off
200 Ω or higher
I1-5 (R2) - G48-4 (CG)
Ignition switch off
200 Ω or higher
I1-3 (R1) - G48-16 (BAT)
Ignition switch off
6 kΩ or higher
I1-5 (R2) - G48-16 (BAT)
Ignition switch off
6 kΩ or higher
Text in Illustration *a
Front view of wire harness connector
(to Clearance Warning ECU Assembly)
*b
Front view of DLC3
|
|
||||
| OK | ||
|
||
| ||
| 25. CONNECT CONNECTOR |
Reconnect the G95 No. 2 junction connector.
| NEXT | |
|
| 26. CHECK FOR SHORT IN CAN BUS WIRES (NO. 3 JUNCTION CONNECTOR - NO. 2 JUNCTION CONNECTOR) |
Disconnect the G98 No. 3 junction connector.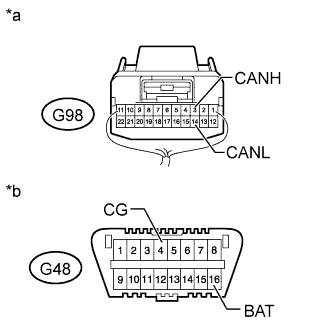
Measure the resistance according to the value(s) in the table below.
- Standard Resistance:
Tester Connection
Switch Condition
Specified Condition
G98-3 (CANH) - G98-14 (CANL)
Ignition switch off
108 to 132 Ω
G98-3 (CANH) - G48-4 (CG)
Ignition switch off
200 Ω or higher
G98-14 (CANL) - G48-4 (CG)
Ignition switch off
200 Ω or higher
G98-3 (CANH) - G48-16 (BAT)
Ignition switch off
6 kΩ or higher
G98-14 (CANL) - G48-16 (BAT)
Ignition switch off
6 kΩ or higher
Text in Illustration *a
Rear view of wire harness connector
(to No. 3 Junction Connector)
*b
Front view of DLC3
|
|
||||
| OK | |
|
| 27. CHECK FOR SHORT IN CAN BUS WIRES (NO. 3 JUNCTION CONNECTOR - NETWORK GATEWAY ECU) |
Measure the resistance according to the value(s) in the table below.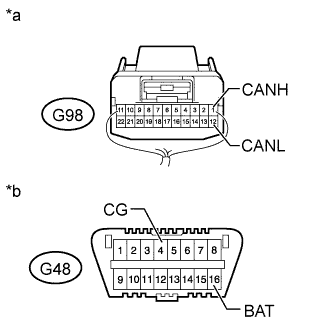
- Standard Resistance:
Tester Connection
Switch Condition
Specified Condition
G98-1 (CANH) - G98-12 (CANL)
Ignition switch off
108 to 132 Ω
G98-1 (CANH) - G48-4 (CG)
Ignition switch off
200 Ω or higher
G98-12 (CANL) - G48-4 (CG)
Ignition switch off
200 Ω or higher
G98-1 (CANH) - G48-16 (BAT)
Ignition switch off
6 kΩ or higher
G98-12 (CANL) - G48-16 (BAT)
Ignition switch off
6 kΩ or higher
Text in Illustration *a
Rear view of wire harness connector
(to No. 3 Junction Connector)
*b
Front view of DLC3
|
|
||||
| OK | ||
|
||
| ||
| 28. CONNECT CONNECTOR |
Reconnect the G98 No. 3 junction connector.
| NEXT | |
|
| 29. CHECK FOR SHORT IN CAN BUS WIRES (NETWORK GATEWAY ECU) |
Disconnect the G155 network gateway ECU connector.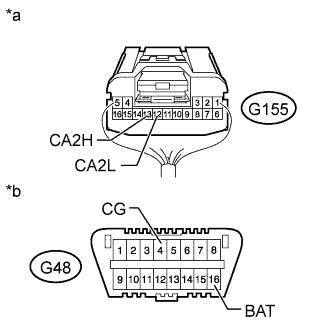
Measure the resistance according to the value(s) in the table below.
- Standard Resistance:
Tester Connection
Switch Condition
Specified Condition
G155-13 (CA2H) - G155-12 (CA2L)
Ignition switch off
108 to 132 Ω
G155-13 (CA2H) - G48-4 (CG)
Ignition switch off
200 Ω or higher
G155-12 (CA2L) - G48-4 (CG)
Ignition switch off
200 Ω or higher
G155-13 (CA2H) - G48-16 (BAT)
Ignition switch off
6 kΩ or higher
G155-12 (CA2L) - G48-16 (BAT)
Ignition switch off
6 kΩ or higher
Text in Illustration *a
Rear view of wire harness connector
(to Network Gateway ECU)
*b
Front view of DLC3
|
|
||||
| OK | ||
|
||
| ||
| 30. CHECK HARNESS AND CONNECTOR (NETWORK GATEWAY ECU - BATTERY AND BODY GROUND) |
Connect the cable to the negative (-) battery terminal.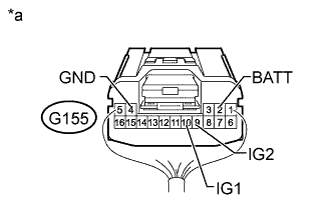
- NOTICE:
- When disconnecting the cable, some systems need to be initialized after the cable is reconnected (Click here).
Disconnect the G155 network gateway ECU connector.
Measure the resistance according to the value(s) in the table below.
- Standard Resistance:
Tester Connection
Condition
Specified Condition
G155-4 (GND) - Body ground
Always
Below 1 Ω
Measure the voltage according to the value(s) in the table below.
- Standard Voltage:
Tester Connection
Condition
Specified Condition
G155-2 (BATT) - Body ground
Always
11 to 14 V
G155-10 (IG1) - Body ground
Ignition switch ON
11 to 14 V
G155-9 (IG2) - Body ground
Ignition switch ON
11 to 14 V
| *a |
Rear view of wire harness connector (to Network Gateway ECU) |
|
|
||||
| OK | ||
|
||
| ||