Home › Engine / Hybrid System › 1GD-FTV (ENGINE CONTROL) › ECD SYSTEM (w/ Urea SCR System) › 2015.06–2017.08
RM27T0E _51 Engine / Hybrid System _053660 1GD-FTV ENGINE CONTROL _0260461 ECD SYSTEM(w/ Urea SCR System) J

1GD-FTV ENGINE CONTROL  ECD SYSTEM(w/ Urea SCR System)  ECM Power Source Circuit  


DESCRIPTION

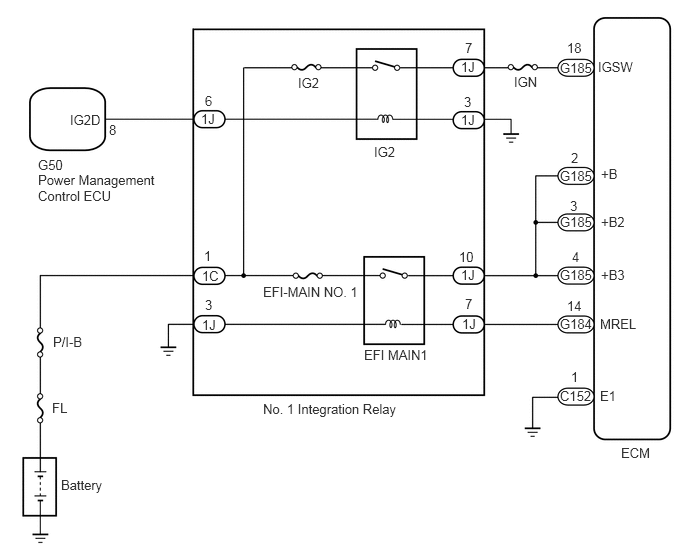
When the engine switch is turned on (IG), the battery voltage is applied to terminal IGSW of the ECM. The MREL output signal from ECM causes a current to flow to the coil, closing the contacts of the EFI MAIN1 relay and supplying power to terminal +B, +B2 and +B3 of the ECM.

WIRING DIAGRAM
A390288E01
0.542,4.167 0.854,4.365 0.313,0.198 10 false FL 1.135,1.271 1.448,1.469 0.313,0.198 10 false 8 0.635,4.969 1.292,5.177 0.656,0.208 10 false Battery 0.396,1.635 0.708,1.833 0.313,0.198 10 false G50 0.729,1.167 1.135,1.365 0.406,0.198 10 false IG2D 0.396,1.792 1.646,2.146 1.25,0.354 10 false Power Management Control ECU 0.552,3.479 1.063,3.698 0.51,0.219 10 false P/I-B 2.74,4.177 4.25,4.427 1.51,0.25 10 false No. 1 Integration Relay 2.74,2.958 3.844,3.198 1.104,0.24 10 false EFI-MAIN NO. 1 3.792,3.615 4.635,3.844 0.844,0.229 10 false EFI MAIN1 3.896,1.5 4.302,1.698 0.406,0.198 10 false IG2 3.104,0.781 3.51,0.979 0.406,0.198 10 false IG2 6.469,4.635 6.917,4.885 0.448,0.25 10 false ECM 5.354,0.771 5.76,0.969 0.406,0.198 10 false IGN 4.802,0.615 5.115,0.813 0.313,0.198 10 false 1J 4.802,1.167 5.115,1.365 0.313,0.198 10 false 1J 2.094,1.156 2.406,1.354 0.313,0.198 10 false 1J 2.104,2.792 2.417,2.99 0.313,0.198 10 false 1C 2.104,3.302 2.417,3.5 0.313,0.198 10 false 1J 4.802,2.781 5.115,2.979 0.313,0.198 10 false 1J 4.813,3.292 5.125,3.49 0.313,0.198 10 false 1J 5.833,4.042 6.229,4.24 0.396,0.198 10 false C152 5.833,0.625 6.354,0.833 0.521,0.208 10 false G185 2.135,0.969 2.458,1.188 0.323,0.219 10 false 6 2.125,2.583 2.448,2.802 0.323,0.219 10 false 1 2.135,3.094 2.458,3.313 0.323,0.219 10 false 3 4.781,2.594 5.104,2.813 0.323,0.219 10 false 10 4.844,3.083 5.167,3.302 0.323,0.219 10 false 7 5.906,0.417 6.229,0.635 0.323,0.219 10 false 18 4.833,0.979 5.156,1.198 0.323,0.219 10 false 3 4.844,0.417 5.167,0.635 0.323,0.219 10 false 7 5.833,1.75 6.354,1.958 0.521,0.208 10 false G185 5.833,2.229 6.354,2.438 0.521,0.208 10 false G185 5.833,2.781 6.354,2.99 0.521,0.208 10 false G185 5.833,3.292 6.354,3.5 0.521,0.208 10 false G184 5.948,1.563 6.271,1.781 0.323,0.219 10 false 2 5.938,2.063 6.26,2.281 0.323,0.219 10 false 3 5.958,2.594 6.281,2.813 0.323,0.219 10 false 4 5.906,3.104 6.229,3.323 0.323,0.219 10 false 14 5.948,3.844 6.271,4.063 0.323,0.219 10 false 1 6.229,0.615 6.875,0.896 0.646,0.281 10 false IGSW 6.26,1.729 6.906,2.01 0.646,0.281 10 false +B 6.25,3.292 6.896,3.573 0.646,0.281 10 false MREL 6.25,4.042 6.896,4.323 0.646,0.281 10 false E1 6.26,2.229 6.906,2.51 0.646,0.281 10 false +B2 6.26,2.781 6.906,3.063 0.646,0.281 10 false +B3

CAUTION / NOTICE / HINT

NOTICE:
·

Inspect the fuses of circuits related to this system before performing the following inspection procedure.


PROCEDURE
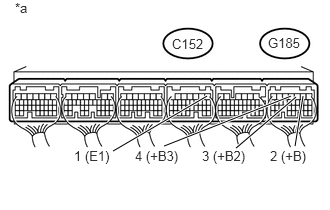
1.CHECK TERMINAL VOLTAGE (+B, +B2 AND +B3 TERMINAL VOLTAGE)
a.
U169485E03
2.156,1 1.177,1.573 true 3.031,1 1.708,1.521 true 3.083,1.01 2.458,1.542 true 3.156,1 3.073,1.521 true 1.792,0.375 2.208,0.563 0.417,0.188 10 false C152 0.156,0 0.406,0.208 0.25,0.208 10 false *a 2.792,0.365 3.188,0.552 0.396,0.188 10 false G185 0.771,1.542 1.26,1.75 0.49,0.208 10 false 1 (E1) 1.406,1.542 1.938,1.75 0.531,0.208 10 false 4 (+B3) 2.104,1.542 2.635,1.75 0.531,0.208 10 false 3 (+B2) 2.813,1.542 3.271,1.75 0.458,0.208 10 false 2 (+B)

Turn the engine switch on (IG).


b.

Measure the voltage according to the value(s) in the table below.

Standard Voltage:
Tester Connection Condition Specified Condition
G185-2 (+B) - C152-1 (E1) Engine switch on (IG) 11 to 14 V
G185-3 (+B2) - C152-1 (E1) Engine switch on (IG) 11 to 14 V
G185-4 (+B3) - C152-1 (E1) Engine switch on (IG) 11 to 14 V


Text in Illustration
*a Component with harness connected
(ECM)


NG

2.CHECK HARNESS AND CONNECTOR (ECM - BODY GROUND)

OK

CHECK PROCEED TO NEXT SUSPECTED AREA SHOWN IN PROBLEM SYMPTOMS TABLE

2.CHECK HARNESS AND CONNECTOR (ECM - BODY GROUND)
a.

Disconnect the ECM connector.


b.

Measure the resistance according to the value(s) in the table below.

Standard Resistance::
Tester Connection Condition Specified Condition
C152-1 (E1) - Body ground Always Below 1 Ω


c.

Reconnect the ECM connector.


OK

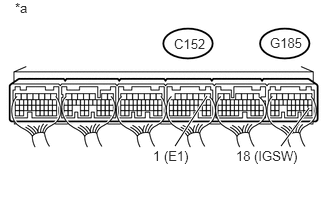
3.CHECK TERMINAL VOLTAGE (IGSW TERMINAL VOLTAGE)

NG

REPAIR OR REPLACE HARNESS OR CONNECTOR

3.CHECK TERMINAL VOLTAGE (IGSW TERMINAL VOLTAGE)
a.
U169486E02
2.156,1 1.823,1.521 true 3.219,1.125 2.927,1.521 true 1.813,0.375 2.229,0.563 0.417,0.188 10 false C152 0.156,0 0.406,0.208 0.25,0.208 10 false *a 2.813,0.365 3.208,0.552 0.396,0.188 10 false G185 1.594,1.542 2.083,1.75 0.49,0.208 10 false 1 (E1) 2.458,1.542 3.219,1.75 0.76,0.208 10 false 18 (IGSW)

Turn the engine switch on (IG).


b.

Measure the voltage according to the value(s) in the table below.

Standard Voltage:
Tester Connection Condition Specified Condition
G185-18 (IGSW) - C152-1 (E1) Engine switch on (IG) 11 to 14 V


Text in Illustration
*a Component with harness connected
(ECM)


OK

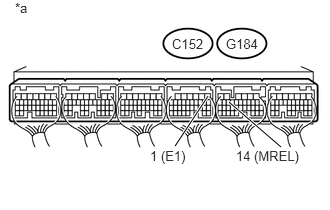
4.CHECK TERMINAL VOLTAGE (MREL TERMINAL VOLTAGE)

NG

7.INSPECT NO. 1 INTEGRATION RELAY (IG2)
4.CHECK TERMINAL VOLTAGE (MREL TERMINAL VOLTAGE)
a.
U169487E02
2.167,1 1.823,1.521 true 2.385,1.063 2.927,1.531 true 1.792,0.375 2.208,0.563 0.417,0.188 10 false C152 0.156,0 0.406,0.208 0.25,0.208 10 false *a 2.354,0.375 2.75,0.563 0.396,0.188 10 false G184 1.563,1.542 2.052,1.75 0.49,0.208 10 false 1 (E1) 2.458,1.542 3.219,1.75 0.76,0.208 10 false 14 (MREL)

Turn the engine switch on (IG).


b.

Measure the voltage according to the value(s) in the table below.

Standard Voltage:
Tester Connection Condition Specified Condition
G184-14 (MREL) - C152-1 (E1) Engine switch on (IG) 11 to 14 V


Text in Illustration
*a Component with harness connected
(ECM)


OK

5.INSPECT NO. 1 INTEGRATION RELAY (EFI MAIN1)

NG

5.INSPECT NO. 1 INTEGRATION RELAY (EFI MAIN1)
a.


OK

6.CHECK HARNESS AND CONNECTOR (NO. 1 INTEGRATION RELAY - ECM)

NG

REPLACE NO. 1 INTEGRATION RELAY (EFI MAIN1)

6.CHECK HARNESS AND CONNECTOR (NO. 1 INTEGRATION RELAY - ECM)
a.

Remove the No. 1 integration relay from the engine room relay block.


b.

Disconnect the ECM connector.


c.

Measure the resistance according to the value(s) in the table below.

Standard Resistance:
Tester Connection Condition Specified Condition
1K-7 - G184-14 (MREL) Always Below 1 Ω
1J-10 - G185-2 (+B) Always Below 1 Ω
1J-10 - G185-3 (+B2) Always Below 1 Ω
1J-10 - G185-4 (+B3) Always Below 1 Ω
1J-3 - Body ground Always Below 1 Ω
1K-7 or G184-14 (MREL) - Body ground and other terminals Always 10 kΩ or higher
1J-10 or G185-2 (+B) - Body ground and other terminals Always 10 kΩ or higher
1J-10 or G185-3 (+B2) - Body ground and other terminals Always 10 kΩ or higher
1J-10 or G185-4 (+B3) - Body ground and other terminals Always 10 kΩ or higher


d.

Reinstall the No. 1 integration relay.


e.

Reconnect the ECM connector.


OK

9.CHECK TERMINAL VOLTAGE (NO. 1 INTEGRATION RELAY)

NG

REPAIR OR REPLACE HARNESS OR CONNECTOR

7.INSPECT NO. 1 INTEGRATION RELAY (IG2)
a.


OK

8.CHECK HARNESS AND CONNECTOR (NO. 1 INTEGRATION RELAY - ECM)

NG

REPLACE NO. 1 INTEGRATION RELAY (IG2)

8.CHECK HARNESS AND CONNECTOR (NO. 1 INTEGRATION RELAY - ECM)
a.

Remove the No. 1 integration relay from the engine room relay block.


b.

Disconnect the ECM connector.


c.

Measure the resistance according to the value(s) in the table below.

Standard Resistance:
Tester Connection Condition Specified Condition
1J-7 - G185-18 (IGSW) Always Below 1 Ω
1J-3 - Body ground Always Below 1 Ω
1J-7 or G185-18 (IGSW) - Body ground and other terminals Always 10 kΩ or higher


d.

Reinstall the No. 1 integration relay.


e.

Reconnect the ECM connector.


OK

9.CHECK TERMINAL VOLTAGE (NO. 1 INTEGRATION RELAY)

NG

REPAIR OR REPLACE HARNESS OR CONNECTOR

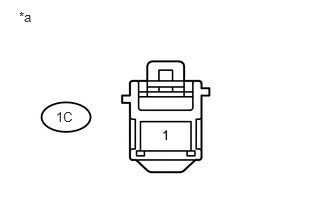
9.CHECK TERMINAL VOLTAGE (NO. 1 INTEGRATION RELAY)
a.
U169115E03
0.583,1.135 0.948,1.323 0.365,0.188 10 false 1C 0.198,0.094 0.448,0.302 0.25,0.208 10 false *a

Remove the No. 1 integration relay from the engine room relay block.


b.

Measure the voltage according to the value(s) in the table below.

Standard Voltage:
Tester Connection Condition Specified Condition
1C-1 - Body ground Engine switch on (IG) 11 to 14 V


Text in Illustration
*a Front view of wire harness connector
(to No. 1 Integration Relay)


c.

Reinstall the No. 1 integration relay.


OK

10.CHECK HARNESS AND CONNECTOR (POWER MANAGEMENT CONTROL ECU - NO. 1 INTEGRATION RELAY)

NG

REPAIR OR REPLACE HARNESS OR CONNECTOR (BATTERY - NO. 1 INTEGRATION RELAY)

10.CHECK HARNESS AND CONNECTOR (POWER MANAGEMENT CONTROL ECU - NO. 1 INTEGRATION RELAY)
a.

Disconnect the power management control ECU connector.


b.

Remove the No. 1 integration relay from the engine room relay block.


c.

Measure the resistance according to the value(s) in the table below.

Standard Resistance::
Tester Connection Condition Specified Condition
G50-8 (IG2D) - 1J-6 Always Below 1 Ω
G50-8 (IG2D) or 1J-6 - Body ground and other terminals Always 10 kΩ or higher


d.

Reconnect the power management control ECU connector.


e.

Reinstall the No. 1 integration relay.


OK

NG

REPAIR OR REPLACE HARNESS OR CONNECTOR