1KD-FTV ENGINE MECHANICAL TIMING BELT INSTALLATION
PROCEDURE

 13505
1.INSTALL NO. 1 TIMING BELT IDLER SUB-ASSEMBLY
Using a 10 mm hexagon wrench, install a new washer and the No. 1 timing belt idler with the bolt.
- Torque:
- 35 N*m (357 kgf*cm, 26 ft.*lbf)
Check that the idler pulley moves smoothly.
If the idler pulley does not move smoothly, check the installation condition of the idler and washer.
13568
2.INSTALL TIMING BELT
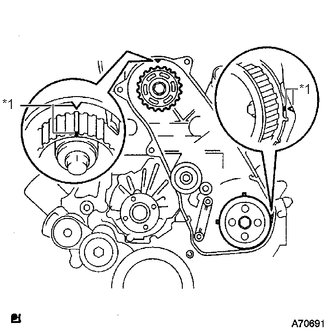
Check that the timing marks are aligned as shown in the illustration.
| *1 | Timing Mark |
- HINT:
-
If reusing the timing belt, align the points marked during removal, and install the belt with the arrow pointing in the direction of crankshaft revolution.
- NOTICE:
- ·
Make sure that the engine is cold.
·When turning the crankshaft, the valve heads will hit against the piston. Do not turn the crankshaft more than necessary.
Install the timing belt to the pump drive shaft pulley, camshaft timing pulley and No. 1 timing belt idler in sequence.
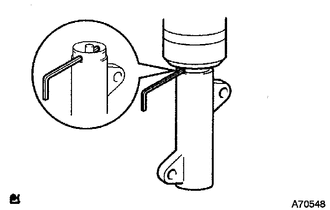
Place the tensioner upright. Then set a press on the top of the tensioner.
- NOTICE:
- ·
Do not scratch or deform the rod end.
·Press in the tensioner rod.
·Protect the tip of the push rod with a cloth in order to prevent damage.
Using the press, slowly push in the push rod using 981 to 9807 N (100 to 1000 kgf, 220 to 2205 lbf) of force.
- NOTICE:
-
Do not apply a load of over 9807 N (1000 kgf, 2205 lbf) to the push rod.
Align the holes of the push rod and housing. Then pass a 1.5 mm hexagon wrench through the holes to fix the push rod in place.
Temporarily install the timing belt tensioner with the 2 bolts while pushing the idler pulley toward the timing belt.
Tighten the 2 bolts.
- Torque:
- 13 N*m (133 kgf*cm, 10 ft.*lbf)
- NOTICE:
-
Uniformly tighten the 2 bolts.
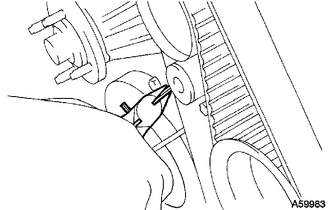
Remove the 1.5 mm hexagon wrench from the tensioner.
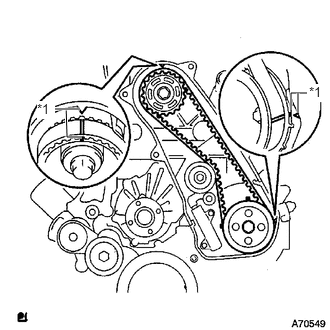
Turn the crankshaft clockwise 720° and check that the timing marks are aligned as shown in the illustration.
| *1 | Timing Mark |
11322A
3.INSTALL NO. 1 TIMING BELT COVER
Install the timing belt cover and 6 washers with the 6 bolts.
- Torque:
- 6.0 N*m (61 kgf*cm, 53 in.*lbf)
16711
4.INSTALL FAN SHROUD
16571C
5.INSTALL NO. 1 RADIATOR HOSE
6.ADD ENGINE COOLANT
7.INSPECT FOR COOLANT LEAK
51405A
8.INSTALL NO. 1 ENGINE UNDER COVER SUB-ASSEMBLY
52129B
9.INSTALL FRONT BUMPER LOWER COVER