1KD-FTV ENGINE MECHANICAL ENGINE ASSEMBLY INSTALLATION
PROCEDURE

 12361
1.INSTALL FRONT ENGINE MOUNTING INSULATOR
Install the 2 front engine mounting insulator with the 2 nuts.
- Torque:
- 76 N*m (775 kgf*cm, 56 ft.*lbf)
82121
2.INSTALL ENGINE WIRE
Install the engine wire to the engine.
3.REMOVE ENGINE FROM ENGINE STAND
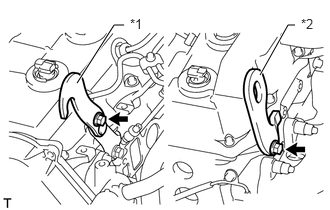
Install 2 engine hangers with 2 bolts as shown in the illustration.
- HINT:
-
Part No.
| No. 1 engine hanger | 12284-30020 |
| No. 2 engine hanger | 12282-67030 |
| Bolt | 91552-81014 and 91642-81030 |
- Torque:
- for No. 1 engine hanger : 25 N*m (255 kgf*cm, 18 ft.*lbf)
- for No. 2 engine hanger : 60 N*m (612 kgf*cm, 44 ft.*lbf)
| *1 | No. 1 Engine Hanger |
| *2 | No. 2 Engine Hanger |
- NOTICE:
-
Install the engine hangers with new bolts.
Attach an engine sling device and hang the engine with a chain block.
Remove the engine from the engine stand.
11355
4.INSTALL REAR END PLATE
Install the rear end plate with the bolts.
- Torque:
- 8.0 N*m (82 kgf*cm, 71 in.*lbf)
32111
5.INSTALL PUMP IMPELLER DRIVE PLATE (for Automatic Transmission)
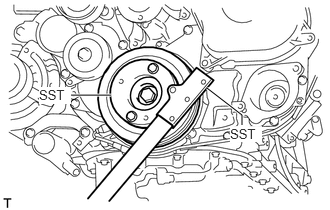
Using SST, hold the crankshaft pulley.
- SST
- 09213-58014
09330-00021
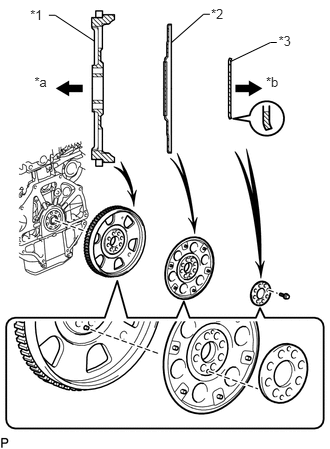
Install the flywheel and ring gear, the pump impeller drive plate and the rear drive plate spacer to the crankshaft.
| *1 | Flywheel and Ring Gear |
| *2 | Pump Impeller Drive Plate |
| *3 | Rear Drive Plate Spacer |
| *a | Engine Side |
| *b | Transmission Side |
- NOTICE:
-
Align either hole in the pump impeller drive plate and either hole in the rear drive plate spacer with the knock pin of the flywheel and ring gear, and then install the flywheel and ring gear, the pump impeller drive plate and the rear drive plate spacer to the crankshaft.
- HINT:
-
As the rear drive plate spacer and pump impeller drive plate are not reversible, be sure to install them in the direction shown in the illustration.
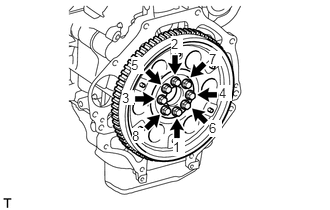
Uniformly install and tighten the 8 bolts in several steps in the sequence shown in the illustration.
- NOTICE:
-
Do not start the engine for at least an hour after installing the flywheel and ring gear.
- Torque:
- 178 N*m (1815 kgf*cm, 131 ft.*lbf)
13405
6.INSTALL FLYWHEEL SUB-ASSEMBLY (for Manual Transmission)
Clean the bolts and their holes.
Apply adhesive to 2 or 3 threads at the end of each bolt.
- Adhesive:
Toyota Genuine Adhesive 1324, Three Bond 1324 or equivalent
Using SST, hold the crankshaft pulley.
- SST
- 09213-58014
09330-00021
Install the flywheel to the crankshaft.
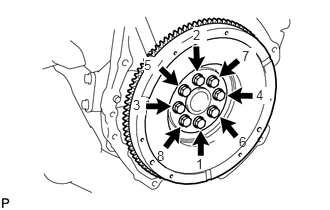
Uniformly install and tighten the 8 bolts in the sequence shown in the illustration.
- Torque:
- 178 N*m (1815 kgf*cm, 131 ft.*lbf)
- NOTICE:
-
Do not start the engine for at least 1 hour after installation.
31250
7.INSTALL CLUTCH DISC ASSEMBLY (for Manual Transmission)
31210
8.INSTALL CLUTCH COVER ASSEMBLY (for Manual Transmission)
31210
9.INSPECT AND ADJUST CLUTCH COVER ASSEMBLY
10.INSTALL ENGINE ASSEMBLY
Slowly lower the engine into the engine compartment.
Install the engine with the 4 bolts and 4 nuts.
- Torque:
- 40 N*m (408 kgf*cm, 30 ft.*lbf)
- HINT:
-
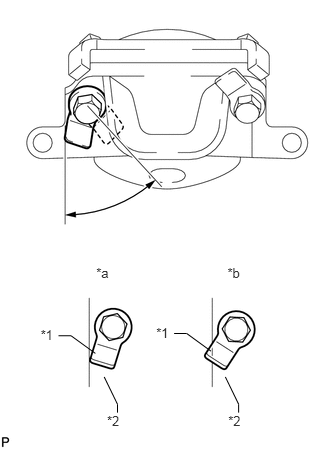 1.002,2.761 1.174,2.951 0.172,0.190 10 *a 2.369,2.761 2.540,2.951 0.172,0.190 10 *b 0.993,3.681 0.74,3.497 0.74,3.497 0.609,3.497 false 0.423,3.407 0.584,3.562 0.161,0.155 10 *1 1.114,4.301 1.276,4.456 0.161,0.155 10 *2 2.197,3.657 1.944,3.473 1.944,3.473 1.813,3.473 false 1.627,3.383 1.788,3.538 0.161,0.155 10 *1 1.085,3.926 1.224,4.212 1.224,4.212 1.224,4.298 false 2.377,4.301 2.538,4.456 0.161,0.155 10 *2 2.347,3.926 2.486,4.212 2.486,4.212 2.486,4.298 false
-
For RHD vehicles only:
-
When tightening the nut closer to the rear of the vehicle for the engine mounting bracket on the right side, make sure that the claw (stopper) of the bolt does not protrude past the rear edge of the bracket.
| *1 | Claw (Stopper) |
| *2 | Bracket |
| *a | Correct |
| *b | Incorrect |
Remove the 2 bolts and 2 engine hangers.
12371
11.INSTALL REAR NO. 1 ENGINE MOUNTING INSULATOR
- HINT:
-
Perform this procedure only when replacement of the rear No. 1 engine mounting insulator is necessary.
Install the 4 bolts and rear No. 1 engine mounting insulator.
- Torque:
- 65 N*m (663 kgf*cm, 48 ft.*lbf)
12.INSTALL AUTOMATIC TRANSMISSION ASSEMBLY (for Automatic Transmission)
Install the automatic transmission (See page Drivetrain>A750F (AUTOMATIC TRANSMISSION / TRANSAXLE)>AUTOMATIC TRANSMISSION ASSEMBLY>INSTALLATION).
32101A
13.INSTALL DRIVE PLATE AND TORQUE CONVERTER CLUTCH SETTING BOLT (for Automatic Transmission)
14.INSTALL MANUAL TRANSMISSION ASSEMBLY (for Manual Transmission)
Install the manual transmission (See page Drivetrain>RA61F (MANUAL TRANSMISSION / TRANSAXLE)>MANUAL TRANSMISSION ASSEMBLY (for 1KD-FTV)>INSTALLATION).
12156
15.INSTALL OIL PAN INSULATOR
Install the oil pan insulator with the 2 bolts.
- Torque:
- 18 N*m (178 kgf*cm, 13 ft.*lbf)
37110
16.INSTALL PROPELLER SHAFT ASSEMBLY
37140
17.INSTALL FRONT PROPELLER SHAFT ASSEMBLY
17410
18.INSTALL FRONT EXHAUST PIPE ASSEMBLY
28100
19.INSTALL STARTER ASSEMBLY (for 2.2 kW Type)
28100
20.INSTALL STARTER ASSEMBLY (for 2.7 kW Type)
28100
21.INSTALL STARTER ASSEMBLY (for 3.0 kW Type)
82121
22.CONNECT ENGINE WIRE
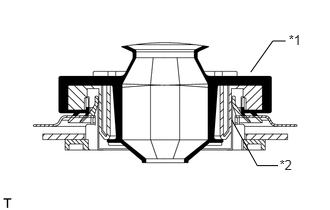
Attach the grommet to the wire harness support.
| *1 | Grommet |
| *2 | Wire Harness Support |
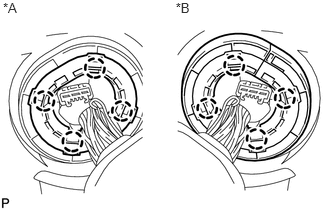
Pass the wire harness into the vehicle and install the wire harness support.
| *A | for LHD |
| *B | for RHD |
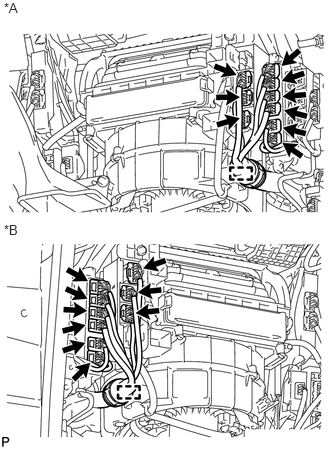
Connect the 9 connectors and attach the clamp.
| *A | for LHD |
| *B | for RHD |
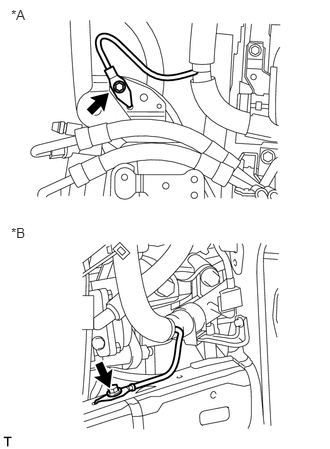
Install the bolt.
- Torque:
- 19 N*m (194 kgf*cm, 14 ft.*lbf)
| *A | w/ KDSS |
| *B | w/o KDSS |
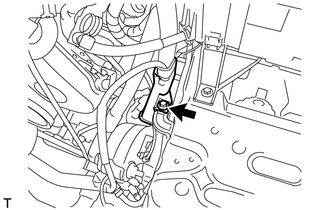
Connect the wire harness protector with the bolt.
- Torque:
- 8.0 N*m (82 kgf*cm, 71 in.*lbf)
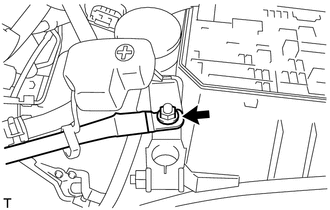
Connect the engine wire with the nut.
- Torque:
- 7.5 N*m (76 kgf*cm, 66 in.*lbf)
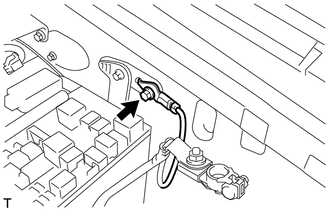
Install the bolt.
- Torque:
- 8.5 N*m (87 kgf*cm, 75 in.*lbf)
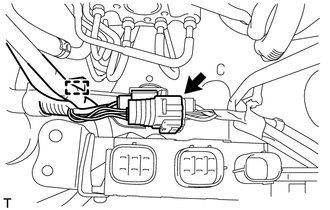
Attach the clamp and connect the connector.
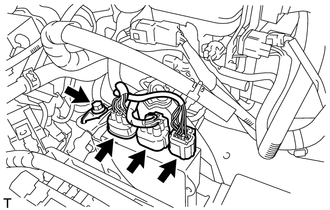
Connect the 3 injection driver connectors and install the bolt.
- Torque:
- 8.0 N*m (82 kgf*cm, 71 in.*lbf)
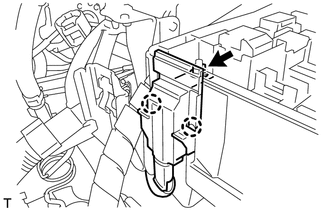
Attach the 2 claws and install the nut.
- Torque:
- 11 N*m (112 kgf*cm, 8 ft.*lbf)
Install the No. 1 relay block cover.
55501A
23.INSTALL GLOVE COMPARTMENT DOOR SUB-ASSEMBLY
Install the glove compartment door (See page Vehicle Interior>INTERIOR PANELS / TRIM>INSTRUMENT PANEL SAFETY PAD>INSTALLATION)
24.CONNECT FUEL HOSE
Connect the No. 1 fuel hose and No. 2 fuel hose.
87246A
25.CONNECT OUTLET HEATER WATER HOSE
Connect the outlet heater water hose.
87245A
26.CONNECT INLET HEATER WATER HOSE
Connect the inlet heater water hose.
44410
27.CONNECT PRESSURE FEED TUBE ASSEMBLY
Connect the pressure feed tube and a new gasket with the union bolt.
- Torque:
- 50 N*m (510 kgf*cm, 37 ft.*lbf)
Connect the power steering oil pressure switch connector.
44306
28.CONNECT VANE PUMP OIL RESERVOIR SUB-ASSEMBLY
Temporarily install the vane pump oil reservoir with the 3 bolts.
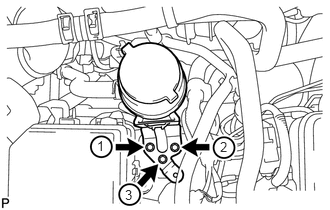
Tighten the 3 bolts of the vane pump oil reservoir in the order shown in the illustration.
- Torque:
- 8.0 N*m (82 kgf*cm, 71 in.*lbf)
23300J
29.INSTALL FUEL FILTER ASSEMBLY
Install the fuel filter (See page Engine / Hybrid System>1KD-FTV (FUEL)>FUEL FILTER (for Engine Room Side)>REPLACEMENT).
26100
30.INSTALL DIESEL THROTTLE BODY ASSEMBLY
Install the diesel throttle body (See page Engine / Hybrid System>1KD-FTV (ENGINE CONTROL)>DIESEL THROTTLE BODY>INSTALLATION).
88320
31.CONNECT COOLER COMPRESSOR ASSEMBLY (w/ Air Conditioning System)
Connect the cooler compressor with the 4 bolts.
- Torque:
- 25 N*m (250 kgf*cm, 18 ft.*lbf)
Connect the compressor connector.
87101
32.INSTALL NO. 1 VISCOUS HEATER BRACKET SUB-ASSEMBLY (for Cold Area Specification Vehicles)
Install the No. 1 viscous heater bracket with the 4 bolts.
- Torque:
- 45 N*m (459 kgf*cm, 33 ft.*lbf)
87120G
33.INSTALL VISCOUS HEATER WITH MAGNET CLUTCH ASSEMBLY (for Cold Area Specification Vehicles)
Install the viscous heater with magnet clutch with the 2 bolts.
- Torque:
- 45 N*m (459 kgf*cm, 33 ft.*lbf)
Connect the water by-pass hose and water hose.
Connect the viscous heater connector.
17275A
34.INSTALL COMPRESSOR OUTLET ELBOW
35.INSTALL AIR CLEANER CASE SUB-ASSEMBLY
17801
36.INSTALL AIR CLEANER FILTER ELEMENT SUB-ASSEMBLY
17705
37.INSTALL AIR CLEANER CAP SUB-ASSEMBLY
17881
38.INSTALL NO. 1 AIR CLEANER HOSE
74431
39.INSTALL BATTERY TRAY
28800
40.INSTALL BATTERY
74481
41.INSTALL BATTERY HOLD DOWN CLAMP
Install the battery hold down clamp with the 2 nuts.
- Torque:
- 6.0 N*m (61 kgf*cm, 53 in.*lbf)
16400
42.INSTALL RADIATOR ASSEMBLY
Install the radiator (See page Engine / Hybrid System>1KD-FTV (COOLING)>RADIATOR>INSTALLATION).
43.ADD POWER STEERING FLUID
44.ADD MANUAL TRANSMISSION OIL (for Manual Transmission)
45.INSPECT MANUAL TRANSMISSION OIL (for Manual Transmission)
47.CONNECT CABLE TO NEGATIVE BATTERY TERMINAL
- NOTICE:
-
When disconnecting the cable, some systems need to be initialized after the cable is reconnected (See page General>INTRODUCTION>REPAIR INSTRUCTION>INITIALIZATION).
48.BLEED AIR FROM FUEL SYSTEM
49.ADD ENGINE COOLANT
50.INSPECT FOR COOLANT LEAK
55781E
51.INSTALL COWL TOP VENTILATOR LOUVER SUB-ASSEMBLY
Install the cowl top ventilator louver (See page Vehicle Exterior>WIPER / WASHER>FRONT WIPER MOTOR>INSTALLATION).
53301
52.INSTALL HOOD SUB-ASSEMBLY
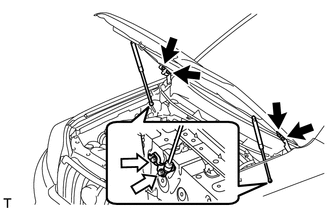
Install the hood with the 8 bolts.
- Torque:
- for bolt A : 13 N*m (133 kgf*cm, 10 ft.*lbf)
- for bolt B : 18 N*m (184 kgf*cm, 13 ft.*lbf)

|
Bolt A |

|
Bolt B |
Connect the washer nozzle hose.
53.ADD AUTOMATIC TRANSMISSION FLUID (for Automatic Transmission)
Add automatic transmission fluid (See page Drivetrain>A750F (AUTOMATIC TRANSMISSION / TRANSAXLE)>VALVE BODY ASSEMBLY>INSTALLATION).
54.INSPECT FOR POWER STEERING FLUID LEAK
55.INSPECT FOR OIL LEAK
56.INSPECT FOR FUEL LEAK
57.INSPECT FOR EXHAUST GAS LEAK
58.INSPECT ENGINE IDLE SPEED AND MAXIMUMSPEED
59.INSPECT ENGINE OIL LEVEL
51450
60.INSTALL REAR ENGINE UNDER COVER ASSEMBLY
Install the rear engine under cover with the 4 bolts.
- Torque:
- 29 N*m (296 kgf*cm, 21 ft.*lbf)
51495
61.INSTALL TRANSMISSION UNDER COVER
Install the transmission under cover with the 2 bolts.
- Torque:
- 29 N*m (296 kgf*cm, 21 ft.*lbf)
51405A
62.INSTALL NO. 1 ENGINE UNDER COVER SUB-ASSEMBLY
Install the No. 1 engine under cover with the 4 bolts.
- Torque:
- 29 N*m (296 kgf*cm, 21 ft.*lbf)
52129B
63.INSTALL FRONT BUMPER LOWER COVER
Install the lower front bumper cover with the clip and 5 bolts.
- Torque:
- 8.0 N*m (82 kgf*cm, 71 in.*lbf)