1GR-FE COOLING RADIATOR INSTALLATION
PROCEDURE

 16561
1.INSTALL NO. 1 RADIATOR TO SUPPORT SEAL
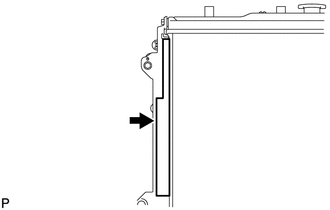
Install the seal to the radiator assembly as shown in the illustration.
16562
2.INSTALL NO. 2 RADIATOR TO SUPPORT SEAL
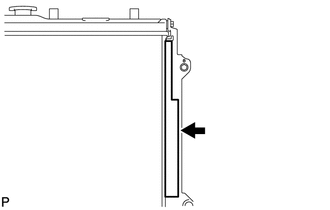
Install the seal to the radiator assembly as shown in the illustration.
16400
3.INSTALL RADIATOR ASSEMBLY
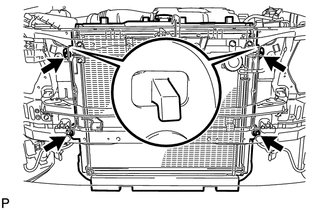
Insert the radiator bracket hooks into the radiator support holes.
Install the radiator with the 4 bolts.
- Torque:
- 18 N*m (184 kgf*cm, 13 ft.*lbf)
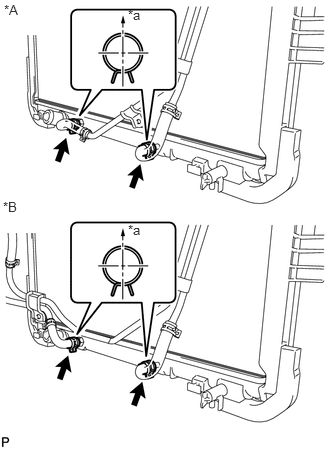
for Automatic Transmission:
Connect the 2 oil cooler hoses.
| *A | w/ Warmer |
| *B | w/ Air Cooled Transmission Oil Cooler |
| *a | Upper |
- HINT:
-
Make sure the direction of the hose clamp is as shown in the illustration.
16711
4.INSTALL FAN SHROUD
Install the fan pulley to the water pump.
Place the shroud together with the coupling fan between the radiator and engine.
- NOTICE:
-
Be careful not to damage the radiator core.
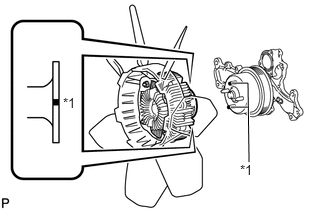
Align the paint marks on the heads of the water pump stud bolts with the paint marks of the same color on the outer edge of the fluid coupling flange and install the fluid coupling to the water pump.
| *1 | Paint Mark |
Temporarily install the fluid coupling fan to the water pump with the 4 nuts. Tighten the nuts as much as possible by hand.
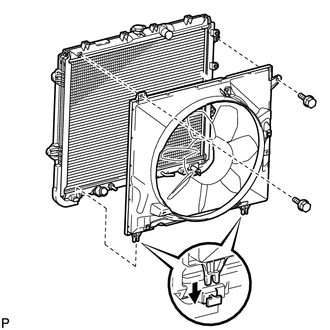
Attach the claws of the shroud to the radiator as shown in the illustration.
Install the shroud with the 2 bolts.
- Torque:
- 5.0 N*m (51 kgf*cm, 44 in.*lbf)
Install the fan and generator V-belt (See page Engine / Hybrid System>1GR-FE (ENGINE MECHANICAL)>DRIVE BELT>INSTALLATION).
Tighten the 4 nuts of the fluid coupling fan.
- Torque:
- 21 N*m (214 kgf*cm, 15 ft.*lbf)
32907C
5.CONNECT OIL COOLER TUBE (w/ Air Cooled Transmission Oil Cooler)
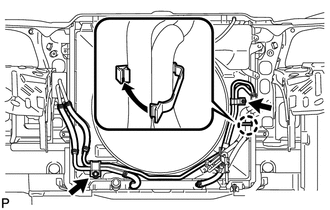
Connect the oil cooler tube with the 2 bolts, and attach the claw to close the flexible hose clamp.
- Torque:
- 5.5 N*m (56 kgf*cm, 49 in.*lbf)
32907C
6.CONNECT OIL COOLER TUBE (w/ Warmer)
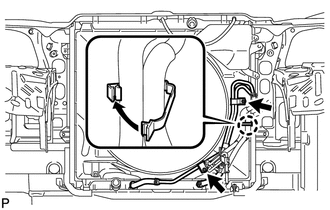
Connect the oil cooler tube with the 2 bolts, and attach the claw to close the flexible hose clamp.
- Torque:
- 5.5 N*m (56 kgf*cm, 49 in.*lbf)
16470
7.INSTALL RADIATOR RESERVOIR
Install the radiator reservoir with the 3 bolts.
- Torque:
- 5.0 N*m (51 kgf*cm, 44 in.*lbf)
Connect the reservoir hose to upper side of the radiator tank upper.
16572D
8.INSTALL NO. 2 RADIATOR HOSE
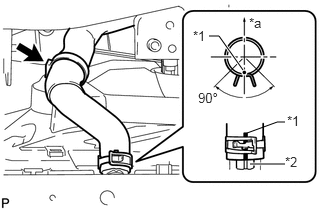
Connect the No. 2 radiator hose so that its paint mark aligns with the radiator protrusion as shown in the illustration.
| *1 | Paint Mark |
| *2 | Protrusion |
| *a | Upper |
- HINT:
- ·
Make sure the paint mark of the No. 1 air injection system hose is facing upward.
·Make sure the direction of the hose clamp is as shown in the illustration.
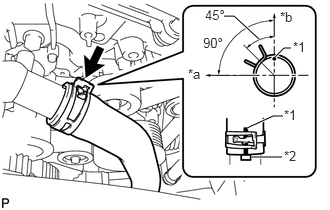
Connect the No. 2 radiator hose so that its paint mark aligns with the water inlet housing protrusion as shown in the illustration.
| *1 | Paint Mark |
| *2 | Protrusion |
| *a | Front |
| *b | Upper |
- HINT:
- ·
Make sure the paint mark of the No. 1 air injection system hose is facing upward.
·Make sure the direction of the hose clamp is as shown in the illustration.
16571C
9.INSTALL NO. 1 RADIATOR HOSE
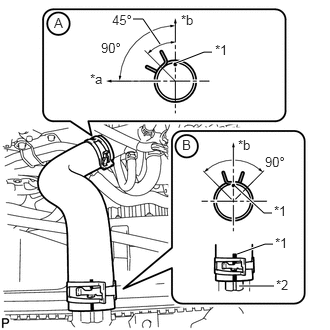
Connect the No. 1 radiator hose to the water inlet housing shown in the illustration labeled A.
| *1 | Paint Mark |
| *2 | Protrusion |
| *a | Front |
| *b | Upper |
- HINT:
- ·
Make sure the paint mark of the No. 1 radiator hose is facing upward.
·Make sure the direction of the hose clamp is as shown in the illustration.
Connect the No. 1 radiator hose so that its paint mark aligns with the radiator protrusion as shown in the illustration labeled B.
- HINT:
- ·
Make sure the paint mark of the No. 1 radiator hose is facing upward.
·Make sure the direction of the hose clamp is as shown in the illustration.
53294C
10.INSTALL RADIATOR SIDE DEFLECTOR LH
Attach the 3 claws.
Install the deflector with the clip.
53293C
11.INSTALL RADIATOR SIDE DEFLECTOR RH
Attach the 3 claws.
Install the deflector with the clip.
52521
12.INSTALL UPPER FRONT BUMPER RETAINER
Install the retainer with the 3 bolts.
- Torque:
- 8.0 N*m (82 kgf*cm, 71 in.*lbf)
52119A
13.INSTALL FRONT BUMPER COVER
Install the front bumper cover (See page Vehicle Exterior>EXTERIOR PANELS / TRIM>FRONT BUMPER>INSTALLATION).
14.ADD ENGINE COOLANT
15.INSPECT FOR ENGINE COOLANT LEAK
51405A
16.INSTALL NO. 1 ENGINE UNDER COVER SUB-ASSEMBLY
52129B
17.INSTALL FRONT BUMPER COVER LOWER
11259
18.INSTALL V-BANK COVER
53292A
19.INSTALL UPPER RADIATOR SUPPORT SEAL