G52F MANUAL TRANSMISSION / TRANSAXLE MANUAL TRANSMISSION UNIT REASSEMBLY
PROCEDURE

 33321
1.INSTALL OUTPUT SHAFT ASSEMBLY
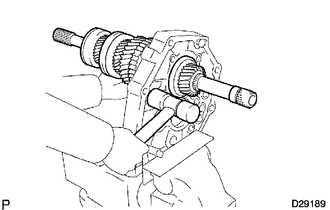
Install the output shaft to the intermediate plate by pushing on the output shaft and tapping on the intermediate plate with a plastic-faced hammer.
Using a snap ring expander, install the snap ring to the center bearing.
- HINT:
-
Make sure the shaft snap ring is flush with the intermediate plate surface.
33311
2.INSTALL INPUT SHAFT ASSEMBLY
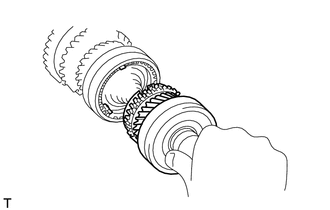
Coat the input shaft and No. 2 synchronizer ring with gear oil, and install them to the output shaft.
33421
3.INSTALL COUNTER GEAR ASSEMBLY
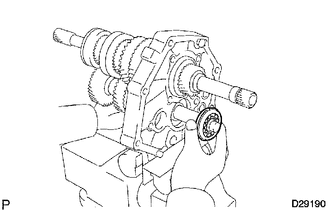
Coat the input shaft and No. 2 synchronizer ring with gear oil.
Temporarily install the counter gear, input shaft and a new center bearing to the intermediate plate.
- NOTICE:
-
Install the bearing (with snap ring) to the rear side of the counter gear.
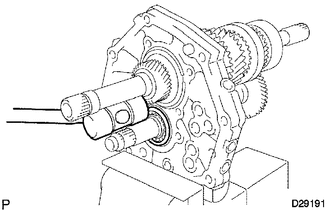
Using a plastic-faced hammer, install the center bearing to the intermediate plate by tapping the outer race to the counter gear center bearing.
- HINT:
-
Hold the front side of the counter gear by hand.
Using a snap ring expander, install the counter shaft center bearing snap ring to the counter shaft center bearing.
33151
4.INSTALL OUTPUT SHAFT REAR BEARING RETAINER
Using a T40 "TORX" socket, install the output shaft rear bearing retainer to the intermediate plate with the 4 bolts.
- Torque:
- 19 N*m (189 kgf*cm, 14 ft.*lbf)
33402
5.INSTALL REVERSE IDLER GEAR SUB-ASSEMBLY
Install the reverse idler gear shaft and reverse idler gear to the intermediate plate.
Install the reverse idler gear shaft stopper to the intermediate plate with the bolt.
- Torque:
- 18 N*m (178 kgf*cm, 13 ft.*lbf)
33228
6.INSTALL REVERSE SHIFT ARM BRACKET
Install the reverse shift arm bracket to the intermediate plate with the 2 bolts.
- Torque:
- 19 N*m (189 kgf*cm, 14 ft.*lbf)
33359A
7.INSTALL 5TH GEAR BEARING INNER RACE LOCK BALL
Install the lock ball.
33349
8.INSTALL 5TH GEAR THRUST WASHER
Install the 5th gear thrust washer.
33395
9.INSTALL NO. 3 TRANSMISSION HUB SLEEVE
Coat the counter shaft 5th gear with gear oil.
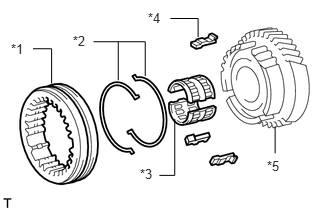
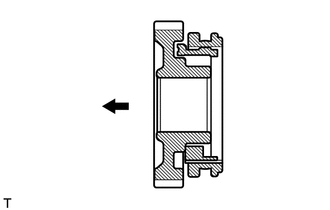
Install the counter 5th gear, counter shaft 5th gear bearing, 3 synchromesh shifting keys, 2 synchromesh shifting key springs and No. 3 transmission hub sleeve.
| *1 | No. 3 Transmission Hub Sleeve |
| *2 | No. 3 Synchromesh Shifting Key Spring |
| *3 | Counter Shaft 5th Gear Bearing |
| *4 | No. 3 Synchromesh Shifting Key |
| *5 | Counter Shaft 5th Gear |
- HINT:
-
Be sure to set the No. 3 transmission hub sleeve and 3 synchromesh shifting keys to the counter shaft 5th gear incorrect direction.
Text in Illustration 
Front
33428
10.INSTALL COUNTER SHAFT 5TH GEAR
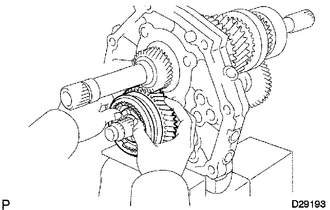
Install the counter 5th gear bearing to the 5th gear.
Install the counter shaft 5th gear to the counter gear.
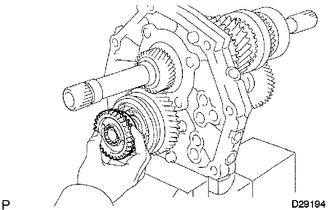
Temporarily install the No. 1 synchronizer ring on the No. 5 gear spline piece.
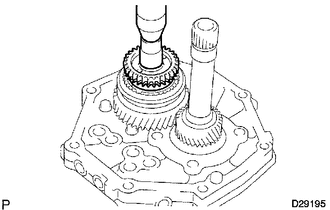
Remove the intermediate plate from the vise.
Stand the transmission as shown in the illustration.
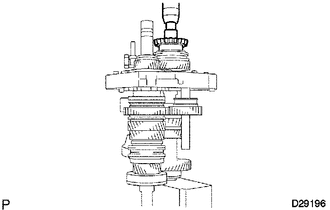
Using a press and 22 mm socket wrench, install the No. 5 gear spline piece with the No. 1 synchronizer ring slots aligned with the shifting keys.
Fix the intermediate plate in a vise between aluminum plates.
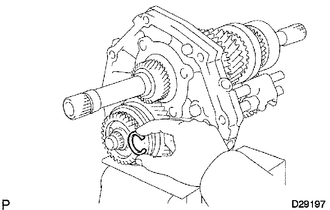
Select a snap ring that will allow minimal axial play.
- Standard clearance:
0.10 mm (0.00394 in.) or less
- Standard Counter Gear Rear Shaft Snap Ring:
Mark Thickness A 2.80 to 2.85 mm (0.110 to 0.112 in.) B 2.85 to 2.90 mm (0.112 to 0.114 in.) C 2.90 to 2.95 mm (0.114 to 0.116 in.) D 2.95 to 3.00 mm (0.116 to 0.118 in.) E 3.00 to 3.05 mm (0.118 to 0.120 in.) F 3.05 to 3.10 mm (0.120 to 0.122 in.) G 3.10 to 3.15 mm (0.122 to 0.124 in.)
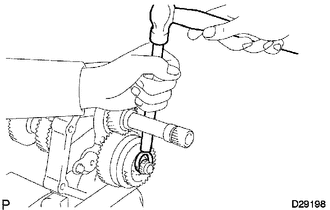
Using a brass bar and hammer, tap the snap ring to the counter gear.
33428
11.INSPECT COUNTER SHAFT 5TH GEAR THRUST CLEARANCE
33243A
12.INSTALL NO. 2 GEAR SHIFT FORK SHAFT
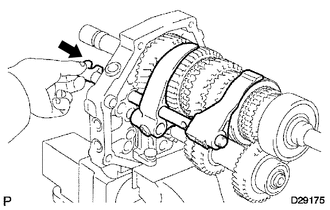
Install the No. 2 gear shift fork and No. 1 gear shift fork.
Pass the No. 2 gear shift fork shaft through the intermediate plate, No. 2 gear shift fork and No. 1 gear shift fork to install it.
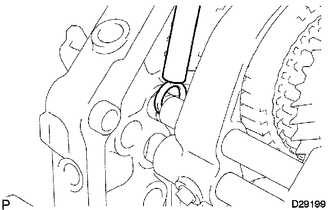
Using a brass bar and hammer, tap the shaft snap ring onto the No. 2 gear shift fork shaft.
Install the bolt to the No. 2 gear shift fork.
- Torque:
- 20 N*m (204 kgf*cm, 15 ft.*lbf)
33265
13.INSTALL NO. 2 SHIFT INTERLOCK PIN
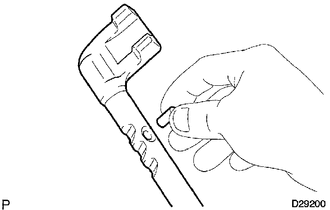
Coat the No. 2 shift interlock pin with MP grease and install it to the No. 1 gear shift fork shaft.
33242
14.INSTALL NO. 1 GEAR SHIFT FORK SHAFT
Coat the No. 1 shift interlock pin with MP grease.
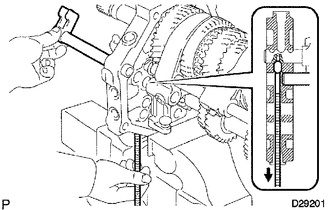
Using a magnet hand, install the No. 1 shift interlock pin to the intermediate plate.
Pass the No. 1 gear shift fork shaft through the intermediate plate and No. 2 gear shift fork to install it.
Install the bolt to the No. 1 shift fork.
- Torque:
- 20 N*m (204 kgf*cm, 15 ft.*lbf)
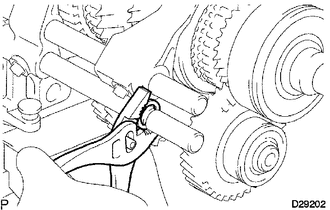
Using pliers, install the shaft snap ring to the No. 1 gear shift fork shaft.
33221
15.INSTALL REVERSE SHIFT ARM
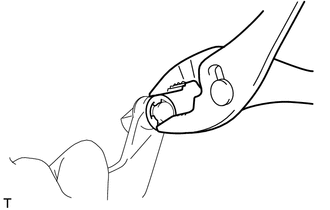
Install the shift arm shoe E-ring and the shift arm shoe to the reverse shift arm.
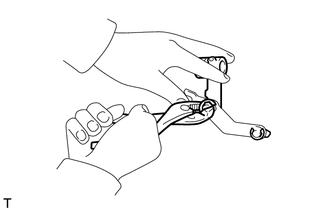
Install the reverse shift arm E-ring and reverse shift fork to the reverse shift arm.
Install the reverse shift arm to the reverse shift arm bracket.
33265
16.INSTALL NO. 2 SHIFT INTERLOCK PIN
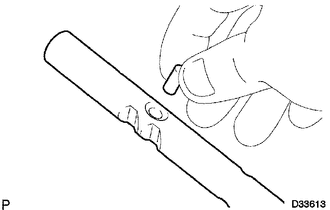
Coat the No. 2 shift interlock pin with MP grease, and install it to the No. 3 gear shift fork shaft.
33264
17.INSTALL NO. 3 SHIFT INTERLOCK PIN
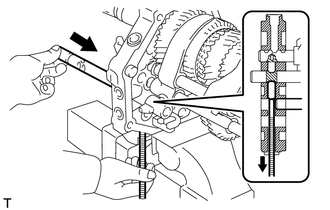
Coat the No. 3 shift interlock pin with MP grease.
Using a magnet hand, install the No. 3 shift interlock pin to the intermediate plate.
33244D
18.INSTALL NO. 3 GEAR SHIFT FORK SHAFT
Install the No. 3 gear shift fork shaft through the reverse shift fork and intermediate plate.
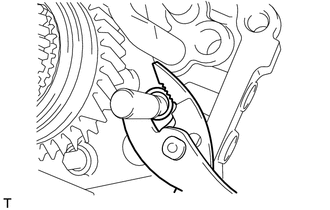
Install the reverse shift head ring to the reverse shift fork shaft.
Using a 5 mm pin punch and a hammer, tap in the slotted spring pin to the No. 3 shift fork shaft.
33246C
19.INSTALL NO. 5 GEAR SHIFT FORK SHAFT
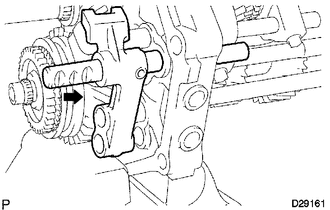
Install the No. 5 gear shift fork shaft and reverse shift head.
Using a 5 mm pin punch and hammer, tap in the slotted spring pin to the No. 3 shift fork shaft.
33245G
20.INSTALL NO. 4 GEAR SHIFT FORK SHAFT
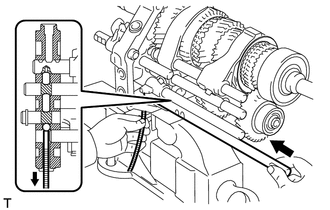
Coat the 2 shift detent balls with MP grease.
Using a magnet hand, install the 2 shift detent balls to the intermediate plate.
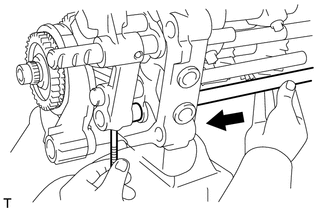
Pass the No. 4 gear shift fork shaft through the reverse shift fork, intermediate plate and reverse shift head to install it.
Install a new No. 3 gear shift fork with the bolt.
- Torque:
- 20 N*m (204 kgf*cm, 15 ft.*lbf)
33276B
21.INSTALL NO. 2 SHIFT DETENT BALL
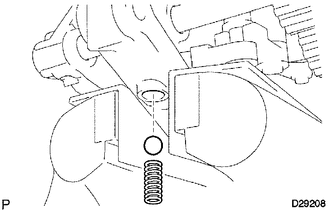
Coat the No. 2 detent ball with MP grease.
Install the No. 2 detent ball and compression spring to the intermediate plate.
Coat the spring seat with adhesive.
- Adhesive:
Toyota Genuine Adhesive 1344, Three Bond 1344 or equivalent
Using a T40 "TORX" socket, install the spring seat to the intermediate plate.
- Torque:
- 19 N*m (194 kgf*cm, 14 ft.*lbf)
22.INSTALL SHIFT DETENT BALL
Coat the 3 shift detent balls with MP grease, and then install them and the 3 compression springs to the intermediate plate.
Coat the spring seat and 2 ball plugs with adhesive.
- Adhesive:
Toyota Genuine Adhesive 1344, Three Bond 1344 or equivalent
Using a T40 "TORX" socket, install the spring seat and 2 ball plugs to the intermediate plate.
- Torque:
- 19 N*m (194 kgf*cm, 14 ft.*lbf)
33111
23.INSTALL MANUAL TRANSMISSION CASE
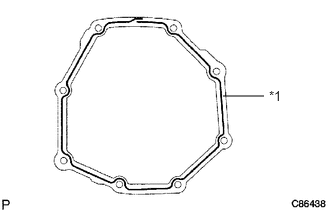
Apply seal packing to the transmission case as shown in the illustration.
- Seal packing:
Toyota Genuine Seal Packing 1281, Three Bond 1281 or equivalent
| *1 | Seal Packing |
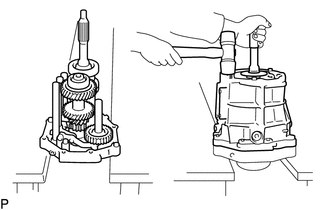
Stand the intermediate plate as shown in the illustration.
Using a plastic-faced hammer, install the transmission case to the intermediate plate as shown in the illustration.
33411D
24.INSTALL NO. 1 COUNTER GEAR FRONT BEARING SNAP RING
Using a snap ring expander, install the snap ring to the counter gear front bearing.
33311B
25.INSTALL FRONT BEARING SHAFT SNAP RING
Using a snap ring expander, install the snap ring to the input shaft front bearing.
33131A
26.INSTALL TRANSMISSION FRONT BEARING RETAINER OIL SEAL
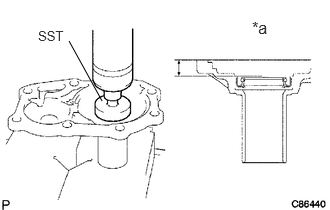
Using SST, press in a new oil seal to the front bearing retainer.
- SST
- 09950-60010 (09951-00440, 09952-06010)
- Standard depth:
12.2 to 13.2 m (0.480 to 0.519 in.)
| *a | Oil Seal Depth |
- NOTICE:
-
Do not damage the oil seal lip.
Apply a light coat of MP grease to the lip of the oil seal.
33131
27.INSTALL FRONT BEARING RETAINER
Install a new gasket and the front bearing retainer to the transmission case.
Install the 8 bolts.
- Torque:
- 17 N*m (173 kgf*cm, 13 ft.*lbf)
36117A
28.INSTALL TRANSFER ADAPTER OIL SEAL
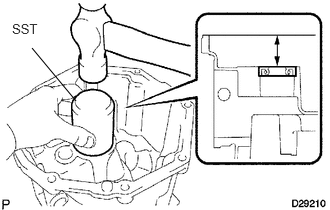
Using SST, tap in a new oil seal to the transfer adaptor.
- SST
- 09223-00010
- Standard depth:
45 to 46 mm (1.78 to 1.81 in.)
- NOTICE:
-
Be careful not to damage the lip of the oil seal.
Apply a light coat of MP grease to the lip of the oil seal.
33283
29.INSTALL NO. 1 REVERSE RESTRICT PIN ASSEMBLY
Install the restrict pin to the transfer adaptor.
Using a 5 mm pin punch and hammer, tap in the slotted spring pin to the transfer adaptor.
Using a T40 "TORX" socket, install the plug to the transfer adaptor.
- Torque:
- 19 N*m (194 kgf*cm, 14 ft.*lbf)
33251
30.INSTALL SHIFT AND SELECT LEVER
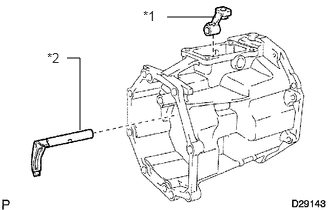
Install the shift and select lever and shift lever housing to the transfer adaptor.
| *1 | Shift Lever Housing |
| *2 | Shift and Select Lever |
33124E
31.INSTALL TRANSFER OIL RECEIVER PIPE
Install the oil receiver pipe to the transfer adaptor.
33449B
32.INSTALL TRANSMISSION MAGNET
Install the magnet to the transfer adaptor.
36117
33.INSTALL TRANSFER ADAPTER
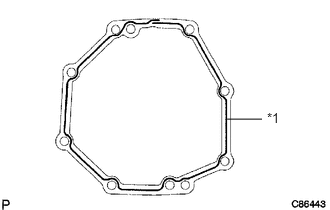
Apply seal packing to the transfer adaptor as shown in the illustration.
- Seal packing:
Toyota Genuine Seal Packing 1281, Three Bond 1281 or equivalent
| *1 | Seal Packing |
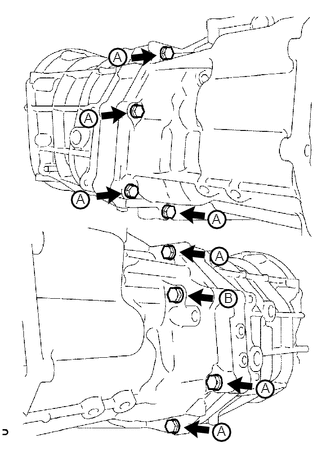
Install the transfer adaptor to the manual transmission case with the 8 bolts.
- Torque:
- 37 N*m (377 kgf*cm, 27 ft.*lbf)
- HINT:
-
Each bolt length is indicated below.
-
80 mm (3.15 in.) for bolt A
-
130 mm (5.12 in.) for bolt B
Install the bolt to the shift lever housing.
- Torque:
- 33 N*m (340 kgf*cm, 25 ft.*lbf)
34.INSTALL SHIFT DETENT BALL
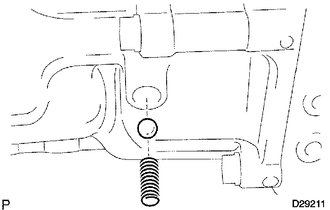
Coat the shift detent ball with MP grease, and then install it and the compression spring to the transfer adapter.
Using a T40 "TORX" socket, install the spring seat to the transfer adapter.
- Torque:
- 19 N*m (194 kgf*cm, 14 ft.*lbf)
33506F
35.INSTALL FLOOR SHIFT CONTROL SHIFT LEVER RETAINER SUB-ASSEMBLY
Install a new gasket to the transfer adapter.
Install the shift lever retainer with the 4 bolts.
- Torque:
- 18 N*m (184 kgf*cm, 13 ft.*lbf)
33280
36.INSTALL RESTRICT PIN
Install the 2 restrict pins to the transfer adaptor.
- Torque:
- 28 N*m (286 kgf*cm, 21 ft.*lbf)
31111
37.INSTALL FRONT TRANSMISSION CASE
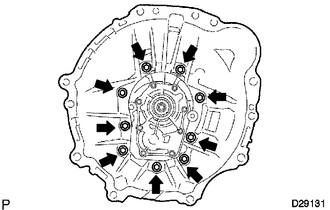
Install the front transmission case.
Apply adhesive to the bolt threads.
- Adhesive:
Toyota Genuine Adhesive 1344, Three Bond 1344 or equivalent
Install the 9 bolts.
- Torque:
- 37 N*m (377 kgf*cm, 27 ft.*lbf)
84210
38.INSTALL BACK-UP LIGHT SWITCH ASSEMBLY
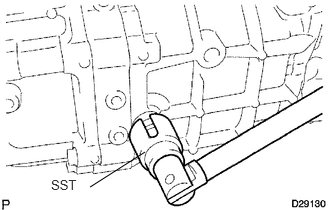
Using SST, install a new gasket and the back-up light switch to the manual transmission case.
- SST
- 09817-16011
- Torque:
- 37 N*m (377 kgf*cm, 27 ft.*lbf)
31126
39.INSTALL CLUTCH RELEASE FORK BOOT
Install the release fork boot to the front transmission case.
31236B
40.INSTALL RELEASE FORK SUPPORT
Install the release fork support to the front transmission case.
- Torque:
- 39 N*m (400 kgf*cm, 29 ft.*lbf)
31230
41.INSTALL CLUTCH RELEASE BEARING ASSEMBLY
31204
42.INSTALL CLUTCH RELEASE FORK SUB-ASSEMBLY
33104
43.INSTALL DRAIN PLUG SUB-ASSEMBLY
Install a new gasket and the drain plug to the transmission case.
- Torque:
- 37 N*m (377 kgf*cm, 27 ft.*lbf)
33101A
44.INSTALL MANUAL TRANSMISSION FILLER PLUG
Install a new gasket and the filler plug to the transmission case.
- Torque:
- 37 N*m (377 kgf*cm, 27 ft.*lbf)