WINDOW / GLASS GLASS HATCH OPENER SYSTEM Glass Hatch Opener System does not Operate
DESCRIPTION
The glass hatch opener system enables the back door glass to be opened when the glass hatch opener switch is pressed.
WIRING DIAGRAM
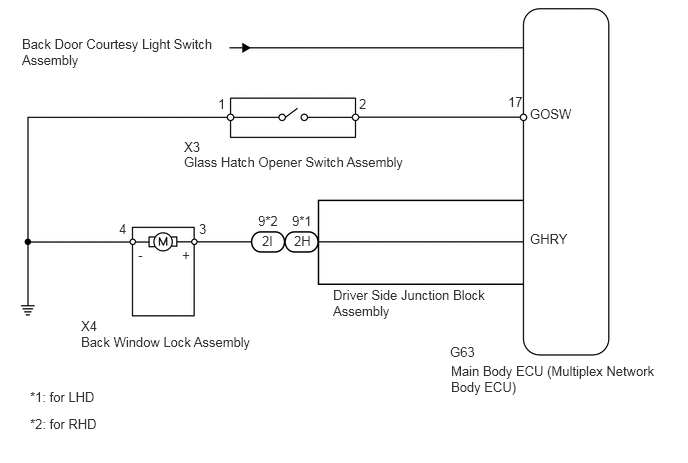
CAUTION / NOTICE / HINT
- NOTICE:
-
Inspect the fuses for circuits related to this system before performing the following inspection procedure.
PROCEDURE
Use the Data List to check if the back door courtesy light switch is functioning properly (See page Vehicle Interior>LIGHTING (INT)>LIGHTING SYSTEM>Back Door Courtesy Switch Circuit).
| Tester Display | Measurement Item/Range | Normal Condition | Diagnostic Note |
|---|---|---|---|
| Back Door Courtesy SW | Back door courtesy switch signal / ON or OFF | ON: Back door open
OFF: Back door closed |
- |
- OK:
On the tester screen, item changes between ON and OFF according to above chart.
OK
NG
Confirm that the vehicle is equipped with the entry and start system.
| Result | Proceed to |
|---|---|
| w/ Entry and Start System | A |
| w/o Entry and Start System | B |
A
B
When the back door entry lock switch is operated, check that the glass hatch opens.
- OK:
The back door entry lock function operates normally.
OK
NG
Use the Data List to check if the glass hatch opener switch is functioning properly (See page Vehicle Exterior>WINDOW / GLASS>GLASS HATCH OPENER SYSTEM>DATA LIST / ACTIVE TEST).
| Tester Display | Measurement Item/Range | Normal Condition | Diagnostic Note |
|---|---|---|---|
| Glass Hatch Opener Switch | Glass hatch opener switch signal / ON or OFF | ON: Glass hatch opener switch operated
OFF: Glass hatch opener switch not operated |
- |
| Result | Proceed to |
|---|---|
| Glass hatch opener switch does not operate | A |
| Glass hatch opener switch operates | B |
A
B
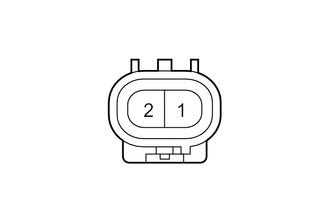
Remove the glass hatch opener switch (See page Vehicle Exterior>WINDOW / GLASS>GLASS HATCH OPENER SWITCH>INSPECTION).
Measure the resistance according to the value(s) in the table below.
- Standard Resistance:
Tester Connection Switch Condition Specified Condition 1 - 2 Switch not pushed 10 kΩ or higher 1 - 2 Switch pushed Below 1 Ω
OK
NG
Disconnect the X3 glass hatch opener switch connector.
Remove the main body ECU (See page Power Source / Network>POWER DISTRIBUTION>MAIN BODY ECU>REMOVAL).
Measure the resistance according to the value(s) in the table below.
- Standard Resistance:
Tester Connection Condition Specified Condition X3-2 - G63-17 (GOSW) Always Below 1 Ω X3-1 - Body ground Always Below 1 Ω X3-2 - Body ground Always 10 kΩ or higher
OK
NG
Using the intelligent tester, perform the Active Test (See page Vehicle Exterior>WINDOW / GLASS>GLASS HATCH OPENER SYSTEM>DATA LIST / ACTIVE TEST).
| Tester Display | Test Part | Control Range | Diagnostic Note |
|---|---|---|---|
| Glass Hatch Open | Operate Glass Hatch | ON/OFF | - |
- OK:
The glass hatch is opened.
OK
NG
Remove the back window lock (See page Vehicle Exterior>WINDOW / GLASS>BACK WINDOW LOCK>INSPECTION).
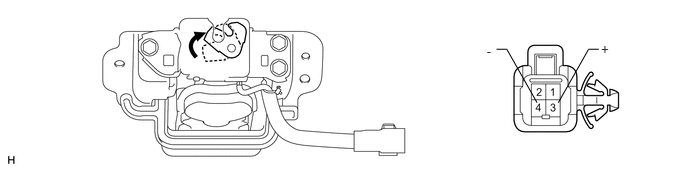

|
Moves to Open Position | - | - |
Move the back window lock to the lock position.
Apply battery voltage and check the operation of the window door lock motor.
- Standard Resistance:
Measurement Condition Specified Condition Battery positive (+) - Terminal 3 (+) Opens Battery negative (-) - Terminal 4 (-)
OK
NG
Disconnect the X4 back window lock connector.
Disconnect the 2I*1 or 2H*2 main body ECU connector.
*1: for LHD
*2: for RHD
Measure the resistance according to the value(s) in the table below.
- Standard Resistance:
- for LHD:
Tester Connection Condition Specified Condition X4-3 (+) - 2I-9 (GHRY) Always Below 1 Ω X4-4 (-) - Body ground Always Below 1 Ω X4-3 (+) - Body ground Always 10 kΩ or higher
- for RHD:
Tester Connection Condition Specified Condition X4-3 (+) - 2H-9 (GHRY) Always Below 1 Ω X4-4 (-) - Body ground Always Below 1 Ω X4-3 (+) - Body ground Always 10 kΩ or higher
OK
NG
Temporarily replace the main body ECU with a new or normally functioning one (See page Power Source / Network>POWER DISTRIBUTION>MAIN BODY ECU>REMOVAL).
Check that the glass hatch opener function operates normally.
- OK:
The glass hatch opener function operates normally.
OK
NG