LIGHTING (EXT) LIGHTING SYSTEM(for LED Headlight) B2439 Headlight LH Circuit B243A Headlight RH Circuit
DESCRIPTION
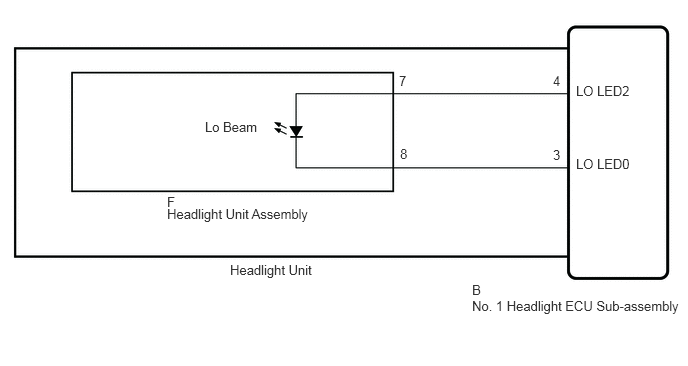
A DTC is stored when the No. 1 headlight ECU sub-assembly receives a light source malfunction signal from its respective headlight unit. The No. 1 headlight ECU sub-assembly LH stores DTC B2439 and B243A.
| DTC No. | Detection Item | DTC Detection Condition | Trouble Area | Note |
|---|---|---|---|---|
| B2439 | Headlight LH Circuit | No. 1 headlight ECU sub-assembly LH light source malfunction | ·
Headlight unit assembly LH ·
Headlight unit LH ·
No. 1 headlight ECU sub-assembly LH |
- |
| B243A | Headlight RH Circuit | No. 1 headlight ECU sub-assembly RH light source malfunction | ·
Headlight unit assembly RH ·
Headlight unit RH ·
No. 1 headlight ECU sub-assembly RH |
- |
WIRING DIAGRAM
CAUTION / NOTICE / HINT
- NOTICE:
-
If the No. 1 headlight ECU sub-assembly LH has been replaced, it is necessary to synchronize the vehicle information and initialize the No. 1 headlight ECU sub-assembly LH.
PROCEDURE
Clear the DTCs.
Click hereVehicle Exterior>LIGHTING (EXT)>LIGHTING SYSTEM (for LED Headlight)>DTC CHECK / CLEAR
10 seconds elapse after turning the ignition switch to ON and illuminating the low beam headlights using the light control switch.
Check for DTCs.
Click hereVehicle Exterior>LIGHTING (EXT)>LIGHTING SYSTEM (for LED Headlight)>DTC CHECK / CLEAR
- OK:
DTC B2439 and B243A are not output.
- Result:
Result Proceed to OK A NG (DTC B2439 is output) B NG (DTC B243A is output) C
A
Click hereGeneral>INTRODUCTION>HOW TO TROUBLESHOOT ECU CONTROLLED SYSTEMS>HOW TO PROCEED WITH TROUBLESHOOTING
B
C
Interchange the headlight unit LH with RH and connect the connectors to them.
Click hereVehicle Exterior>LIGHTING (EXT)>HEADLIGHT ASSEMBLY(for LED Headlight)>REMOVAL
Clear the DTCs.
Click hereVehicle Exterior>LIGHTING (EXT)>LIGHTING SYSTEM (for LED Headlight)>DTC CHECK / CLEAR
10 seconds elapse after turning the ignition switch to ON and illuminating the low beam headlights using the light control switch.
Check for DTCs.
Click hereVehicle Exterior>LIGHTING (EXT)>LIGHTING SYSTEM (for LED Headlight)>DTC CHECK / CLEAR
- Result:
Result Proceed to DTC B2439 is output A DTC B243A is output B
A
B
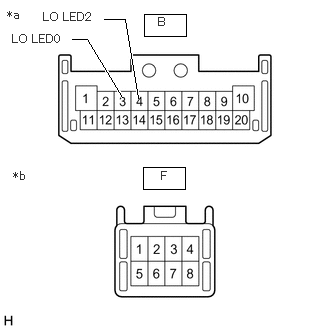
| *a | Front view of wire harness connector
(to No. 1 Headlight ECU Sub-assembly LH) |
| *b | Front view of wire harness connector
(to Headlight Unit Assembly LH) |
Remove the headlight unit LH.
Click hereVehicle Exterior>LIGHTING (EXT)>HEADLIGHT ASSEMBLY(for LED Headlight)>DISASSEMBLY
Remove the headlight unit assembly LH.
Click hereVehicle Exterior>LIGHTING (EXT)>HEADLIGHT ASSEMBLY(for LED Headlight)>DISASSEMBLY
Measure the resistance according to the value(s) in the table below.
- Standard Resistance:
Tester Connection Condition Specified Condition B-4 (LO LED2) - F-7 Always Below 1 Ω B-3 (LO LED0) - F-8 Always Below 1 Ω
- Result:
Proceed to OK NG
OK
NG
Interchange the headlight unit RH with LH and connect the connectors to them.
Click hereVehicle Exterior>LIGHTING (EXT)>HEADLIGHT ASSEMBLY(for LED Headlight)>REMOVAL
Clear the DTCs.
Click hereVehicle Exterior>LIGHTING (EXT)>LIGHTING SYSTEM (for LED Headlight)>DTC CHECK / CLEAR
10 seconds elapse after turning the ignition switch to ON and illuminating the low beam headlights using the light control switch.
Check for DTCs.
Click hereVehicle Exterior>LIGHTING (EXT)>LIGHTING SYSTEM (for LED Headlight)>DTC CHECK / CLEAR
- Result:
Result Proceed to DTC B243A is output A DTC B2439 is output B
A
B
| *a | Front view of wire harness connector
(to No. 1 Headlight ECU Sub-assembly RH) |
| *b | Front view of wire harness connector
(to Headlight Unit Assembly RH) |
Remove the headlight unit RH.
Click hereVehicle Exterior>LIGHTING (EXT)>HEADLIGHT ASSEMBLY(for LED Headlight)>DISASSEMBLY
Remove the headlight unit assembly RH.
Click hereVehicle Exterior>LIGHTING (EXT)>HEADLIGHT ASSEMBLY(for LED Headlight)>DISASSEMBLY
Measure the resistance according to the value(s) in the table below.
- Standard Resistance:
Tester Connection Condition Specified Condition B-4 (LO LED2) - F-7 Always Below 1 Ω B-3 (LO LED0) - F-8 Always Below 1 Ω
- Result:
Proceed to OK NG
OK
NG