LIGHTING (EXT) LIGHTING SYSTEM(for LED Headlight) B243B LED Wiring for High Beam LH Circuit B243C LED Wiring for High Beam RH Circuit
DESCRIPTION
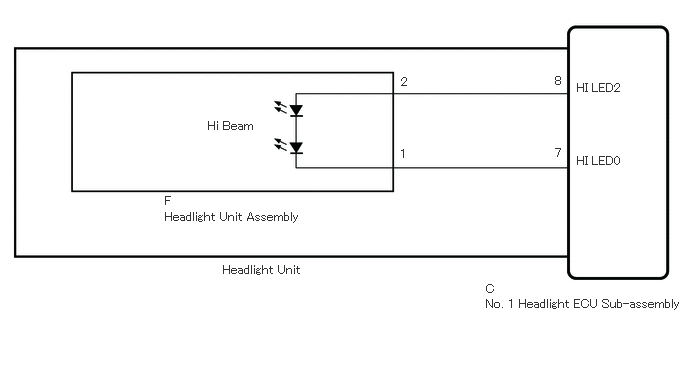
This DTC is output when the headlight ECU sub-assembly receives a high beam output malfunction signal from the headlight unit. The headlight ECU sub-assembly LH outputs DTCs B243B and B243C.
| DTC No. | Detection Item | DTC Detection Condition | Trouble Area | Note |
|---|---|---|---|---|
| B243B | LED Wiring for High Beam LH Circuit | High beam LED output line LH malfunction | ·
Headlight unit assembly LH ·
Headlight unit LH ·
No. 1 headlight ECU sub-assembly LH |
- |
| B243C | LED Wiring for High Beam RH Circuit | High beam LED output line RH malfunction | ·
Headlight unit assembly RH ·
Headlight unit RH ·
No. 1 headlight ECU sub-assembly RH |
- |
WIRING DIAGRAM
CAUTION / NOTICE / HINT
- NOTICE:
-
If the No. 1 headlight ECU sub-assembly LH has been replaced, it is necessary to synchronize the vehicle information and initialize the No. 1 headlight ECU sub-assembly LH.
-
Click hereVehicle Exterior>LIGHTING (EXT)>LIGHTING SYSTEM (for LED Headlight)>REGISTRATION
PROCEDURE
Clear the DTCs.
Click hereVehicle Exterior>LIGHTING (EXT)>LIGHTING SYSTEM (for LED Headlight)>DTC CHECK / CLEAR
10 seconds elapse after turning the ignition switch to ON and illuminating the high beam headlights using the light control switch.
Check for DTCs.
Click hereVehicle Exterior>LIGHTING (EXT)>LIGHTING SYSTEM (for LED Headlight)>DTC CHECK / CLEAR
- OK:
DTC B243B and B243C are not output.
- Result:
Result Proceed to OK A NG (DTC B243B is output) B NG (DTC B243C is output) C
A
B
C
Interchange the headlight unit LH with RH and connect the connectors to them.
Click hereVehicle Exterior>LIGHTING (EXT)>HEADLIGHT ASSEMBLY(for LED Headlight)>REMOVAL
Clear the DTCs.
Click hereVehicle Exterior>LIGHTING (EXT)>LIGHTING SYSTEM (for LED Headlight)>DTC CHECK / CLEAR
10 seconds elapse after turning the ignition switch to ON and illuminating the high beam headlights using the light control switch.
Check for DTCs.
Click hereVehicle Exterior>LIGHTING (EXT)>LIGHTING SYSTEM (for LED Headlight)>DTC CHECK / CLEAR
- Result:
Result Proceed to DTC B243B is output A DTC B243C is output B
A
B
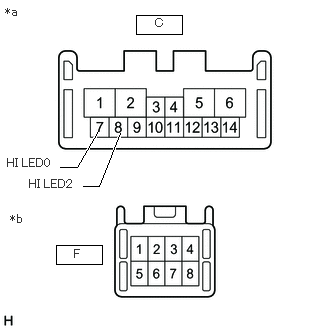
| *a | Front view of wire harness connector
(to No. 1 Headlight ECU Sub-assembly LH) |
| *b | Front view of wire harness connector
(to Headlight Unit Assembly LH) |
Remove the headlight unit LH.
Click hereVehicle Exterior>LIGHTING (EXT)>HEADLIGHT ASSEMBLY(for LED Headlight)>DISASSEMBLY
Remove the headlight unit assembly LH.
Click hereVehicle Exterior>LIGHTING (EXT)>HEADLIGHT ASSEMBLY(for LED Headlight)>DISASSEMBLY
Measure the resistance according to the value(s) in the table below.
- Standard Resistance:
Tester Connection Condition Specified Condition C-8 (HI LED2) - F-1 Always Below 1 Ω C-7 (HI LED0) - F-2 Always Below 1 Ω
- Result:
Proceed to OK NG
OK
NG
Interchange the headlight unit RH with LH and connect the connectors to them.
Click hereVehicle Exterior>LIGHTING (EXT)>HEADLIGHT ASSEMBLY(for LED Headlight)>REMOVAL
Clear the DTCs.
Click hereVehicle Exterior>LIGHTING (EXT)>LIGHTING SYSTEM (for LED Headlight)>DTC CHECK / CLEAR
10 seconds elapse after turning the ignition switch to ON and illuminating the high beam headlights using the light control switch.
Check for DTCs.
Click hereVehicle Exterior>LIGHTING (EXT)>LIGHTING SYSTEM (for LED Headlight)>DTC CHECK / CLEAR
- Result:
Result Proceed to DTC B243C is output A DTC B243B is output B
A
B
| *a | Front view of wire harness connector
(to No. 1 Headlight ECU Sub-assembly RH) |
| *b | Front view of wire harness connector
(to Headlight Unit Assembly RH) |
Remove the headlight unit RH.
Click hereVehicle Exterior>LIGHTING (EXT)>HEADLIGHT ASSEMBLY(for LED Headlight)>DISASSEMBLY
Remove the headlight unit assembly RH.
Click hereVehicle Exterior>LIGHTING (EXT)>HEADLIGHT ASSEMBLY(for LED Headlight)>DISASSEMBLY
Measure the resistance according to the value(s) in the table below.
- Standard Resistance:
Tester Connection Condition Specified Condition C-8 (HI LED2) - F-1 Always Below 1 Ω C-7 (HI LED0) - F-2 Always Below 1 Ω
- Result:
Proceed to OK NG
OK
NG