1GD-FTV EMISSION CONTROL UREA TANK REMOVAL
PROCEDURE

 33030
1.REMOVE MANUAL TRANSMISSION UNIT ASSEMBLY (for Manual Transmission)
35000
2.REMOVE AUTOMATIC TRANSMISSION ASSEMBLY (for Automatic Transmission)
53737A
3.REMOVE NO. 1 FRONT FENDER APRON TO FRAME SEAL LH
Remove the 5 clips and No. 1 front fender apron to frame seal LH from the body.
82169
4.DISCONNECT NO. 3 FRAME WIRE
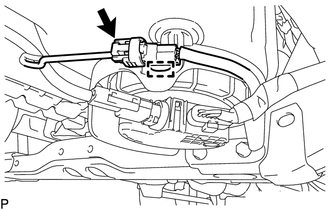
Disconnect the connector from the urea tube with heater assembly.
Detach the clamp from the urea tank sub-assembly.
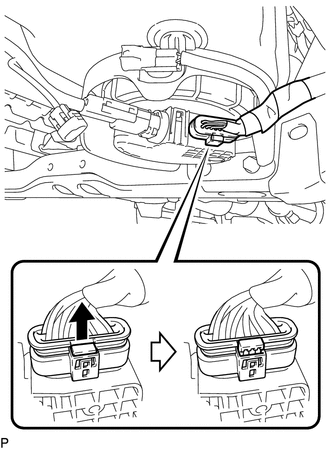
Pull the tabs of the connector as shown in the illustration and disconnect the connector from the urea pump.
77840
5.DISCONNECT UREA TUBE WITH HEATER ASSEMBLY
Disconnect the urea tube with heater assembly from the urea injector set (See page Engine / Hybrid System>1GD-FTV (EMISSION CONTROL)>UREA INJECTOR>REMOVAL).
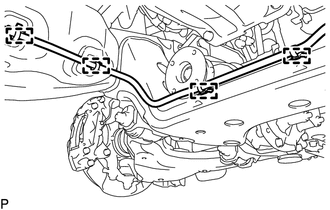
Detach the 4 clamps and disconnect the urea tube with heater assembly from the frame crossmember and urea tank sub-assembly.
77900
6.DISCONNECT UREA TANK FILLER PIPE WITH SUPPORT ASSEMBLY
- NOTICE:
-
Check for dirt or mud on the urea tank breather tube sub-assembly, urea tank sub-assembly and around the urea tank filler pipe with support connector before disconnection. Clean if necessary.
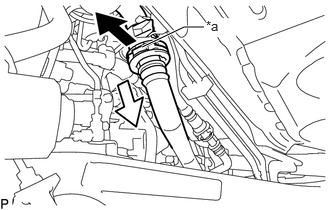
Disconnect the urea tank filler pipe with support assembly from the urea tank breather tube sub-assembly.
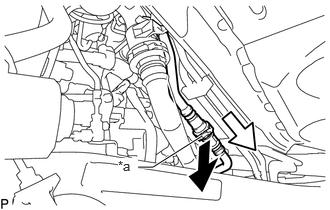
| *a | Retainer |

|
Pull |

|
Pull Out |
Detach the claw of the retainer of the urea tank filler pipe with support connector, pull up the retainer and disconnect the urea tank filler pipe with support connector from the urea tank breather tube sub-assembly.
- NOTICE:
- ·
If there is any solidified urea solution (white solids) on the connection area, clean the solids off with a damp cloth, etc., before disconnecting the connector.
·Be sure to disconnect the urea tank filler pipe with support connector by hand.
·Check for foreign matter in the urea tank breather tube sub-assembly and around the urea tank filler pipe with support connector. Clean if necessary. Foreign matter may damage the O-ring or cause leaks in the seal between the urea tank breather tube sub-assembly and urea tank filler pipe with support connector.
·Put the urea tank breather tube sub-assembly and urea tank filler pipe with support connector ends in plastic bags to prevent damage and foreign matter contamination.
Disconnect the urea tank filler pipe with support assembly from the urea tank sub-assembly.
| *a | Retainer |
|
|
Pull |
|
|
Pull Out |
Detach the claw of the retainer of the urea tank filler pipe with support connector, pull up the retainer and disconnect the urea tank filler pipe with support connector from the urea tank sub-assembly.
- NOTICE:
- ·
If there is any solidified urea solution (white solids) on the connection area, clean the solids off with a damp cloth, etc., before disconnecting the connector.
·Be sure to disconnect the urea tank filler pipe with support connector by hand.
·Check for foreign matter in the urea tank sub-assembly and around the urea tank filler pipe with support connector. Clean if necessary. Foreign matter may damage the O-ring or cause leaks in the seal between the urea tank sub-assembly and urea tank filler pipe with support connector.
·Put the urea tank sub-assembly and urea tank filler pipe with support connector ends in plastic bags to prevent damage and foreign matter contamination.
77801
7.REMOVE UREA TANK SUB-ASSEMBLY
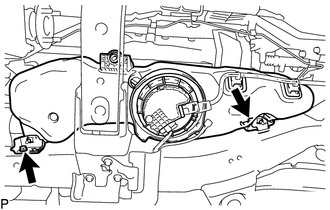
Remove the 2 bolts and urea tank sub-assembly from the flame LH.
77903
8.REMOVE UREA TANK BREATHER TUBE SUB-ASSEMBLY
- NOTICE:
-
Check for dirt or mud on the urea tank sub-assembly and around the urea tank breather tube connector before disconnection. Clean if necessary.
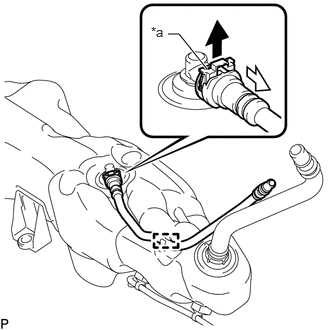
Detach the clamp and remove the urea tank breather tube sub-assembly from the urea tank sub-assembly.
| *a | Retainer |
|
|
Pull |
|
|
Pull Out |
Detach the claw of the retainer of the urea tank breather tube connector, pull up the retainer and disconnect the urea tank breather tube connector from the urea tank sub-assembly.
- NOTICE:
- ·
If there is any solidified urea solution (white solids) on the connection area, clean the solids off with a damp cloth, etc., before disconnecting the connector.
·Be sure to disconnect the urea tank breather tube connector by hand.
·Check for foreign matter in the urea tank sub-assembly and around the urea tank breather tube connector. Clean if necessary. Foreign matter may damage the O-ring or cause leaks in the seal between the urea tank sub-assembly and urea tank breather tube connector.
·Put the urea tank sub-assembly and urea tank breather tube connector ends in plastic bags to prevent damage and foreign matter contamination.
77840
9.REMOVE UREA TUBE WITH HEATER ASSEMBLY
- NOTICE:
-
Check for dirt or mud on the urea pump and around the urea tube with heater connector before disconnection. Clean if necessary.
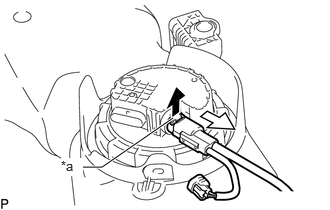
Remove the urea tube with heater assembly from the urea pump.
| *a | Retainer |
|
|
Pull |
|
|
Pull Out |
Detach the claw of the retainer of the urea tube with heater connector, pull up the retainer and disconnect the urea tube with heater connector from the urea pump.
- NOTICE:
- ·
If there is any solidified urea solution (white solids) on the connection area, clean the solids off with a damp cloth, etc., before disconnecting the connector.
·Be sure to disconnect the urea tube with heater connector by hand.
·Check for foreign matter in the urea pump and around the urea tube with heater connector. Clean if necessary. Foreign matter may damage the O-ring or cause leaks in the seal between the urea pump and urea tube with heater connector.
·Put the urea pump and urea tube with heater connector ends in plastic bags to prevent damage and foreign matter contamination.
77871
10.REMOVE UREA PUMP
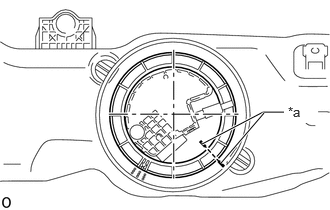
| *a | Co-rotation Prevention Check Mark |
Apply a co-rotation prevention check mark to the urea pump from the urea tank sub-assembly.
- NOTICE:
- ·
If the urea pump and urea tank sub-assembly are not firmly attached and the urea pump gauge retainer is rotated, the urea pump will co-rotate and result in the urea pump being damaged.
·Make sure to apply co-rotation prevention check mark to prevent the urea pump from co-rotating.
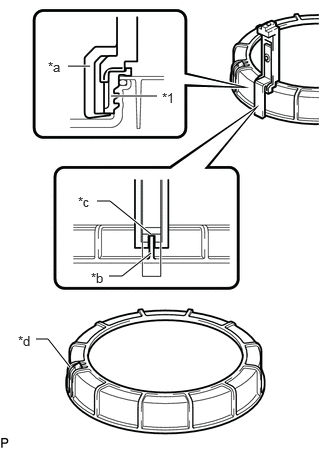
| *1 | Urea Pump Gauge Retainer |
| *a | SST (Claw Set) |
| *b | Rib |
| *c | Cutout |
| *d | SST (Claw Set) Incorrect Installation Point (Rotational Start Point Mark of Urea Pump Gauge Retainer) |
Set 4 SST (claw sets) to the urea pump gauge retainer and temporarily install.
- SST
- 09808-14031 (09808-01080, 09808-01090, 09808-01100)
- NOTICE:
- ·
Align the cutout of SST (claw set) to the rib of the urea pump gauge retainer.
·Do not place SST on the rotational start paint mark of the urea pump gauge retainer, otherwise SST (claw set) cannot be set correctly.
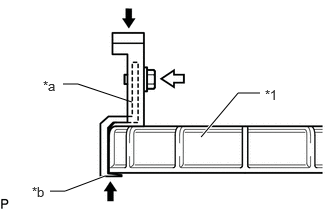
| *1 | Urea Pump Gauge Retainer |
| *a | SST (Claw Set) |
| *b | Hook |
|
|
Pinch |
|
|
SST (Bolt) |
While firmly pressing the claw of SST into rib of the urea pump gauge retainer, tighten the bolt.
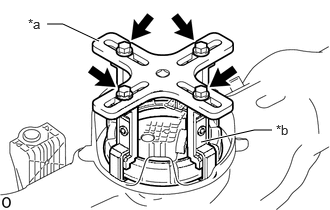
| *a | SST (Plate) |
| *b | SST (Claw Set) |
|
|
SST (Bolt) |
Temporarily install SST (plate) to SST (claw set) with 4 SST (bolts).
- SST
- 09808-14031 (09808-01030, 09808-01090)
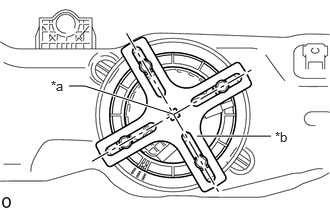
| *a | Center of Urea Pump Gauge Retainer |
| *b | SST (Plate) |
Adjust the position of SST (plate) so that the setting hole of SST (handle) aligns with the center of the urea pump gauge retainer.
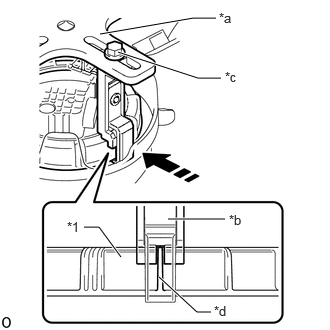
| *1 | Urea Pump Gauge Retainer |
| *a | SST (Plate) |
| *b | SST (Claw Set) |
| *c | SST (Bolt) |
| *d | Rib |

|
Press |
While firmly pressing SST (claw set) into rib of the urea pump gauge retainer, tighten SST (bolt).
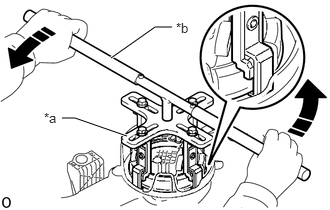
| *a | SST (Plate) |
| *b | SST (Handle) |
|
|
Loosen |
Install SST (handle) to SST (plate).
- SST
- 09808-14031 (09808-01010, 09808-01020)
Slowly loosen the urea pump gauge retainer by approximately 90°.
- NOTICE:
- ·
Do not use any tools other than SST, such as screwdriver, etc.
·Do not apply excessive force when pressing down on SST, as urea pump will place excessive force on the urea pump gauge retainer and be difficult to remove, and parts may be damaged.
·Do not use an impact wrench or turn SST handle with excessive force, as parts may be damaged.
While on person slowly loosens the urea pump gauge retainer, have another person press down the rising urea pump, and then remove the urea pump gauge retainer while making sure that the urea pump is properly aligned.
- NOTICE:
- ·
If the urea pump gauge retainer is turned while the urea pump and urea tank sub-assembly are not correctly aligned, urea pump will move with the urea pump gauge retainer, and the urea pump and urea tank sub-assembly may both be damaged.
·Do not rotate the urea pump gauge retainer when the co-rotation prevention check mark is out of place.
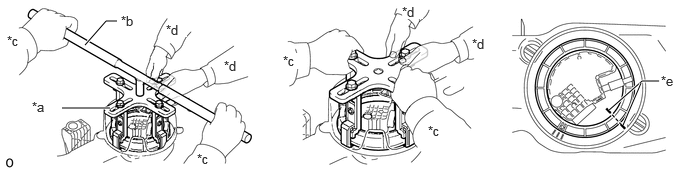
| *a | SST (Plate) | *b | SST (Handle) |
| *c | Person in Charge of Loosening | *d | Person in Charge of Supporting |
| *e | Co-rotation Prevention Check Mark | - | - |
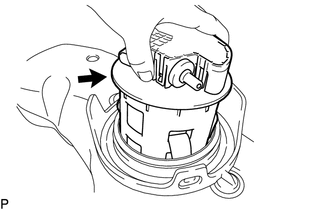
Remove the urea pump from the urea tank sub-assembly.
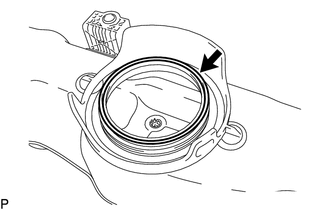
Remove the gasket from the urea tank sub-assembly.
77861
11.REMOVE NO. 1 UREA TANK BRACKET
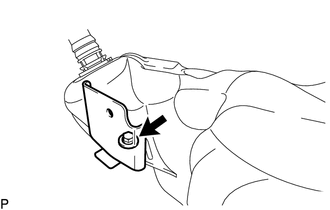
Remove the bolt and No. 1 urea tank bracket from the urea tank sub-assembly.
77862
12.REMOVE NO. 2 UREA TANK BRACKET
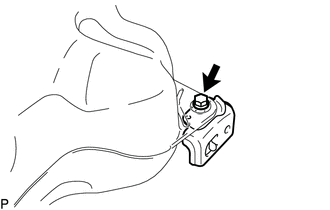
Remove the bolt and No. 2 urea tank bracket from the urea tank sub-assembly.