AUDIO / VIDEO QUARTER TRIM SPEAKER(for 3 Door) REMOVAL
CAUTION / NOTICE / HINT
- HINT:
- ·
Use the same procedure for the RH and LH sides.
·The procedure listed below is for the LH side.
PROCEDURE

 1. PRECAUTION
- NOTICE:
-
After turning the ignition switch off, waiting time may be required before disconnecting the cable from the negative (-) battery terminal.
-
Click hereGeneral>INTRODUCTION>REPAIR INSTRUCTION>PRECAUTION
2.DISCONNECT CABLE FROM NEGATIVE BATTERY TERMINAL
3.REMOVE REAR NO. 1 SEAT ASSEMBLY
for 60/40 Split Tumble Seat Type LH Side:
Click hereVehicle Interior>SEAT>REAR NO. 1 SEAT ASSEMBLY(for 60/40 Split Tumble Seat Type LH Side)>REMOVAL
for 60/40 Split Tumble Seat Type RH Side:
Click hereVehicle Interior>SEAT>REAR NO. 1 SEAT ASSEMBLY(for 60/40 Split Tumble Seat Type RH Side)>REMOVAL
67920
4.REMOVE DOOR SCUFF PLATE ASSEMBLY LH
62312B
5.REMOVE FRONT DOOR OPENING TRIM WEATHERSTRIP LH
64910M
6.REMOVE TONNEAU COVER ASSEMBLY (w/ Tonneau Cover)
58649C
7.REMOVE MAT SET PLATE COVER
58574A
8.REMOVE REAR FLOOR MAT REAR SUPPORT PLATE
62538C
9.REMOVE QUARTER TRIM COVER HOLE
58570C
10.REMOVE REAR FLOOR CARPET ASSEMBLY
64725D
11.REMOVE NO. 1 LUGGAGE COMPARTMENT TRIM HOOK
64937A
12.REMOVE NO. 1 TONNEAU COVER HOLDER CAP (w/o Tonneau Cover)
64712F
13.REMOVE FRONT DECK SIDE TRIM COVER (w/ Tonneau Cover)
62596D
14.REMOVE QUARTER TRIM POCKET TRAY
73233
15.REMOVE OUTER LAP BELT ANCHOR COVER
64740C
16.REMOVE DECK TRIM SIDE PANEL ASSEMBLY LH
86160C
17.REMOVE REAR SPEAKER SET
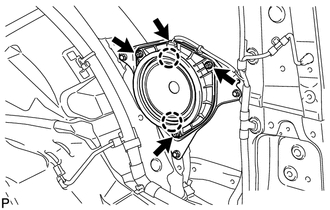
Disconnect the speaker connector.
Remove the 3 screws.
Detach the 2 claws and remove the rear speaker set.
- NOTICE:
-
Do not touch the cone of the speaker.
86163
18.REMOVE NO. 2 SPEAKER BRACKET
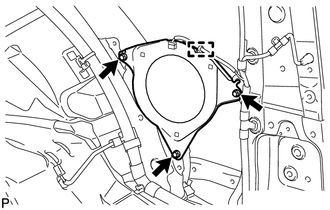
Detach the clamp.
Remove the 3 bolts and No. 2 speaker bracket.