PRE-COLLISION PRE-COLLISION SYSTEM HOW TO PROCEED WITH TROUBLESHOOTING
CAUTION / NOTICE / HINT
- HINT:
- ·
Use these procedures to troubleshoot the pre-collision system.
·*: Use the GTS.
PROCEDURE
- Result:
Proceed to NEXT
NEXT
| Pre-collision System Customer Problem Analysis | Vehicle Brought to Workshop | ||||||
|---|---|---|---|---|---|---|---|
| Year | Month | Day | |||||
| Dealer name | Person in charge at headquarters | Telephone number | |||||
| Shop name | Person in charge at shop | ||||||
| Frame type | Frame No. | First registered year | Total distance traveled | ||||
| Customer concerns (Include details) | Does not operate | ||||||
| Operates abnormally | |||||||
| Date of malfunction occurrence (Since when) | Year | Month | Day | Approx. Time | |||
| Date of last inspection | Year | Month | Day | ||||
| Frequency of problem symptoms | Once / Occasionally (times per day, times per month) / Every time certain conditions are met ( ) | ||||||
| Weather | Sunny / Cloudy / Rain / Snow (Amount of snowfall cm) / Other ( ) | Vehicle speed | Approximately ( ) km/h | ||||
| Place | Prefecture/State/Providence
(Attach a map if possible) |
||||||
| Driving path (where vehicle turned, where driver attempted to drive to, etc.)
* Describe the conditions immediately after the occurrence in as much detail as possible. |
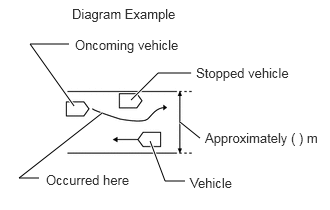
Conditions of Occurrence Diagram

|
||||||
0.771,1.104 0.313,0.458
0.313,0.458 0.719,0.458
true
1.365,1.042 1.646,0.76
1.646,0.76 1.99,0.76
true
0.406,1.854 0.198,1.854
0.198,1.854 1.063,1.177
true
1.875,1.271 2.083,1.438
true
1.563,1.469 1.719,1.885
1.719,1.885 1.927,1.885
true
0.75,0.063 1.99,0.26
1.24,0.198
10
false
Diagram Example
0.781,0.385 3.229,0.583
2.448,0.198
10
false
Oncoming vehicle
2.042,0.677 3.208,1
1.167,0.323
10
false
Stopped vehicle
0.479,1.792 1.406,2.01
0.927,0.219
10
false
Occurred here
1.979,1.823 3.052,2.021
1.073,0.198
10
false
Vehicle
2.135,1.354 3.427,1.604
1.292,0.25
10
false
Approximately ( ) m
|
|||||||
| Surrounding road conditions
Describe whether there were any billboards, metal objects on the road (manholes), guardrails, pipes, cat's eyes, gate bars, etc. |
|||||||
| Urban area / Suburbs / Highway / Other ( ) | Road surface conditions | Temperature | About °C ( °F) | ||||
| Direction of travel | Straight / Right turn / Left turn / Right curve / Left curve | Snow wall(s) | Y / N | ||||
| Driving lane | Number of lanes on one side (lanes) / ( ) lane(s) from left | Backlighting | Y / N | ||||
| Condition of external area around detection sensor | No foreign matter / Foreign matter (water, snow, ice, other) | ||||||
| Additional information about condition of vehicle exterior (other than above) | |||||||
| DTC | First Time (when vehicle brought to workshop) | ||||||
| Second Time (after clearing DTC) | |||||||
| Status of operation switch | Pre-collision system cancel switch | Early / Middle / Late / Off | VSC OFF switch | ON / OFF | |||
| Serial number of main part
* Fill in when removing, installing or replacing part |
Forward recognition camera | ||||||
| Describe the items to the right in as much detail as possible. | Driver operation | Accelerator pedal operated / Brake pedal operated / Steering wheel operated | Time elapsed after hybrid system was started | Approximately ( ) minutes | |||
| Tire pressure inspection result | Front: LH ( ) kPa RH ( ) kPa Standard ( ) kPa | ||||||
| Rear: LH ( ) kPa RH ( ) kPa Standard ( ) kPa | |||||||
| Sensor optical axis inspection result | Forward recognition camera | Accident history | Y / N | ||||
| Millimeter wave radar sensor assembly | Accident history | Y / N | |||||
| Vehicle modified | Y ( ) / N | ||||||
| Items installed or attached around windshield glass | Drive recorder* / Radar detector / Navigation unit (genuine/non-genuine) / ETC / Charms or toys / Other:
*: As information regarding the item is important for the investigation, make sure to obtain the item if permission is given by the customer. |
||||||
- Result:
Proceed to NEXT
NEXT
Measure the battery voltage.
- HINT:
-
If the voltage is below 11 V, replace or recharge the battery before proceeding to the next step.
- Standard voltage:
11 to 14 V
Check the fuses and relays.
Check the connector connections and terminals to make sure that there are no abnormalities such as loose connections, deformation, etc.
- Result:
Proceed to NEXT
NEXT
Check if a pre-collision system warning message is displayed on the multi-information display in the combination meter assembly.
- HINT:
-
If more than one warning message is displayed, check in the order of A, B, C, D and E.
- Result:
Result Proceed to "VSC Turned Off Pre-Collision Brake System Unavailable" is displayed A "Pre-Collision System Malfunction Visit Your Dealer" is displayed B "Pre-Collision System Unavailable Clean Sensor" is displayed C Any of the following messages is displayed:
·"Pre-Collision System Unavailable"
·"Front Camera Unavailable"
·"Front Camera Temporarily Unavailable See Owner's Manual" (If the meter customize "Language" is "English(BRITISH)")
·"Front Camera Unavailable See Owner's Manual" (If the meter customize "Language" is "English(AMERICAN)")
D Pre-collision system warning message is not displayed E
A
B
C
D
E
Using the GTS, check if the CAN communication system is functioning normally.
Click herePower Source / Network>NETWORKING>CAN COMMUNICATION SYSTEM (w/ Central Gateway ECU)>DIAGNOSIS SYSTEM
- OK:
CAN communication system is functioning normally.
- Result:
Proceed to OK NG
OK
NG
Check for DTCs.
Click hereVehicle Interior>PRE-COLLISION>PRE-COLLISION SYSTEM>DTC CHECK / CLEAR
- Result:
Result Proceed to DTCs are not output A DTC C142571 is output B A DTC other than C142571 is output C
A
B
C
Check for vehicle control history and note any codes that are output.
Click hereVehicle Interior>PRE-COLLISION>PRE-COLLISION SYSTEM>VEHICLE CONTROL HISTORY
Record the vehicle control history.
- Result:
Result Proceed to Vehicle control history is not output A Vehicle control history (X2013, X2015, X2022, X2024, X2025, X2026 or X2028) is output B Vehicle control history other than (X2013, X2015, X2022, X2024, X2025, X2026 and X2028) is output C
A
Click hereGeneral>INTRODUCTION>HOW TO TROUBLESHOOT ECU CONTROLLED SYSTEMS>HOW TO PROCEED WITH TROUBLESHOOTING
B
C
Clear the vehicle control history.
Click hereVehicle Interior>PRE-COLLISION>PRE-COLLISION SYSTEM>VEHICLE CONTROL HISTORY
Recheck for vehicle control history.
Check if the following vehicle control history is output.
Click hereVehicle Interior>PRE-COLLISION>PRE-COLLISION SYSTEM>VEHICLE CONTROL HISTORY
- Result:
Result Proceed to Vehicle control history is not output A Vehicle control history is output B
A
Click hereGeneral>INTRODUCTION>HOW TO TROUBLESHOOT ECU CONTROLLED SYSTEMS>HOW TO PROCEED WITH TROUBLESHOOTING
B
Clear the DTCs.
Click hereVehicle Interior>PRE-COLLISION>PRE-COLLISION SYSTEM>DTC CHECK / CLEAR
Reproduce the detection conditions of the recorded DTC.
- HINT:
-
Refer to the flowchart for the detection conditions for each of the DTCs.
-
Click hereVehicle Interior>PRE-COLLISION>PRE-COLLISION SYSTEM>DIAGNOSTIC TROUBLE CODE CHART
Recheck for DTCs.
Attempt to duplicate the malfunction and check if the DTCs are output again.
Click hereVehicle Interior>PRE-COLLISION>PRE-COLLISION SYSTEM>DTC CHECK / CLEAR
- Result:
Result Proceed to DTCs are not output A DTC is output B
A
Click hereGeneral>INTRODUCTION>HOW TO TROUBLESHOOT ECU CONTROLLED SYSTEMS>HOW TO PROCEED WITH TROUBLESHOOTING
B
Check whether the millimeter wave radar sensor assembly and surrounding area is dirty or obstructed by foreign matter.
- HINT:
-
Check that the following situations do not occur.
- ·
A non-genuine radar sensor cover is installed
·The millimeter wave radar sensor assembly or radar sensor cover and its surrounding area are dirty
·An accessory, such as bull bars, a grille guard, etc., which interferes with millimeter radio waves is installed
·The radar sensor cover or its surrounding area has been painted or has a sticker attached
·There is foreign matter attached to or between the radar sensor cover or millimeter wave radar sensor assembly
Clean away any dirt or foreign matter that is adhering to the area around the millimeter wave radar sensor assembly.
- Result:
Proceed to NEXT
NEXT
- NOTICE:
-
Before inspecting the multi-information display, be sure to first turn the ignition switch off and then to ON again.
Turn the ignition switch off.
Turn the ignition switch to ON.
Check whether "Pre-Collision System Unavailable Clean Sensor" is displayed on the multi-information display.
- Result:
Result Proceed to Not displayed A Displayed B
A
B
Using the GTS, read the following Data List item for the front radar system.
| Tester Display | Measurement Item / Range | Normal Condition | Diagnostic Note |
|---|---|---|---|
| On-Line Calibration Angle (Horizontal) | Calibrated angle value (horizontal) / Min.: -12.8 deg, Max.: 12.7 deg | Learned value | - |
- Standard:
The value displayed is less than -0.5 to 0.5 deg.
- Result:
Proceed to OK NG
OK
NG
Explain to the customer that the "Pre-Collision System Unavailable Clean Sensor" message on the multi-information display was caused by dirt or foreign matter adhering to the area around the millimeter wave radar sensor assembly, and that the situation has been corrected.
- Result:
Proceed to NEXT
NEXT
Refer to Problem Symptoms Table.
Click hereVehicle Interior>PRE-COLLISION>PRE-COLLISION SYSTEM>PROBLEM SYMPTOMS TABLE
- Result:
Result Proceed to Fault is not listed in Problem Symptoms Table. A Fault is listed in Problem Symptoms Table. B
A
B
Check the condition of the PCS warning light.
- Result:
Result Proceed to Only the PCS warning light is illuminated. A The PCS warning light is not illuminated. B
A
B
Check for vehicle control history and note any codes that are output.
Click hereVehicle Interior>PRE-COLLISION>PRE-COLLISION SYSTEM>VEHICLE CONTROL HISTORY
- Result:
Proceed to NEXT
NEXT
Check for DTCs.
Click hereVehicle Interior>PRE-COLLISION>PRE-COLLISION SYSTEM>DTC CHECK / CLEAR
- Result:
Result Proceed to DTC is output A DTCs are not output B
A
B
Check detection condition for the confirmed pre-collision system DTC.
Click hereVehicle Interior>PRE-COLLISION>PRE-COLLISION SYSTEM>FAIL-SAFE CHART
- Result:
Proceed to NEXT
NEXT
Explain to the customer the cause of the previously stored DTC and that the output reason has been cleared.
Check for vehicle control history and note any codes that are output.
Click hereVehicle Interior>PRE-COLLISION>PRE-COLLISION SYSTEM>VEHICLE CONTROL HISTORY
Record the vehicle control history.
- Result:
Result Proceed to Vehicle control history is not output A Vehicle control history is output B
A
B
Check the conditions when pre-collision system operates or does not operate.
Click hereVehicle Interior>PRE-COLLISION>PRE-COLLISION SYSTEM>PRECAUTION
- Result:
Result Proceed to No condition is met. A Any condition is met. B
A
B
- NOTICE:
-
Before performing beam axis adjustment, check the fitting of the front bumper cover and radiator grille assembly and confirm that there is no warping or deformation.
Adjust the reflector height.
Click hereEngine / Hybrid System>CRUISE CONTROL>MILLIMETER WAVE RADAR SENSOR>ADJUSTMENT
Place the reflector.
Click hereEngine / Hybrid System>CRUISE CONTROL>MILLIMETER WAVE RADAR SENSOR>ADJUSTMENT
Turn the cruise control main switch on.
Check the amount of misalignment and make a note.
- Standard (before performing adjustment):
- Front Beam Axis Misalignment Value:
Vertical -5.0 to 5.0 deg. Horizontal -0.6 to 0.6 deg.
- Result:
Result Proceed to Front beam axis misalignment value is within the specified range. A Front beam axis misalignment value is not within the specified range. B
A
Click hereGeneral>INTRODUCTION>HOW TO TROUBLESHOOT ECU CONTROLLED SYSTEMS>HOW TO PROCEED WITH TROUBLESHOOTING
B
Check for vehicle control history and note any codes that are output.
Click hereVehicle Interior>PRE-COLLISION>PRE-COLLISION SYSTEM>VEHICLE CONTROL HISTORY
- HINT:
-
Based on the customer's inquiry, check the corresponding factors in the vehicle control history, such as the detection time and date, trip information and elapsed time.
- Result:
Proceed to NEXT
NEXT
Explain to the customer the cause of the previously stored vehicle control history and that the output reason has been cleared.
- NOTICE:
-
After the explanation, make sure to clear vehicle control history.