5L-E ENGINE MECHANICAL TIMING BELT INSTALLATION
PROCEDURE

 13505
1.INSTALL NO. 1 TIMING BELT IDLER SUB-ASSEMBLY
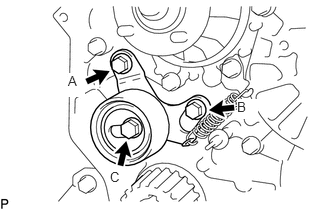
Install the No. 1 belt idler with the 3 bolts.
- Torque:
- for bolt A : 44 N*m (449 kgf*cm, 32 ft.*lbf)
- for bolt B, C : 19 N*m (195 kgf*cm, 14 ft.*lbf)
- HINT:
-
 1.979,1.156 1.979,1.313 false 1.708,1.177 1.708,1.323 false 1.156,1.979 1.156,2.125 false 1.99,1.885 1.99,2.104 false 1.24,2.031 1.917,2.031 false 1.531,1.26 1.646,1.26 false 2.052,1.26 2.156,1.26 false 1.688,1.698 1.688,1.875 false 1.719,1.688 1.719,1.865 false 1.469,1.698 1.469,1.875 false 1.542,1.688 1.542,1.865 false 1.51,1.688 1.51,1.875 false 1.583,1.688 1.583,1.865 false 1.188,1.698 1.188,1.875 false 1.646,1.688 1.646,1.865 false 1.615,1.698 1.615,1.875 false 1.438,1.688 1.438,1.875 false 1.406,1.698 1.406,1.875 false 1.365,1.698 1.365,1.875 false 1.333,1.698 1.333,1.885 false 1.219,1.688 1.219,1.875 false 1.25,1.698 1.25,1.875 false 1.281,1.688 1.281,1.875 false 1.313,1.698 1.313,1.875 false 0.698,0.302 0.844,0.604 0.146,0.302 10 false A 0.698,0.969 0.854,1.229 0.156,0.26 10 false B 0.698,1.688 0.844,1.927 0.146,0.24 10 false C 2.188,1.188 3.052,1.354 0.865,0.167 8 false 13 mm (0.51 in.) 2.021,1.865 2.969,2.021 0.948,0.156 8 false 36.5 mm (1.44 in.)
- ·
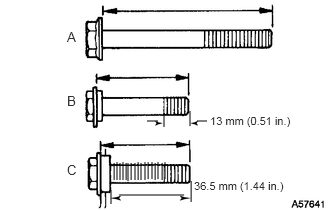
The bolt lengths for bolt A, B and C as follows.
·Bolt C is combined with the No. 1 timing belt idler.
- Standard Bolt:
Item Length A 76.5 mm (3.01 in.) B 42.9 mm (1.69 in.) C 41.3 mm (1.63 in.)
2.SET NO. 1 CYLINDER TO TDC/COMPRESSION
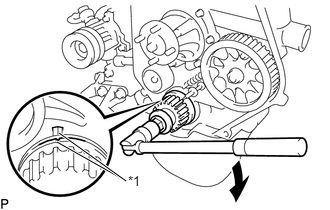
Using the crankshaft pulley bolt, align the groove of the crankshaft pulley with the timing pointer by turning the crankshaft clockwise.
| *1 | Timing Mark |

|
Turn |
- NOTICE:
-
Do not turn the crankshaft pulley counterclockwise.
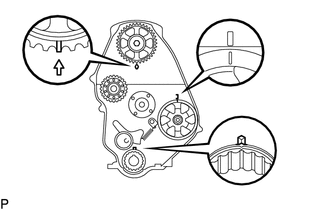
Set the timing and drive pulleys at each position.
- NOTICE:
- ·
Make sure the engine is cold.
·When turning the crankshaft or camshaft, the valve heads will hit against the piston top. Do not turn them more than necessary.
13568
3.INSTALL TIMING BELT
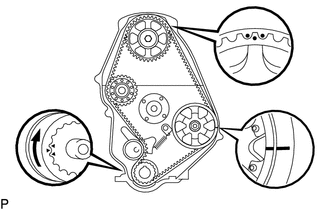
- HINT:
-
If reusing the timing belt, align the points marked during removal, and install the timing belt with the arrow pointing in the direction the belt moves when the engine is running.
Remove any oil or water on each pulley, and keep them clean.
Install the timing belt to the crankshaft timing and timing belt idlers.
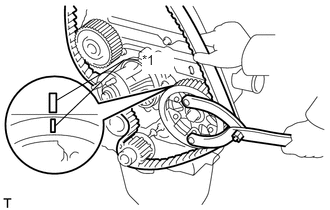
Using SST, slightly turn the injection pump drive pulley clockwise. Install the timing belt to the pulley, and align the timing marks of the drive pulley and timing belt case.
- SST
- 09960-10010 (09962-01000, 09963-01000)
| *1 | Timing Mark |
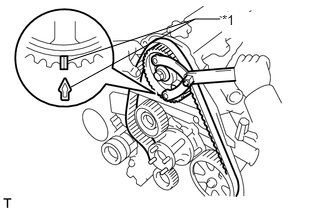
Using SST, slightly turn the camshaft timing pulley clockwise. Install the timing belt to the timing pulley, and align the timing marks of the timing pulley and timing belt case.
- SST
- 09960-10010 (09962-01000, 09963-01000)
| *1 | Timing Mark |
Check that the timing belt has tension between the injection pump drive and camshaft timing pulleys.
Install the timing belt to the No. 1 timing belt idler.
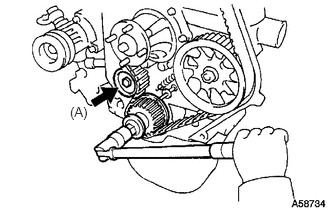
Loosen the No. 1 timing belt idler bolt (A), and stretch the timing belt.
Slowly turn the crankshaft pulley.
- NOTICE:
-
Always turn the crankshaft clockwise.
Tighten the No. 1 timing belt idler bolt.
- Torque:
- 44 N*m (449 kgf*cm, 33 ft.*lbf)
4.CHECK NO. 1 CYLINDER TO TDC/COMPRESSION
Slowly turn the crankshaft pulley 2 revolutions from TDC to TDC.
- NOTICE:
-
Always turn the crankshaft clockwise.
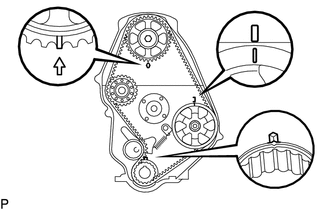
Check that the timing marks for each pulley align as shown in the illustration.
If the timing marks do not align, remove the timing belt and reinstall it.
13566A
5.INSTALL TIMING BELT GUIDE
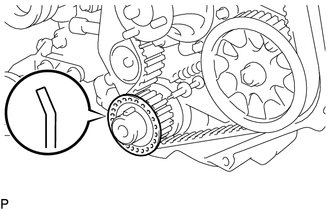
Install the timing belt guide with the cup side facing outward.
11302
6.INSTALL TIMING BELT COVER
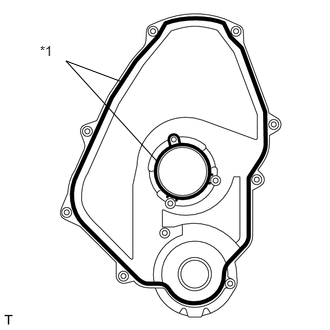
Install 2 new gaskets to the timing belt cover.
| *1 | Gasket |
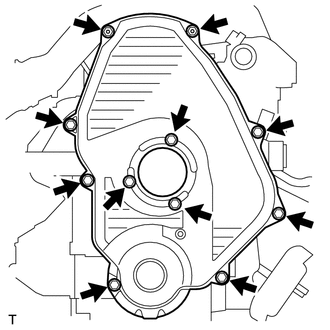
Install the timing belt cover with the 11 bolts and washers.
- Torque:
- for bolt A : 8.5 N*m (85 kgf*cm, 75 ft.*lbf)
- except bolt A : 11 N*m (107 kgf*cm, 8 ft.*lbf)
88545
7.INSTALL IDLE PULLEY ASSEMBLY
Install the idle pulley bracket with the 2 bolts.
- Torque:
- 29 N*m (300 kgf*cm, 22 ft.*lbf)
13471
8.INSTALL CRANKSHAFT PULLEY
Align the key groove of the pulley with the pulley set key, and slide the pulley onto the crankshaft to install it.
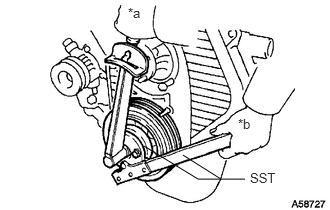
Using SST, install the pulley bolt.
- SST
- 09213-54015 (91651-60855)
09330-00021
- Torque:
- 235 N*m (2396 kgf*cm, 173 ft.*lbf)
| *a | Turn |
| *b | Hold |
44319
9.INSTALL VANE PUMP DRIVE PULLEY
Install the vane pump drive pulley and cooler compressor drive pulley with the 4 bolts.
- Torque:
- 19 N*m (194 kgf*cm, 14 ft.*lbf)
16711
10.INSTALL FAN SHROUD
Install the fan shroud (See page Engine / Hybrid System>5L-E (COOLING)>RADIATOR>INSTALLATION).
11.CONNECT CABLE TO NEGATIVE BATTERY TERMINAL
12. INITIALIZATION AFTER RECONNECTING BATTERY TERMINAL
Click hereGeneral>SETUP>WHEN DISCONNECTING OR RECONNECTING BATTERY TERMINAL>WORK PROCEDURE
- HINT:
-
When disconnecting and reconnecting the battery, there is an automatic learning function that completes learning when the respective system is used.
-
Click hereGeneral>SETUP>WHEN DISCONNECTING OR RECONNECTING BATTERY TERMINAL>AUTOMATIC LEARNING CHART
13.INSPECT ENGINE IDLE SPEED
14.INSPECT MAXIMUM ENGINE SPEED