INSTALLATION
Removal / installation · Vehicles built from Jan 2012
Versions by build date: Sep 2011 – Dec 2011 from Jan 2012
| 1. INSTALL CAMSHAFT TIMING OIL CONTROL VALVE ASSEMBLY (for Exhaust Side of Bank 2) |

Apply a light coat of engine oil to a new O-ring and install it to the camshaft timing oil control valve.
Install the camshaft timing oil control valve with the bolt.
- Torque:
- 10 N*m{ 102 kgf*cm , 7 ft.*lbf }
- NOTICE:
- Do not allow foreign matter to contact the oil seal face of the camshaft timing oil control valve (surface which contacts the cylinder head).
- Be careful that the O-ring is not cracked when installing the camshaft timing oil control valve.
- Do not allow foreign matter to contact the oil seal face of the camshaft timing oil control valve (surface which contacts the cylinder head).
Connect the camshaft timing oil control valve connector.
| 2. INSTALL CAMSHAFT TIMING OIL CONTROL VALVE ASSEMBLY (for Intake Side of Bank 2) |
Apply a light coat of engine oil to a new O-ring and install it to the camshaft timing oil control valve.
Install the camshaft timing oil control valve with the bolt.
- Torque:
- 10 N*m{ 102 kgf*cm , 7 ft.*lbf }
- NOTICE:
- Do not allow foreign matter to contact the oil seal face of the camshaft timing oil control valve (surface which contacts the cylinder head).
- Be careful that the O-ring is not cracked when installing the camshaft timing oil control valve.
- Do not allow foreign matter to contact the oil seal face of the camshaft timing oil control valve (surface which contacts the cylinder head).
Connect the camshaft timing oil control valve connector.
| 3. INSTALL CAMSHAFT TIMING OIL CONTROL VALVE ASSEMBLY (for Exhaust Side of Bank 1) |
Apply a light coat of engine oil to a new O-ring and install it to the camshaft timing oil control valve.
Install the camshaft timing oil control valve with the bolt.
- Torque:
- 10 N*m{ 102 kgf*cm , 7 ft.*lbf }
- NOTICE:
- Do not allow foreign matter to contact the oil seal face of the camshaft timing oil control valve (surface which contacts the cylinder head).
- Be careful that the O-ring is not cracked when installing the camshaft timing oil control valve.
- Do not allow foreign matter to contact the oil seal face of the camshaft timing oil control valve (surface which contacts the cylinder head).
Connect the camshaft timing oil control valve connector.
| 4. INSTALL CAMSHAFT TIMING OIL CONTROL VALVE ASSEMBLY (for Intake Side of Bank 1) |
Apply a light coat of engine oil to a new O-ring and install it to the camshaft timing oil control valve.
Install the camshaft timing oil control valve with the bolt.
- Torque:
- 10 N*m{ 102 kgf*cm , 7 ft.*lbf }
- NOTICE:
- Do not allow foreign matter to contact the oil seal face of the camshaft timing oil control valve (surface which contacts the cylinder head).
- Be careful that the O-ring is not cracked when installing the camshaft timing oil control valve.
- Do not allow foreign matter to contact the oil seal face of the camshaft timing oil control valve (surface which contacts the cylinder head).
Connect the camshaft timing oil control valve connector.
| 5. INSTALL NO. 2 EMISSION CONTROL VALVE SET (w/ Secondary Air Injection System) |
| 6. INSTALL NO. 1 AIR CLEANER HOSE |
Install the No. 1 air cleaner hose with the 2 hose clamps.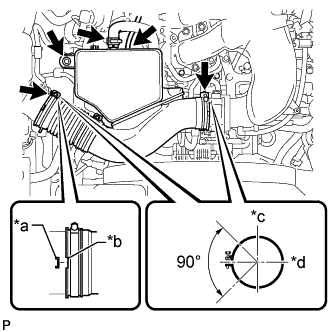

- Torque:
- 2.5 N*m{ 25 kgf*cm , 22 in.*lbf }
Text in Illustration *a
Protrusion
*b
Groove
*c
Top
*d
Front
Install the bolt.
- Torque:
- 5.0 N*m{ 51 kgf*cm , 44 in.*lbf }
Connect the vacuum hose and No. 2 PCV hose.
| 7. INSTALL V-BANK COVER |
Attach the 2 V-bank cover hooks to the bracket. Then align the 2 V-bank cover grommets with the 2 pins and press down on the V-bank cover to attach the pins.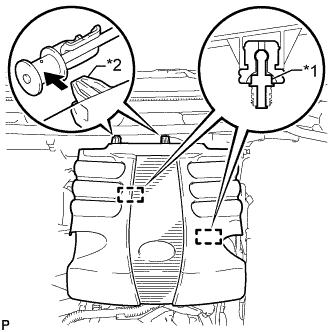
Text in Illustration *1
Pin
*2
Hook