REASSEMBLY
Removal / installation · Vehicles built from Jan 2012
| 1.
INSTALL GENERATOR DRIVE END FRAME BEARING |
 |
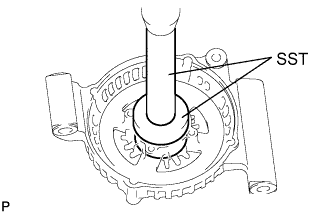
- Using SST and a press, press in a new drive end frame bearing.
- SST
- 09950-60010
(09951-00500)
09950-70010
(09951-07100)
Install the retainer plate with the 4 screws.
-
Torque:
- 2.3 N*m{
23 kgf*cm
, 20 in.*lbf
}
| 2.
INSTALL GENERATOR ROTOR ASSEMBLY |
|
Install the generator rotor to the drive end frame.
Place a new generator washer on the generator rotor.
| 3.
INSTALL GENERATOR COIL ASSEMBLY |
|
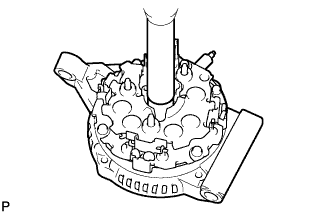
- Using a 22 mm socket wrench and press, slowly press in the generator coil.
Install the 4 bolts.
-
Torque:
- 5.9 N*m{
60 kgf*cm
, 52 in.*lbf
}
| 4.
INSTALL GENERATOR BRUSH HOLDER ASSEMBLY |
|
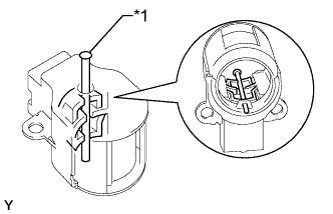
- While pushing the 2 brushes into the brush holder, insert a pin with a diameter of 1.0 mm (0.0394 in.) into the brush holder hole.
Text in Illustration
*1
|
Pin
|
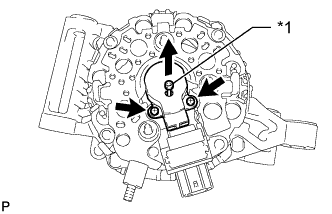
- Install the brush holder with the 2 screws.
-
Torque:
- 1.8 N*m{
18 kgf*cm
, 16 in.*lbf
}
Pull out the pin from the brush holder.
Text in Illustration
*1
|
Pin
|
| 5.
INSTALL TERMINAL INSULATOR |
|
Install the terminal insulator to the generator coil.
- NOTICE:
- Pay attention to the mounting orientation of the terminal insulator.
| 6.
INSTALL GENERATOR REAR END COVER |
|
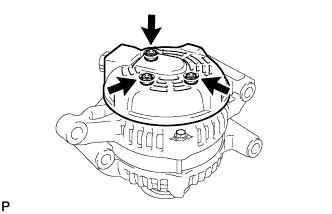
- Install the generator rear end cover with the 3 nuts.
-
Torque:
- 4.6 N*m{
46 kgf*cm
, 40 in.*lbf
}
| 7.
INSTALL GENERATOR PULLEY |
|
Temporarily install the generator pulley with the pulley nut by hand.
Mount the generator in a vise between aluminum plates.
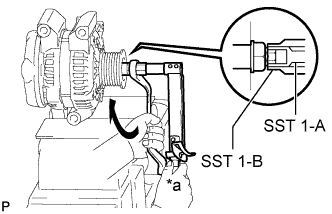
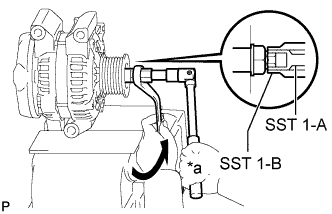
- Install SST 1-A to the pulley shaft.
- SST
- 09820-63011
(09820-06010, 09820-06021)
- HINT:
SST 1-A and B
|
09820-06010
|
SST 2
|
09820-06021
|
Install SST 1-B to SST 1-A.
Hold SST 1-A with a torque wrench and turn SST 1-B clockwise with the specified torque.
-
Torque:
- 39 N*m{
398 kgf*cm
, 29 ft.*lbf
}
Text in Illustration
*a
|
Hold
|
 
|
Turn
|
- NOTICE:
- Check that SST is secured to the rotor shaft.
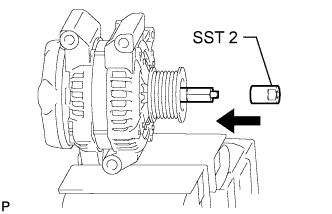
- Insert SST 2 and attach it to the pulley nut.
Text in Illustration
|
Insert
|
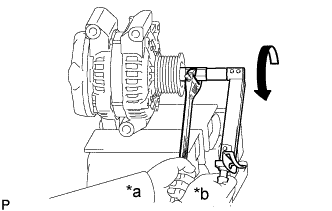
- Tighten the pulley nut by turning SST 1-A in the direction shown in the illustration.
-
Torque:
- 133 N*m{
1351 kgf*cm
, 98 ft.*lbf
}
Text in Illustration
*a
|
Hold
|
*b
|
Turn
|
- HINT:
- Hold the adjustable wrench against the vise and tighten the nut securely.
Remove SST 2 from the generator.
- Turn SST 1-B, and then remove SST 1-A and B.
Text in Illustration
*a
|
Hold
|
|
Turn
|
Turn the generator pulley and check that the pulley moves smoothly.