INSTALLATION
Removal / installation · Vehicles built from Jan 2012
| 1. INSTALL GENERATOR ASSEMBLY |

Install the stud bolt.
- Torque:
- 10 N*m{ 102 kgf*cm , 7 ft.*lbf }
Install the generator with the 3 bolts and nut.
- Torque:
- 43 N*m{ 438 kgf*cm , 32 ft.*lbf }
Connect the harness bracket to the generator with the bolt.
- Torque:
- 31 N*m{ 316 kgf*cm , 23 ft.*lbf }
Connect the generator wire with the nut.
- Torque:
- 9.8 N*m{ 100 kgf*cm , 87 in.*lbf }
Close the terminal cap.
Connect the generator connector.
| 2. CONNECT OIL COOLER TUBE |
Connect the oil cooler tube with the 2 bolts.
- Torque:
- 14 N*m{ 143 kgf*cm , 10 ft.*lbf }
| 3. CONNECT VANE PUMP ASSEMBLY |
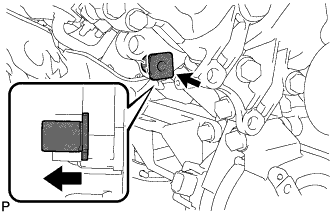  |
- HINT:
- Before performing the following procedures, move the spacer until the vane pump can be installed.
 |
Spacer |
Connect the vane pump to the timing chain cover with the 2 bolts.
- Torque:
- 21 N*m{ 214 kgf*cm , 15 ft.*lbf }
| 4. INSTALL AIR CLEANER CAP AND HOSE |
Install the air cleaner cap and hose, and then tighten the hose clamp.
- Torque:
- 2.5 N*m{ 25 kgf*cm , 22 in.*lbf }
Attach the 4 clamps.
Connect the mass air flow meter connector and attach the clamp.
Connect the No. 2 PCV hose and No. 1 air hose.
| 5. INSTALL FRONT FENDER APRON TRIM PACKING A |
Install the front fender apron trim packing A with the 3 clips.
| 6. INSTALL FAN AND GENERATOR V BELT |
Set the fan and generator V belt onto every part.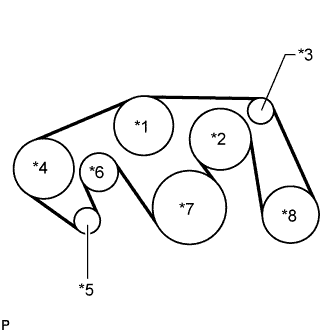
Text in Illustration *1
Water Pump Pulley
*2
Fan Pulley
*3
No. 1 Idler Pulley
*4
Vane Pump Pulley
*5
Generator Pulley
*6
V-ribbed Belt Tensioner
*7
Crankshaft Pulley
*8
Cooler Compressor Pulley
While turning the belt tensioner counterclockwise, remove the pin.
- NOTICE:
- Make sure that the fan and generator V belt is properly set on each pulley.
Check that the belt fits properly in the ribbed grooves.
- HINT:
- Make sure to check by hand that the belt has not slipped out of the grooves on the bottom of the pulley.
| 7. INSTALL NO. 1 ENGINE UNDER COVER SUB-ASSEMBLY |
Install the No. 1 engine under cover sub-assembly with the 10 bolts.
- Torque:
- 29 N*m{ 296 kgf*cm , 21 ft.*lbf }
| 8. INSTALL FRONT FENDER SPLASH SHIELD SUB-ASSEMBLY LH |
Push in the clip to install the front fender splash shield sub-assembly LH.
Install the 3 bolts and screw.
| 9. INSTALL FRONT FENDER SPLASH SHIELD SUB-ASSEMBLY RH |
Push in the clip to install the front fender splash shield sub-assembly RH.
Install the 3 bolts and 2 screws.
| 10. CONNECT CABLE TO NEGATIVE BATTERY TERMINAL |
- NOTICE:
- When disconnecting the cable, some systems need to be initialized after the cable is reconnected (Click here).
| 11. INSTALL V-BANK COVER SUB-ASSEMBLY |
Attach the 2 V-bank cover hooks to the bracket. Then align the 3 V-bank cover grommets with the 3 pins, and press down on the V-bank cover to attach the pins.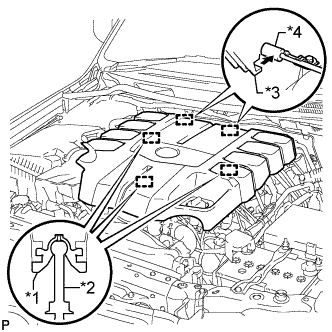
Text in Illustration *1
Grommet
*2
Pin
*3
Hook
*4
Bracket