ECM Power Source Circuit
Circuit diagnosis · Vehicles built Sep 2011 – Dec 2011
Versions by build date: Sep 2011 – Dec 2011 from Jan 2012
DESCRIPTION
When the ignition switch is turned to ON, battery voltage is applied to the IGSW of the ECM. The output signal from the MREL terminal of the ECM causes a current to flow to the coil, closing the contacts of the integration relay (EFI relay) and supplying power to either terminal +B or +B2 of the ECM.WIRING DIAGRAM
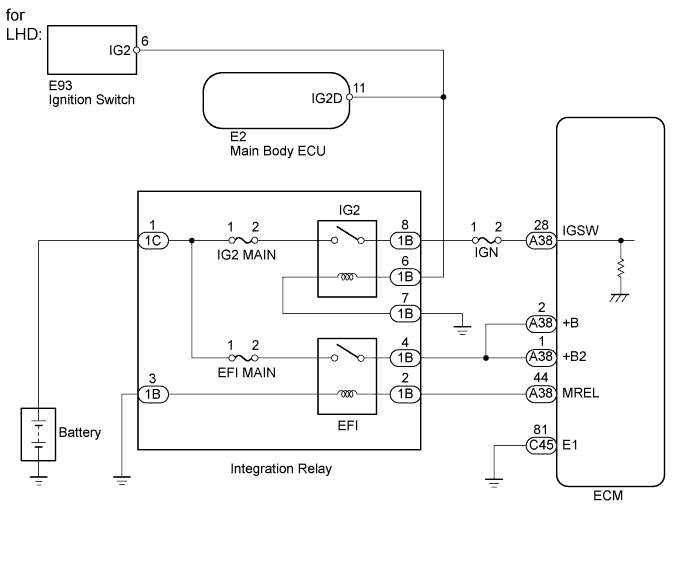

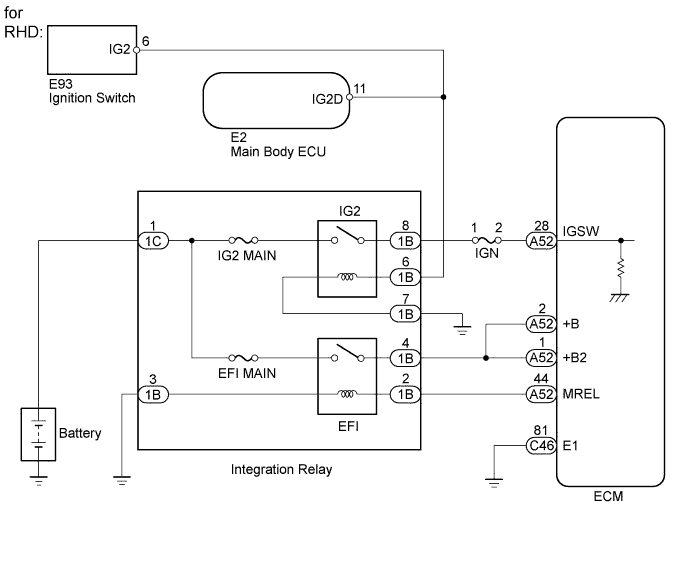
INSPECTION PROCEDURE
| 1. CHECK HARNESS AND CONNECTOR (INTEGRATION RELAY - BATTERY) |

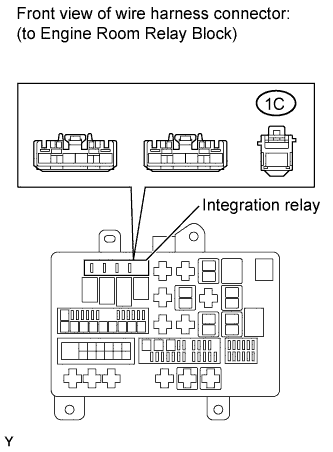 |
Remove the integration relay from the engine room relay block.
Measure the voltage according to the value(s) in the table below.
- Standard Voltage:
Tester Connection
Condition
Specified Condition
1C-1 - Body ground
Always
11 to 14 V
|
|
||||

| OK | |
 |
| 2. INSPECT INTEGRATION RELAY (EFI RELAY AND IG2 RELAY) |
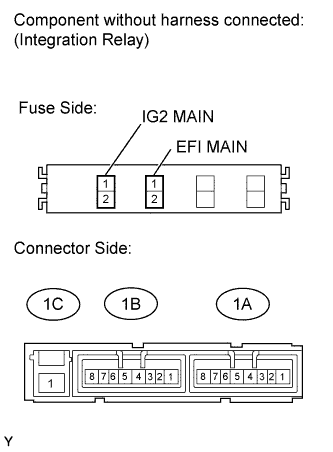 |
Remove the integration relay from the engine room relay block.
Inspect the EFI MAIN fuse and the IG2 MAIN fuse.
Remove the EFI MAIN fuse and IG2 MAIN fuse from the integration relay.
Measure the resistance according to the value(s) in the table below.
- Standard Resistance:
Tester Connection
Condition
Specified Condition
EFI MAIN fuse
Always
Below 1 Ω
IG2 MAIN fuse
Always
Below 1 Ω
Inspect the EFI relay and the IG2 relay.
Measure the resistance according to the value(s) in the table below.
- Standard Resistance:
Tester Connection
Condition
Specified Condition
1C-1 - 1B-4
Battery voltage is not applied to terminals 1B-2 and 1B-3
10 kΩ or higher
Battery voltage is applied to terminals 1B-2 and 1B-3
Below 1 Ω
1C-1 - 1B-8
Battery voltage is not applied to terminals 1B-7 and 1B-6
10 kΩ or higher
Battery voltage is applied to terminals 1B-7 and 1B-6
Below 1 Ω
|
|
||||
| OK | |
|
| 3. CHECK HARNESS AND CONNECTOR (+B, +B2 AND MREL CIRCUIT) |
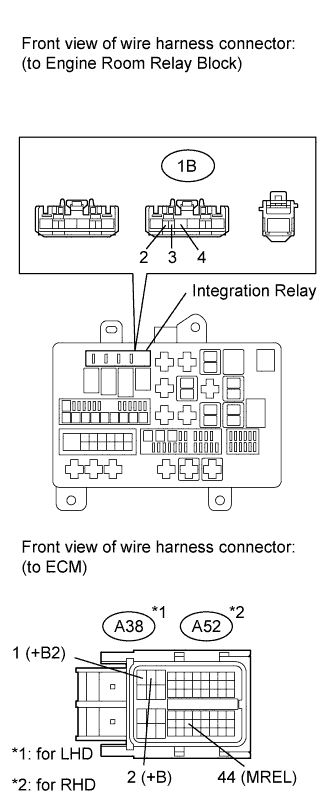 |
Check the harness and the connectors between the integration relay and the ECM.
Remove the integration relay from the engine room relay block.
Disconnect the ECM connector.
Measure the resistance according to the value(s) in the table below.
- Standard Resistance (Check for Open):
for LHD Tester Connection
Condition
Specified Condition
A38-44 (MREL) - 1B-2
Always
Below 1 Ω
A38-2 (+B) - 1B-4
Always
Below 1 Ω
A38-1 (+B2) - 1B-4
Always
Below 1 Ω
for RHD Tester Connection
Condition
Specified Condition
A52-44 (MREL) - 1B-2
Always
Below 1 Ω
A52-2 (+B) - 1B-4
Always
Below 1 Ω
A52-1 (+B2) - 1B-4
Always
Below 1 Ω
- Standard Resistance (Check for Short):
for LHD Tester Connection
Condition
Specified Condition
A38-44 (MREL) or 1B-2 - Body ground
Always
10 kΩ or higher
A38-2 (+B) or 1B-4 - Body ground
Always
10 kΩ or higher
A38-1 (+B2) or 1B-4 - Body ground
Always
10 kΩ or higher
for RHD Tester Connection
Condition
Specified Condition
A52-44 (MREL) or 1B-2 - Body ground
Always
10 kΩ or higher
A52-2 (+B) or 1B-4 - Body ground
Always
10 kΩ or higher
A52-1 (+B2) or 1B-4 - Body ground
Always
10 kΩ or higher
Check the harness and connectors between the integration relay and body ground.
Measure the resistance according to the value(s) in the table below.
- Standard Resistance (Check for Open):
Tester Connection
Condition
Specified Condition
1B-3 - Body ground
Always
Below 1 Ω
|
|
||||
| OK | |
|
| 4. CHECK HARNESS AND CONNECTOR (ECM - BODY GROUND) |
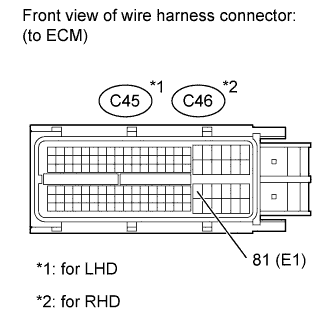 |
Disconnect the ECM connector.
Measure the resistance according to the value(s) in the table below.
- Standard Resistance (Check for Open):
for LHD Tester Connection
Condition
Specified Condition
C45-81 (E1) - Body ground
Always
Below 1 Ω
for RHD Tester Connection
Condition
Specified Condition
C46-81 (E1) - Body ground
Always
Below 1 Ω
|
|
||||
| OK | |
|
| 5. INSPECT ECM (IGSW VOLTAGE) |
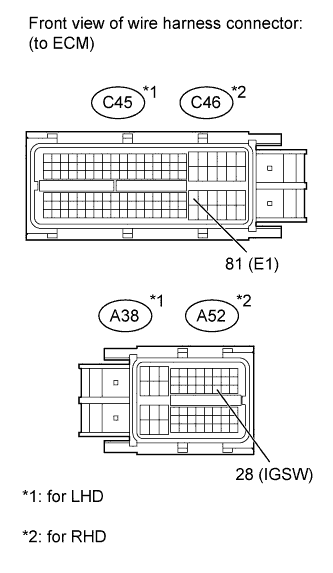 |
Disconnect the ECM connector.
Measure the voltage according to the value(s) in the table below.
- Standard Voltage:
for LHD Tester Connection
Switch Condition
Specified Condition
A38-28 (IGSW) - C45-81 (E1)
Ignition switch ON
11 to 14 V
for RHD Tester Connection
Switch Condition
Specified Condition
A52-28 (IGSW) - C46-81 (E1)
Ignition switch ON
11 to 14 V
|
|
||||

| OK | ||
 |
||
| ||
| 6. INSPECT FUSE (IGN) |
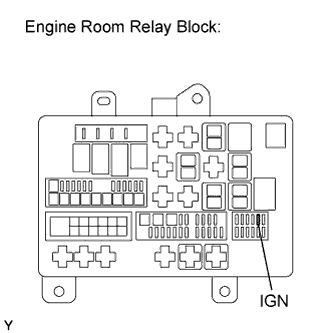 |
Remove the IGN fuse from the engine room relay block.
Measure the resistance according to the value(s) in the table below.
- Standard Resistance (Check for Open):
Tester Connection
Condition
Specified Condition
IGN fuse
Always
Below 1 Ω
|
|
||||
| OK | |
|
| 7. CHECK HARNESS AND CONNECTOR (INTEGRATION RELAY - ECM, INTEGRATION RELAY - BODY GROUND) |
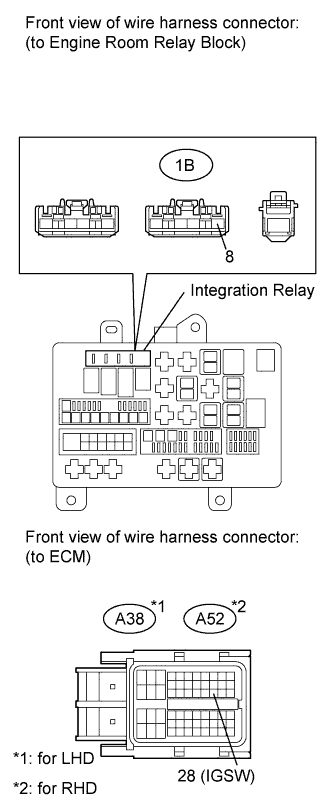 |
Remove the integration relay from the engine room relay block.
Disconnect the ECM connector.
Measure the resistance according to the value(s) in the table below.
- Standard Resistance (Check for Open):
for LHD Tester Connection
Condition
Specified Condition
1B-8 - A38-28 (IGSW)
Always
Below 1 Ω
for RHD Tester Connection
Condition
Specified Condition
1B-8 - A52-28 (IGSW)
Always
Below 1 Ω
- Standard Resistance (Check for Short):
for LHD Tester Connection
Condition
Specified Condition
1B-8 or A38-28 (IGSW) - Body ground
Always
10 kΩ or higher
for RHD Tester Connection
Condition
Specified Condition
1B-8 or A52-28 (IGSW) - Body ground
Always
10 kΩ or higher
|
|
||||
| OK | |
|
| 8. CHECK IF VEHICLE IS EQUIPPED WITH ENTRY AND START SYSTEM |
| Result |
Proceed to |
| w/ Entry and Start System |
A |
| w/o Entry and Start System |
B |
|
|
||||
| A | |
|
| 9. CHECK HARNESS AND CONNECTOR (MAIN BODY ECU - ENGINE ROOM RELAY BLOCK) |
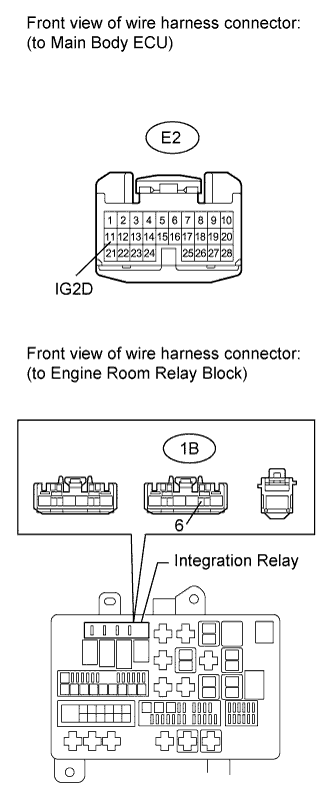 |
Remove the integration relay from the engine room relay block.
Disconnect the E2 main body ECU connector.
Measure the resistance according to the value(s) in the table below.
- Standard Resistance (Check for Open):
Tester Connection
Condition
Specified Condition
E2-11 (IG2D) - 1B-6
Always
Below 1 Ω
- Standard Resistance (Check for Short):
Tester Connection
Condition
Specified Condition
E2-11 (IG2D) or 1B-6 - Body ground
Always
10 kΩ or higher
|
|
||||
| OK | |
|
| 10. CHECK ENTRY AND START SYSTEM (POWER SOURCE MODE DOES NOT CHANGE) |
Check the entry and start system (Click here).
|
|
||||
| OK | ||
|
||
| ||
| 11. CHECK HARNESS AND CONNECTOR (IGNITION SWITCH - ENGINE ROOM RELAY BLOCK) |
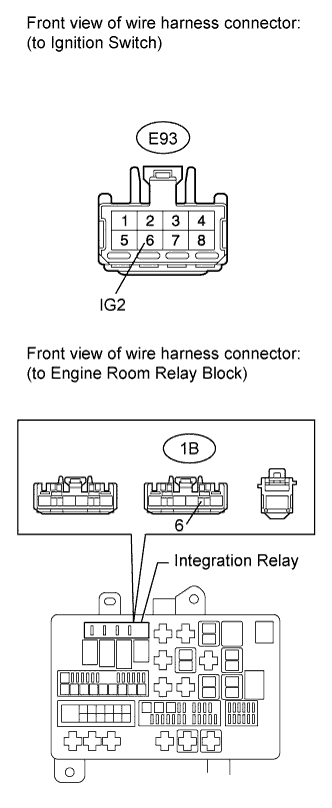 |
Remove the integration relay from the engine room relay block.
Disconnect the E93 ignition switch connector.
Measure the resistance according to the value(s) in the table below.
- Standard Resistance (Check for Open):
Tester Connection
Condition
Specified Condition
E93-6 (IG2) - 1B-6
Always
Below 1 Ω
- Standard Resistance (Check for Short):
Tester Connection
Condition
Specified Condition
E93-6 (IG2) or 1B-6 - Body ground
Always
10 kΩ or higher
|
|
||||
| OK | |
|
| 12. INSPECT IGNITION SWITCH ASSEMBLY |
Inspect the ignition switch assembly (Click here).
|
|
||||
| OK | ||
|
||
| ||