C1380 Stop Light Control Relay Malfunction
Diagnostic trouble codes · Vehicles built from Jan 2012
DESCRIPTION
Upon receiving the hill-start assist control operating signal from the skid control ECU (master cylinder solenoid), the relay contact turns on and the stop light comes on.| DTC Code |
DTC Detection Condition |
Trouble Area |
| C1380 |
Either condition is met:
|
|
WIRING DIAGRAM
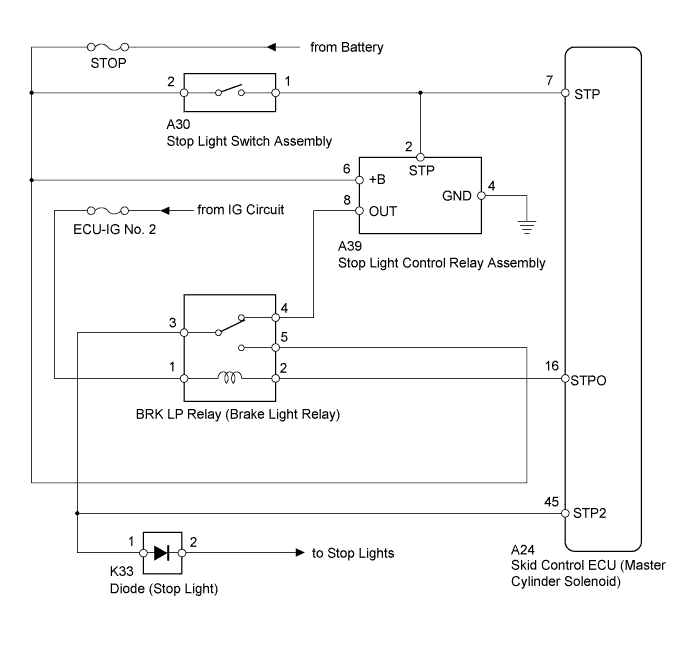

INSPECTION PROCEDURE
- NOTICE:
- After replacing the master cylinder solenoid, perform zero point calibration and store the system information (Click here).
- Inspect the fuses for circuits related to this system before performing the following inspection procedure.
- After replacing the master cylinder solenoid, perform zero point calibration and store the system information (Click here).
- HINT:
- When DTC C1425 is output together with DTC C1380, inspect and repair the trouble areas indicated by DTC C1425 first (Click here).
| 1. CHECK STOP LIGHT OPERATION |

Check that the stop lights come on when the brake pedal is depressed and go off when the brake pedal is released.
- OK:
Condition
Illumination Condition
Brake pedal depressed
On
Brake pedal released
Off
|
|
||||

| OK | |
 |
| 2. READ VALUE USING GTS (STOP LIGHT SW) |
Turn the ignition switch off.
Connect the GTS to the DLC3.
Turn the ignition switch to ON.
Turn the GTS on.
Enter the following menus: Chassis / ABS/VSC/TRC / Data List.
ABS/VSC/TRC Tester Display
Measurement Item/Range
Normal Condition
Diagnostic Note
Stop Light SW
Stop light switch / ON or OFF
ON: Brake pedal depressed
OFF: Brake pedal released
-
Check that the stop light switch condition observed on the GTS changes according to brake pedal operation.
- OK:
- The GTS displays ON and OFF according to brake pedal operation.
|
|
||||
| OK | |
|
| 3. PERFORM ACTIVE TEST USING GTS (STOP LIGHT RELAY) |
Turn the ignition switch off.
Connect the GTS to the DLC3.
Turn the ignition switch to ON.
Turn the GTS on.
Enter the following menus: Chassis / ABS/VSC/TRC / Active Test.
ABS/VSC/TRC Tester Display
Test Part
Control Range
Diagnostic Note
Stop Light Relay
BRK LP relay (Brake light relay)
Relay ON/OFF
Observe the stop lights (the stop lights do not come on for 2 to 5 seconds).
While performing the Active Test, check the illumination condition of the stop lights and "Stop Light Relay Output" in the Data List.
ABS/VSC/TRC Tester Display
Measurement Item/Range
Normal Condition
Diagnostic Note
Stop Light Relay Output
BRK LP relay (Brake light relay) output / ON or OFF
ON: Relay output on (Stop lights on)
OFF: Relay output off (Stop lights off)
-
Result Result
Proceed to
When Active Test performed, Data List item changes between ON and OFF and stop lights turn on and off
A
When Active Test performed, Data List item changes between ON and OFF, but stop lights do not turn on
B
|
|
||||
| A | |
|
| 4. CHECK HARNESS AND CONNECTOR (STP2 TERMINAL) |
Turn the ignition switch off.
Disconnect the skid control ECU (master cylinder solenoid) connector.
Measure the voltage according to the value(s) in the table below.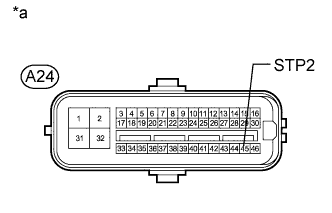
- Standard Voltage:
Tester Connection
Condition
Specified Condition
A24-45 (STP2) - Body ground
Brake pedal depressed
8 to 14 V
Brake pedal released
Below 1.5 V
Text in Illustration *a
Front view of wire harness connector
(to Skid Control ECU [Master Cylinder Solenoid])
|
|
||||

| OK | |
|
| 5. RECONFIRM DTC |
Clear the DTCs (Click here).
Turn the ignition switch off.
Start the engine.
Perform a road test.
Check if the same DTC is output (Click here).
Result Result
Proceed to
DTC is not output
A
DTC is output (for LHD)
B
DTC is output (for RHD)
C
|
|
||||
|
|
||||
| A | ||
 |
||
| ||
| 6. CHECK HARNESS AND CONNECTOR (+B/GND TERMINAL) |
Turn the ignition switch off.
Disconnect the stop light control relay assembly connector.
Measure the voltage according to the value(s) in the table below.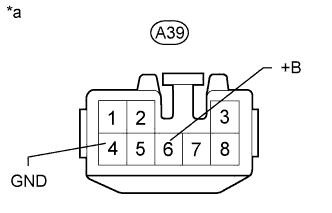
- Standard Voltage:
Tester Connection
Condition
Specified Condition
A39-6 (+B) - Body ground
Always
11 to 14 V
Measure the resistance according to the value(s) in the table below.
- Standard Resistance:
Tester Connection
Condition
Specified Condition
A39-4 (GND) - Body ground
Always
Below 1 Ω
Text in Illustration *a
Front view of wire harness connector
(to Stop Light Control Relay Assembly)
|
|
||||
| OK | |
|
| 7. CHECK HARNESS AND CONNECTOR (STP TERMINAL) |
Turn the ignition switch off.
Disconnect the stop light control relay assembly connector.
Measure the voltage according to the value(s) in the table below.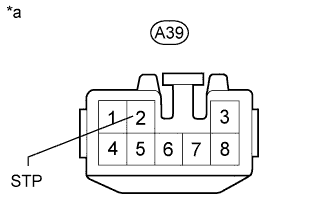
- Standard Voltage:
Tester Connection
Condition
Specified Condition
A39-2 (STP) - Body ground
Brake pedal depressed
8 to 14 V
Brake pedal released
Below 1.5 V
Text in Illustration *a
Front view of wire harness connector
(to Stop Light Control Relay Assembly)
|
|
||||
| OK | |
|
| 8. INSPECT BRK LP RELAY |
Remove the BRK LP relay (brake light relay) from the engine room relay block.
Measure the resistance according to the value(s) in the table below.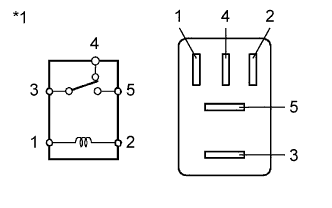
- Standard Resistance:
Tester Connection
Condition
Specified Condition
3 - 4
Battery positive voltage is applied to terminal 1 and battery negative voltage is applied to terminal 2
10 kΩ or higher
Battery positive voltage is not applied to terminal 1 and battery negative voltage is not applied to terminal 2
Below 1 Ω
3 - 5
Battery positive voltage is applied to terminal 1 and battery negative voltage is applied to terminal 2
Below 1 Ω
Battery positive voltage is not applied to terminal 1 and battery negative voltage is not applied to terminal 2
10 kΩ or higher
Text in Illustration *1
BRK LP Relay (Brake Light Relay)
|
|
||||
| OK | |
|
| 9. CHECK HARNESS AND CONNECTOR (STOP LIGHT CONTROL RELAY - BRK LP RELAY) |
Turn the ignition switch off.
Disconnect the A39 stop light control relay assembly connector.
Remove the BRK LP relay (brake light relay) from the engine room relay block.
Measure the resistance according to the value(s) in the table below.
- Standard Resistance:
Tester Connection
Condition
Specified Condition
A39-8 (OUT) - Engine room relay block BRK LP relay (brake light relay) terminal 4
Always
Below 1 Ω
A39-8 (OUT) - Body ground
Always
10 kΩ or higher
|
|
||||
| OK | |
|
| 10. CHECK HARNESS AND CONNECTOR (STOP LIGHT POWER SOURCE TERMINAL) |
Remove the BRK LP relay (brake light relay) from the engine room relay block.
Measure the voltage according to the value(s) in the table below.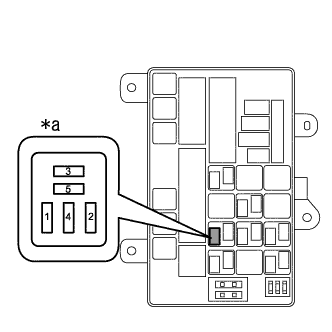
- Standard Voltage:
Tester Connection
Condition
Specified Condition
4 - Body ground
Brake pedal depressed
8 to 14 V
Brake pedal released
Below 1.5 V
Text in Illustration *a
Component without BRK LP Relay (Brake Light Relay)
(Engine Room Relay Block)
|
|
||||
| OK | ||
|
||
| ||
| 11. CHECK HARNESS AND CONNECTOR (STP TERMINAL) |
Turn the ignition switch off.
Disconnect the skid control ECU (master cylinder solenoid) connector.
Measure the voltage according to the value(s) in the table below.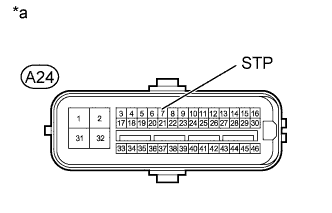
- Standard Voltage:
Tester Connection
Condition
Specified Condition
A24-7 (STP) - Body ground
Brake pedal depressed
8 to 14 V
Brake pedal released
Below 1.5 V
Text in Illustration *a
Front view of wire harness connector
(to Skid Control ECU [Master Cylinder Solenoid])
Result Result
Proceed to
NG
A
OK (for LHD)
B
OK (for RHD)
C
|
|
||||
|
|
||||
| A | ||
|
||
| ||
| 12. INSPECT BRK LP RELAY |
Remove the BRK LP relay (brake light relay) from the engine room relay block.
Measure the resistance according to the value(s) in the table below.
- Standard Resistance:
Tester Connection
Condition
Specified Condition
3 - 4
Battery positive voltage is applied to terminal 1 and battery negative voltage is applied to terminal 2
10 kΩ or higher
Battery positive voltage is not applied to terminal 1 and battery negative voltage is not applied to terminal 2
Below 1 Ω
3 - 5
Battery positive voltage is applied to terminal 1 and battery negative voltage is applied to terminal 2
Below 1 Ω
Battery positive voltage is not applied to terminal 1 and battery negative voltage is not applied to terminal 2
10 kΩ or higher
Text in Illustration *1
BRK LP Relay (Brake Light Relay)
|
|
||||
| OK | |
|
| 13. CHECK HARNESS AND CONNECTOR (BRK LP RELAY POWER SOURCE TERMINAL) |
Remove the BRK LP relay (brake light relay) from the engine room relay block.
Measure the voltage according to the value(s) in the table below.
- Standard Voltage:
Tester Connection
Condition
Specified Condition
1 - Body ground
Ignition switch ON
8 to 14 V
5 - Body ground
Always
11 to 14 V
Text in Illustration *a
Component without BRK LP relay (Brake Light Relay)
(Engine Room Relay Block)
|
|
||||
| OK | |
|
| 14. CHECK HARNESS AND CONNECTOR (STPO TERMINAL) |
Turn the ignition switch off.
Disconnect the skid control ECU (master cylinder solenoid) connector.
Measure the voltage according to the value(s) in the table below.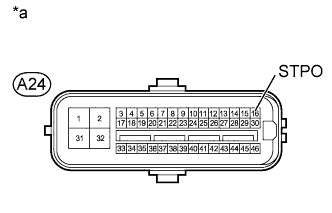
- Standard Voltage:
Tester Connection
Switch Condition
Specified Condition
A24-16 (STPO) - Body ground
Ignition switch ON
11 to 14 V
Text in Illustration *a
Front view of wire harness connector
(to Skid Control ECU [Master Cylinder Solenoid])
|
|
||||
| OK | |
|
| 15. RECONFIRM DTC |
Clear the DTCs (Click here).
Turn the ignition switch off.
Check if the same DTC is output (Click here).
Result Result
Proceed to
DTC is not output
A
DTC is output (for LHD)
B
DTC is output (for RHD)
C
|
|
||||
|
|
||||
| A | ||
|
||
| ||