C1380/64 Stop Light Control Relay Malfunction
Diagnostic trouble codes · Vehicles built Sep 2011 – Dec 2011
DESCRIPTION
Upon receiving the CRAWL or hill-start assist control operating signal from the skid control ECU, the relay contact turns on and the stop light comes on.| DTC Code |
DTC Detection Condition |
Trouble Area |
| C1380/64 |
|
|
WIRING DIAGRAM
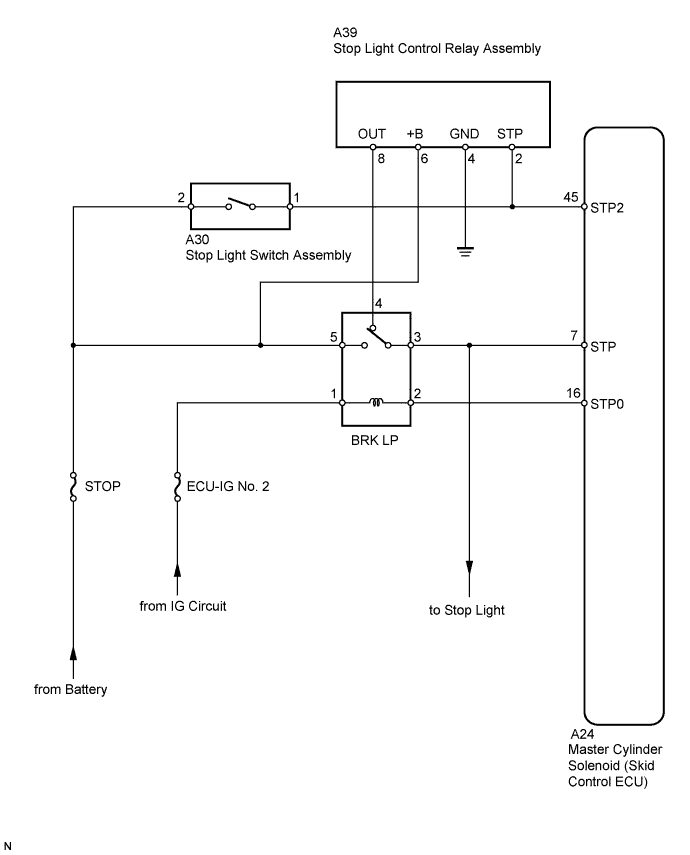

INSPECTION PROCEDURE
- NOTICE:
- When replacing the master cylinder solenoid, perform zero point calibration (Click here).
- Inspect the fuses for circuits related to this system before performing the following inspection procedure.
- When replacing the master cylinder solenoid, perform zero point calibration (Click here).
| 1. CHECK STOP LIGHT OPERATION |

Check that the stop light come on when the brake pedal is depressed, and go off when the brake pedal is released.
- OK:
Condition
Illumination Condition
Brake pedal depressed
On
Brake pedal released
Off
|
|
||||

| OK | |
 |
| 2. INSPECT SKID CONTROL ECU (STP TERMINAL) |
Disconnect the A24 skid control ECU connector.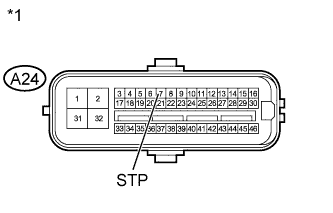
Measure the voltage according to the value(s) in the table below.
- Standard Voltage:
Tester Connection
Switch Condition
Specified Condition
A24-7 (STP) - Body ground
Stop light switch on
(Brake pedal depressed)
8 to 14 V
A24-7 (STP) - Body ground
Stop light switch off
(Brake pedal released)
Below 1.5 V
Text in Illustration *1
Front view of wire harness connector
(to Skid Control ECU)
|
|
||||
| OK | |
|
| 3. INSPECT SKID CONTROL ECU (STP2 TERMINAL) |
Measure the voltage according to the value(s) in the table below.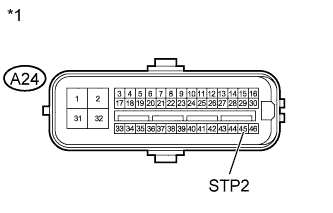
- Standard Voltage:
Tester Connection
Switch Condition
Specified Condition
A24-45 (STP2) - Body ground
Stop light switch on
(Brake pedal depressed)
8 to 14 V
A24-45 (STP2) - Body ground
Stop light switch off
(Brake pedal released)
Below 1.5 V
Text in Illustration *1
Front view of wire harness connector
(to Skid Control ECU)
|
|
||||
| OK | |
|
| 4. PERFORM ACTIVE TEST USING INTELLIGENT TESTER (STOP LIGHT RELAY) |
Reconnect the A24 skid control ECU connector.
Connect the intelligent tester to the DLC3.
Turn the ignition switch to ON and turn the intelligent tester on.
Enter the following menus: Chassis / ABS/VSC/TRC / Active Test.
ABS/VSC/TRC Item
Test Part
Control Range
Diagnostic Note
Stop Light Relay
BRK LP relay
Relay ON/OFF
Observe the rear combination light (Does not come on for 5 seconds or more).
Check that "ON" and "OFF" of the stop light can be shown on the rear combination light by the intelligent tester.
- OK:
- The stop light turns on or off in accordance with the intelligent tester.
|
|
||||

| OK | |
|
| 5. RECONFIRM DTC |
Clear the DTC (Click here).
Check if the same DTC is output (Click here).
- HINT:
- Reinstall the sensors, connectors, etc. and restore the previous vehicle conditions before rechecking for DTCs.
Result Result
Proceed to
DTC is not output
A
DTC is output
for LHD
B
for RHD
C
|
|
||||
|
|
||||
| A | ||
 |
||
| ||
| 6. INSPECT BRK LP RELAY (POWER SOURCE TERMINAL) |
Remove the BRK LP relay.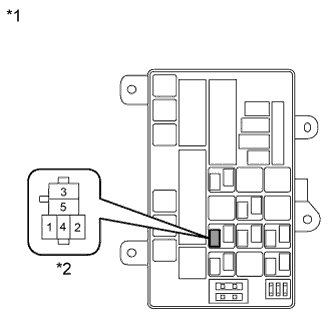
Measure the voltage according to the value(s) in the table below.
- Standard Voltage:
Tester Connection
Condition
Specified Condition
1 - Body ground
Ignition switch ON
8 to 14 V
5 - Body ground
Always
11 to 14 V
Text in Illustration *1
Engine Room Relay Block
*2
BRK LP Relay
|
|
||||
| OK | |
|
| 7. INSPECT BRK LP RELAY |
Measure the resistance according to the value(s) in the table below.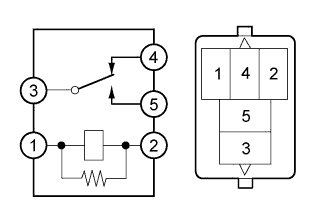
- Standard Resistance:
Tester Connection
Condition
Specified Condition
3 - 4
Battery voltage not applied
Below 1 Ω
Battery voltage applied to terminal 1 and 2
10 kΩ or higher
3 - 5
Battery voltage not applied
10 kΩ or higher
Battery voltage applied to terminal 1 and 2
Below 1 Ω
|
|
||||
| OK | |
|
| 8. INSPECT SKID CONTROL ECU (STPO TERMINAL) |
Install the BRK LP relay.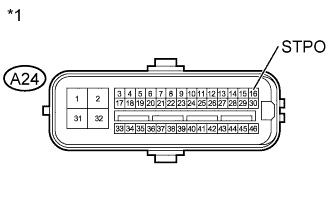
Disconnect the A24 skid control ECU connector.
Measure the voltage according to the value(s) in the table below.
- Standard Voltage:
Tester Connection
Switch Condition
Specified Condition
A24-16 (STPO) - Body ground
Ignition switch ON
11 to 14 V
Text in Illustration *1
Front view of wire harness connector
(to Skid Control ECU)
|
|
||||
| OK | |
|
| 9. RECONFIRM DTC |
Clear the DTC (Click here).
Check if the same DTC is output (Click here).
- HINT:
- Reinstall the sensors, connectors, etc. and restore the previous vehicle conditions before rechecking for DTCs.
Result Result
Proceed to
DTC is not output
A
DTC is output
for LHD
B
for RHD
C
|
|
||||
|
|
||||
| A | ||
|
||
| ||