Back-up Light Circuit
Circuit diagnosis · Vehicles built from Jan 2012
Versions by build date: Sep 2011 – Dec 2011 from Jan 2012
DESCRIPTION
The park/neutral position switch turns on when the shift lever is moved to R, causing the back-up lights to illuminate.WIRING DIAGRAM
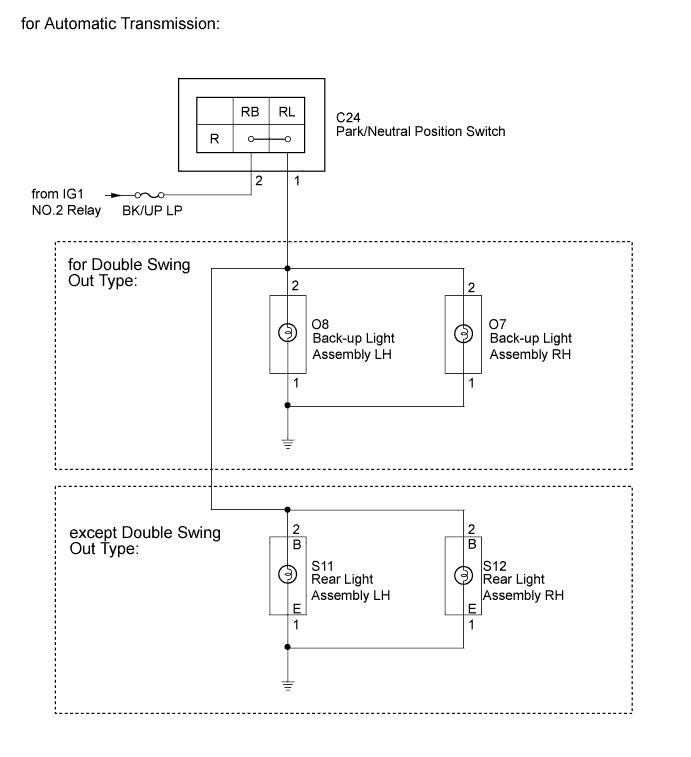

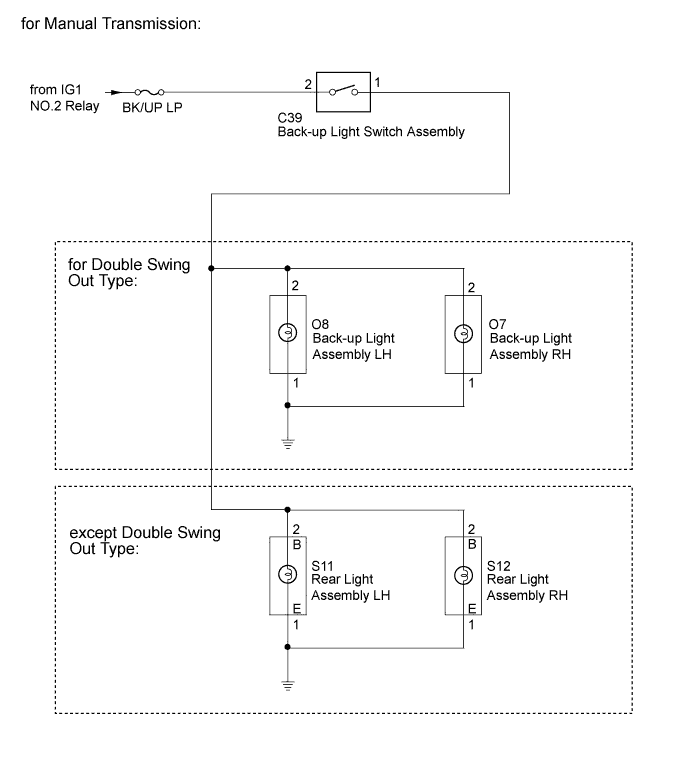
INSPECTION PROCEDURE
| 1. INSPECT FUSE (BK/UP LP FUSE) |
 |
Remove the BK/UP LP fuse from the main body ECU.
Measure the resistance according to the value(s) in the table below.
- Standard Resistance:
Tester Connection
|
Condition
|
Specified Condition
|
BK/UP LP fuse
|
Always
|
Below 1 Ω
|
|
NG |
 |
|
|
|
| OK |
|
 |
|
| 2. CHECK VEHICLE TYPE |
|
Check the vehicle type.
Result
Result
|
Proceed to
|
for Automatic Transmission
|
A
|
for Manual Transmission
|
B
|
|
B |
 |
|
|
|
| A |
|
|
|
| 3. INSPECT PARK/NEUTRAL POSITION SWITCH |
|
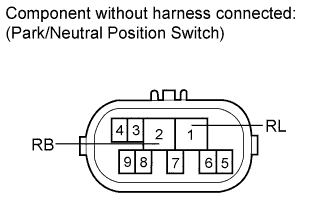
Remove the park/neutral position switch.
- for A750F Automatic Transmission: Click here
- for AB60F Automatic Transmission: Click here
Measure the resistance according to the value(s) in the table below.
- Standard Resistance:
Tester Connection
|
Condition
|
Specified Condition
|
2 (RB) - 1 (RL)
|
Shift lever in R
|
Below 1 Ω
|
2 (RB) - 1 (RL)
|
Shift lever not in R
|
10 kΩ or higher
|
Result
Result
|
Proceed to
|
OK
|
A
|
NG (for A750F Automatic Transmission)
|
B
|
NG (for AB60F Automatic Transmission)
|
C
|
|
B |
|
|
|
|
|
C |
|
|
|
|
| A |
|
|
|
| 4. CHECK HARNESS AND CONNECTOR (PARK/NEUTRAL POSITION SWITCH - BATTERY) |
|
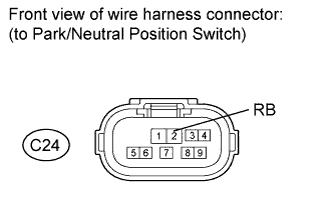
Disconnect the C24 park/neutral position switch connector.
Measure the voltage according to the value(s) in the table below.
- Standard Voltage:
Tester Connection
|
Switch Condition
|
Specified Condition
|
C24-2 (RB) - Body ground
|
Ignition switch ON
|
11 to 14 V
|
|
NG |
|
|
| REPAIR OR REPLACE HARNESS OR CONNECTOR |
|
|
| OK |
|
|
|
| 5. CHECK VEHICLE TYPE |
|
Check the vehicle type.
Result
Result
|
Proceed to
|
for Double Swing Out Type
|
A
|
except Double Swing Out Type
|
B
|
|
B |
|
|
|
|
| A |
|
|
|
| 6. CHECK HARNESS AND CONNECTOR (PARK/NEUTRAL POSITION SWITCH - BACK-UP LIGHT AND BODY GROUND) |
|
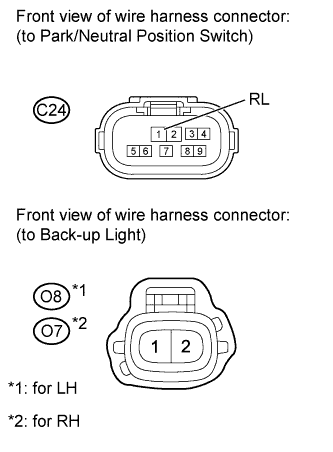
Disconnect the C24 park/neutral position switch connector.
for LH:
Disconnect the O8 light connector.
Measure the resistance according to the value(s) in the table below.
- Standard Resistance:
Tester Connection
|
Condition
|
Specified Condition
|
C24-1 (RL) - O8-2
|
Always
|
Below 1 Ω
|
O8-1 - Body ground
|
O8-2 - Body ground
|
Always
|
10 kΩ or higher
|
for RH:
Disconnect the O7 light connector.
Measure the resistance according to the value(s) in the table below.
- Standard Resistance:
Tester Connection
|
Condition
|
Specified Condition
|
C24-1 (RL) - O7-2
|
Always
|
Below 1 Ω
|
O7-1 - Body ground
|
O7-2 - Body ground
|
Always
|
10 kΩ or higher
|
|
NG |
|
|
| REPAIR OR REPLACE HARNESS OR CONNECTOR |
|
|
| OK |
|
 |
|
| PROCEED TO NEXT INSPECTION PROCEDURE SHOWN IN PROBLEM SYMPTOMS TABLE (Click here)
|
|
| 7. CHECK HARNESS AND CONNECTOR (PARK/NEUTRAL POSITION SWITCH - REAR LIGHT AND BODY GROUND) |
|
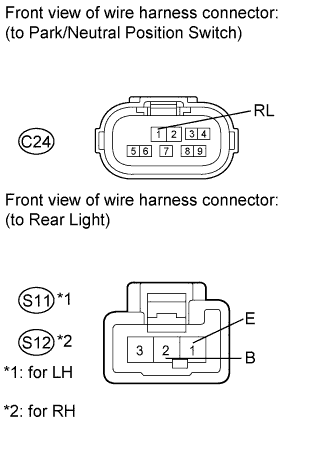
Disconnect the C24 park/neutral position switch connector.
for LH:
Disconnect the S11 light connector.
Measure the resistance according to the value(s) in the table below.
- Standard Resistance:
Tester Connection
|
Condition
|
Specified Condition
|
C24-1 (RL) - S11-2 (B)
|
Always
|
Below 1 Ω
|
S11-1 (E) - Body ground
|
S11-2 (B) - Body ground
|
Always
|
10 kΩ or higher
|
for RH:
Disconnect the S12 light connector.
Measure the resistance according to the value(s) in the table below.
- Standard Resistance:
Tester Connection
|
Condition
|
Specified Condition
|
C24-1 (RL) - S12-2 (B)
|
Always
|
Below 1 Ω
|
S12-1 (E) - Body ground
|
S12-2 (B) - Body ground
|
Always
|
10 kΩ or higher
|
|
NG |
|
|
| REPAIR OR REPLACE HARNESS OR CONNECTOR |
|
|
| OK |
|
|
|
| PROCEED TO NEXT INSPECTION PROCEDURE SHOWN IN PROBLEM SYMPTOMS TABLE (Click here)
|
|
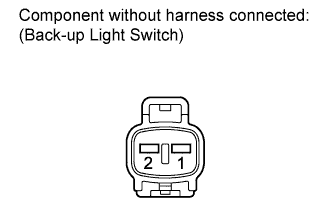
| 8. INSPECT BACK-UP LIGHT SWITCH |
|
Remove the back-up light switch (Click here).
Measure the resistance according to the value(s) in the table below.
- Standard Resistance:
Tester Connection
|
Switch Condition
|
Specified Condition
|
1 - 2
|
On (pushed)
|
Below 1 Ω
|
1 - 2
|
Off (released)
|
10 kΩ or higher
|
|
NG |
|
|
| REPLACE BACK-UP LIGHT SWITCH ASSEMBLY (Click here)
|
|
|
| OK |
|
|
|
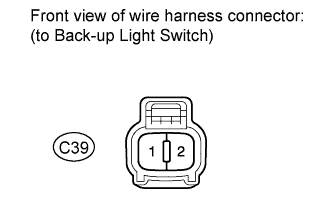
| 9. CHECK HARNESS AND CONNECTOR (BACK-UP LIGHT SWITCH - BATTERY) |
|
Disconnect the C39 back-up light switch connector.
Measure the voltage according to the value(s) in the table below.
- Standard Voltage:
Tester Connection
|
Switch Condition
|
Specified Condition
|
C39-2 - Body ground
|
Ignition switch ON
|
11 to 14 V
|
|
NG |
|
|
| REPAIR OR REPLACE HARNESS OR CONNECTOR |
|
|
| OK |
|
|
|
| 10. CHECK VEHICLE TYPE |
|
Check the vehicle type.
Result
Result
|
Proceed to
|
for Double Swing Out Type
|
A
|
except Double Swing Out Type
|
B
|
|
B |
|
|
|
|
| A |
|
|
|
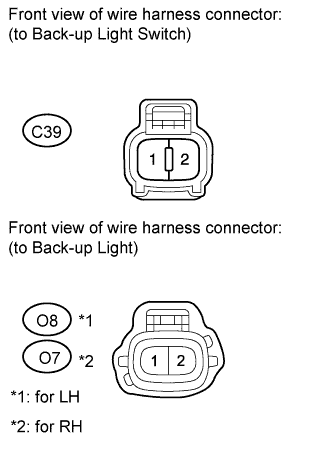
| 11. CHECK HARNESS AND CONNECTOR (BACK-UP LIGHT SWITCH - BACK-UP LIGHT AND BODY GROUND) |
|
Disconnect the C39 back-up light switch connector.
for LH:
Disconnect the O8 light connector.
Measure the resistance according to the value(s) in the table below.
- Standard Resistance:
Tester Connection
|
Condition
|
Specified Condition
|
C39-1 - O8-2
|
Always
|
Below 1 Ω
|
O8-1 - Body ground
|
O8-2 - Body ground
|
Always
|
10 kΩ or higher
|
for RH:
Disconnect the O7 light connector.
Measure the resistance according to the value(s) in the table below.
- Standard Resistance:
Tester Connection
|
Condition
|
Specified Condition
|
C39-1 - O7-2
|
Always
|
Below 1 Ω
|
O7-1 - Body ground
|
O7-2 - Body ground
|
Always
|
10 kΩ or higher
|
|
NG |
|
|
| REPAIR OR REPLACE HARNESS OR CONNECTOR |
|
|
| OK |
|
|
|
| PROCEED TO NEXT INSPECTION PROCEDURE SHOWN IN PROBLEM SYMPTOMS TABLE (Click here)
|
|
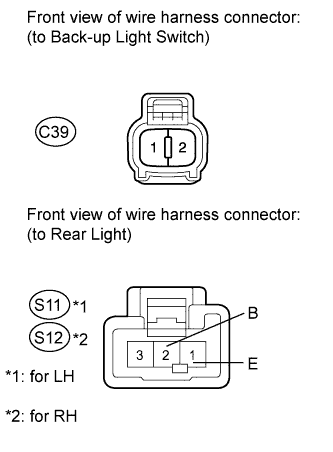
| 12. CHECK HARNESS OR CONNECTOR (BACK-UP LIGHT SWITCH - REAR LIGHT AND BODY GROUND) |
|
Disconnect the C39 back-up light switch connector.
for LH:
Disconnect the S11 light connector.
Measure the resistance according to the value(s) in the table below.
- Standard Resistance:
Tester Connection
|
Condition
|
Specified Condition
|
C39-1 - S11-2 (B)
|
Always
|
Below 1 Ω
|
S11-1 (E) - Body ground
|
S11-2 (B) - Body ground
|
Always
|
10 kΩ or higher
|
for RH:
Disconnect the S12 light connector.
Measure the resistance according to the value(s) in the table below.
- Standard Resistance:
Tester Connection
|
Condition
|
Specified Condition
|
C39-1 - S12-2 (B)
|
Always
|
Below 1 Ω
|
S12-1 (E) - Body ground
|
12-2 (B) - Body ground
|
Always
|
10 kΩ or higher
|
|
NG |
|
|
| REPAIR OR REPLACE HARNESS OR CONNECTOR |
|
|
| OK |
|
|
|
| PROCEED TO NEXT INSPECTION PROCEDURE SHOWN IN PROBLEM SYMPTOMS TABLE (Click here)
|
|