INSTALLATION
Removal / installation · Vehicles built from Jan 2012
Versions by build date: Sep 2011 – Dec 2011 from Jan 2012
| 1. INSTALL BRAKE PEDAL SUPPORT ASSEMBLY |

Install the brake pedal support assembly with the 4 nuts.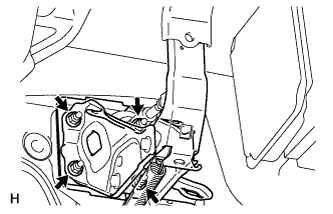

- Torque:
- 14 N*m{ 145 kgf*cm , 10 ft.*lbf }
Install the brake pedal support reinforcement set bolt.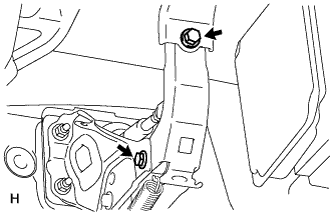
- Torque:
- 16 N*m{ 163 kgf*cm , 12 ft.*lbf }
Tighten the hexagon bolt.
- Torque:
- 23 N*m{ 239 kgf*cm , 17 ft.*lbf }
- HINT:
- Hold the bolt in place and tighten the nut.
| 2. INSTALL PUSH ROD PIN |
Apply a light coat lithium soap base glycol grease to the inner surface of the hole on the brake pedal lever.
Set the master cylinder push rod clevis in place, insert the push rod pin from the outside of the vehicle and then install a new clip.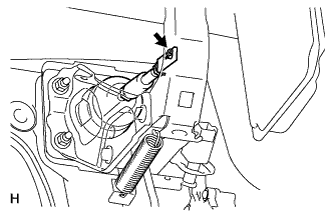
| 3. INSTALL STOP LIGHT SWITCH ASSEMBLY |
Install the stop light switch (Click here).
Connect the stop light switch connector.
| 4. INSTALL DRIVER SIDE KNEE AIRBAG ASSEMBLY |
Connect the connector.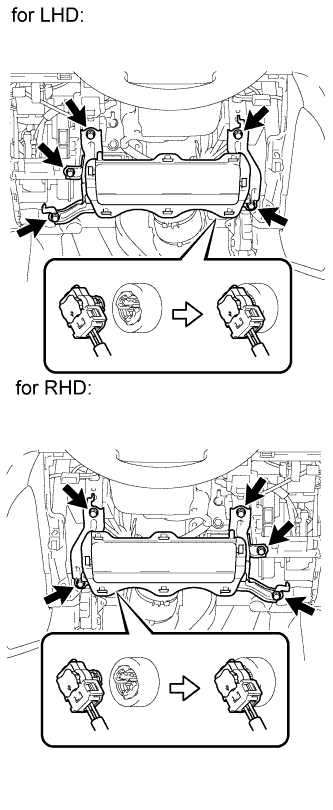
- NOTICE:
- When handling the airbag connector, take care not to damage the airbag wire harness.
Install the driver side knee airbag with the 5 bolts.
- Torque:
- 10 N*m{ 102 kgf*cm , 7 ft.*lbf }
| 5. INSTALL LOWER NO. 1 INSTRUMENT PANEL FINISH PANEL |
Connect the connectors.
for Automatic Air Conditioning System: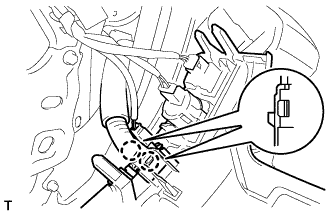
Attach the 2 claws to install the room temperature sensor.
Attach the 2 claws to connect the 2 control cables.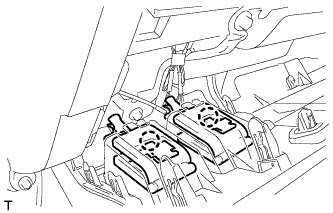
w/ Driver Side Knee Airbag:
Attach the 16 claws to install the lower No. 1 instrument panel finish panel.
Install the 2 bolts.
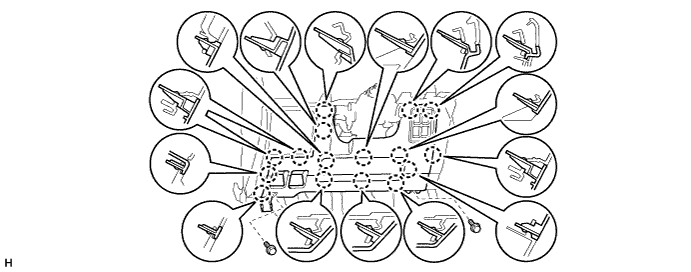
w/o Driver Side Knee Airbag:
Attach the 9 claws to install the lower No. 1 instrument panel finish panel.
Install the 2 bolts.
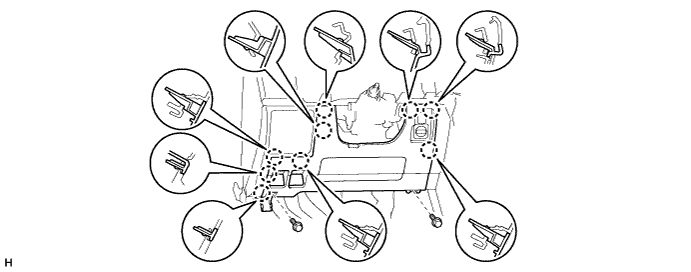
Attach the 2 claws to close the hole cover.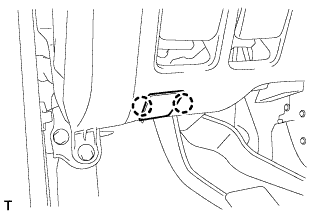
| 6. INSTALL NO. 1 INSTRUMENT PANEL UNDER COVER SUB-ASSEMBLY |
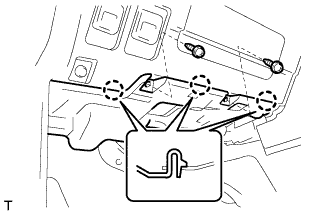 |
Connect the connectors.
Attach the 3 claws to install the No. 1 instrument panel under cover.
Install the 2 screws.
| 7. INSTALL COWL SIDE TRIM BOARD RH |
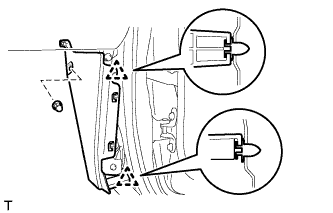 |
Attach the 2 clips to install the cowl side trim board.
Install the cap nut.
| 8. INSTALL FRONT DOOR SCUFF PLATE RH |
- HINT:
- Use the same procedures described for the LH side.
| 9. WARM UP CABLE TO NEGATIVE BATTERY TERMINAL |
- NOTICE:
- When disconnecting the cable, some systems need to be initialized after the cable is reconnected (Click here).
| 10. CHECK BRAKE PEDAL HEIGHT |
Check the brake pedal height.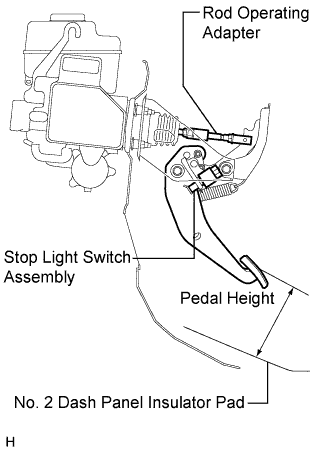
- Standard Pedal Height from No. 2 Dash Panel Insulator Pad:
- 149.1 to 159.1 mm (5.87 to 6.26 in.)
- NOTICE:
- Do not adjust the pedal height. Doing so by changing the push rod length will structurally change the pedal ratio.
Adjust the rod operating adapter length.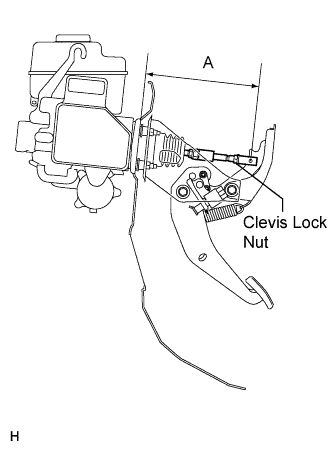
Remove the clip and clevis pin.
Loosen the clevis lock nut.
Adjust the rod operating adapter length by turning the pedal push rod clevis.
- Standard Rod Operating Adapter Length "A":
- 201.7 to 202.7 mm (7.94 to 7.98 in.)
Tighten the clevis lock nut.
- Torque:
- 26 N*m{ 260 kgf*cm , 19 ft.*lbf }
Set the master cylinder push rod clevis in place, insert the push rod pin from the outside of the vehicle and then install a new clip. If the pedal height is incorrect even if the rod operating adapter is adjusted, check that there is no damage in the brake pedal, brake pedal lever, brake pedal support and dash panel.
- Even if there is damage, there is no problem if the reserve distance is within the standard value.
- If necessary, replace any damaged parts.
- Even if there is damage, there is no problem if the reserve distance is within the standard value.
| 11. CHECK PEDAL FREE PLAY |
Push in the pedal until the beginning of the resistance is felt. Measure the pedal free play.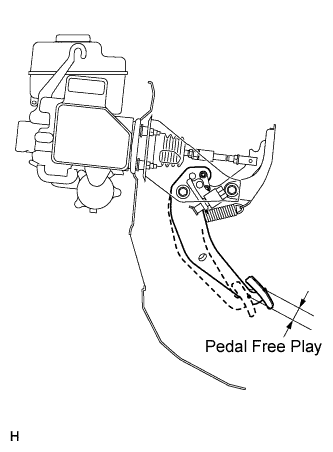
- Standard Pedal Free Play:
- 1 to 6 mm (0.0394 to 0.236 in.)
| 12. CHECK PEDAL RESERVE DISTANCE |
Release the parking brake lever.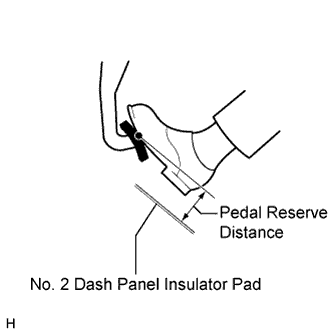
With the engine running, depress the pedal and measure the pedal reserve distance as shown in the illustration.- Standard Pedal Reserve Distance from No. 2 Dash Panel Insulator Pad at 490 N (50 kgf, 110.2 lbf):
- More than 67.5 mm (2.66 in.)