INSTALLATION
Removal / installation · Vehicles built Sep 2011 – Dec 2011
| 1.
INSTALL OIL PUMP ASSEMBLY |
 |
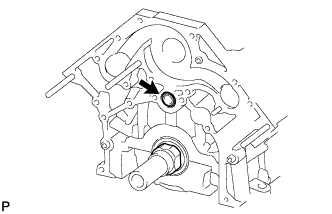
- Apply a light coat of engine oil to a new O-ring and install it to the cylinder block.
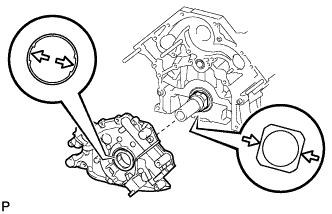
- Align the oil pump drive rotor spline and the crankshaft as shown in the illustration.
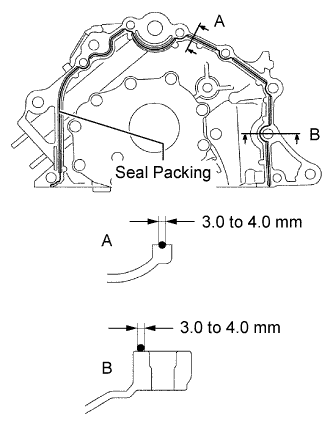
- Apply seal packing to the oil pump as shown in the illustration.
- Seal packing:
- Toyota Genuine Seal Packing Black, Three Bond 1207B or equivalent
- Standard seal diameter:
- 3.0 to 4.0 mm (0.118 to 0.157 in.)
- NOTICE:
- Install the oil pump within 3 minutes and tighten the bolts within 15 minutes after applying seal packing.
- Be careful not to drop any oil on the contact surfaces of the oil pump and cylinder block.
- Do not expose the seal to engine oil for at least 2 hours after installing it.
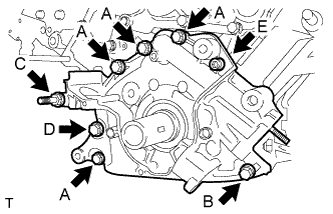
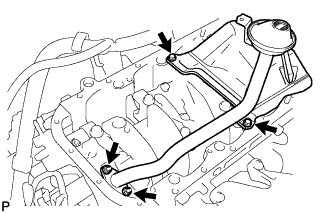
- Install the oil pump with the stud bolt, 6 standard bolts and the 6 mm hexagon wrench bolt. Uniformly tighten the bolts in several steps.
-
Torque:
- for bolt A, B, C, E:
- 16 N*m{
163 kgf*cm
, 12 ft.*lbf
}
- for bolt D:
- 31 N*m{
316 kgf*cm
, 23 ft.*lbf
}
- Bolt Length:
Item
|
Bolt Head Size
|
Length
|
Bolt A
|
12 mm
|
35 mm (1.38 in.)
|
Bolt B
|
12 mm
|
50 mm (1.97 in.)
|
Bolt C
|
14 mm
|
103 mm (4.06 in.)
|
Bolt D
|
14 mm
|
44 mm (1.73 in.)
|
Bolt E
|
6 mm hexagon
|
28 mm (1.10 in.)
|
| 2.
INSTALL OIL STRAINER SUB-ASSEMBLY |
|
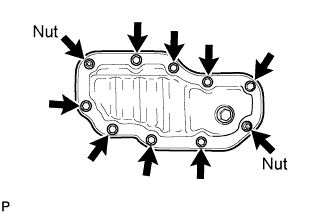
- Install a new gasket and the oil strainer with the 2 bolts and 2 nuts.
-
Torque:
- 8.0 N*m{
82 kgf*cm
, 71 in.*lbf
}
| 3.
INSTALL OIL PAN SUB-ASSEMBLY |
|
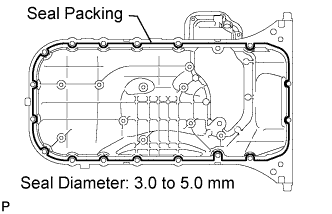
- Apply seal packing to the oil pan as shown in the illustration.
- Seal packing:
- Toyota Genuine Seal Packing Black, Three Bond 1207B or equivalent
- Standard seal diameter:
- 3.0 to 5.0 mm (0.118 to 0.197 in.)
- NOTICE:
- Install the oil pan within 3 minutes and tighten the bolts within 15 minutes after applying seal packing.
- Be careful not to drop any oil on the contact surfaces of the oil pan and cylinder block.
- Do not expose the seal to engine oil for at least 2 hours after installing it.
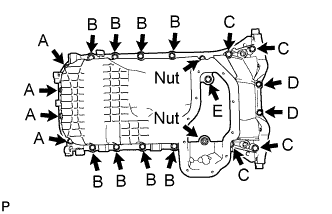
- Temporarily install the oil pan with the 19 bolts and 2 nuts.
- Bolt Length:
Item
|
Bolt Head Size
|
Length
|
Bolt A
|
10 mm
|
22 mm (0.866 in.)
|
Bolt B
|
12 mm
|
25 mm (0.984 in.)
|
Bolt C
|
12 mm
|
60 mm (2.36 in.)
|
Bolt D
|
10 mm
|
35 mm (1.38 in.)
|
Bolt E
|
10 mm
|
22 mm (0.866 in.)
|
- NOTICE:
- Make sure the rear ends of the oil pan and cylinder block are aligned. If not, the oil pan may become damaged.
Uniformly tighten the bolts and nuts in several passes.
-
Torque:
- for bolt A, D, E:
- 7.5 N*m{
76 kgf*cm
, 66 in.*lbf
}
- for bolt B, C, nut:
- 28 N*m{
286 kgf*cm
, 21 ft.*lbf
}
| 4.
INSTALL NO. 2 OIL PAN SUB-ASSEMBLY |
|
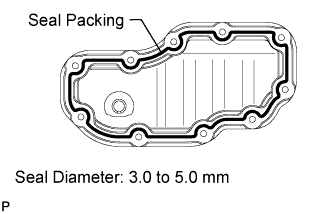
- Apply seal packing to the No. 2 oil pan as shown in the illustration.
- Seal packing:
- Toyota Genuine Seal Packing Black, Three Bond 1207B or equivalent
- Standard seal diameter:
- 3.0 to 5.0 mm (0.118 to 0.197 in.)
- NOTICE:
- Install the oil pan within 3 minutes and tighten the bolts within 15 minutes after applying seal packing.
- Be careful not to drop any oil on the contact surfaces of the oil pan and No. 2 oil pan.
- Do not expose the seal to engine oil for at least 2 hours after installing it.
- Install the No. 2 oil pan with the 8 bolts and 2 nuts. Uniformly tighten the bolts and nuts in several passes.
-
Torque:
- 7.5 N*m{
76 kgf*cm
, 66 in.*lbf
}
| 5.
INSTALL OIL FILTER BRACKET SUB-ASSEMBLY |
|
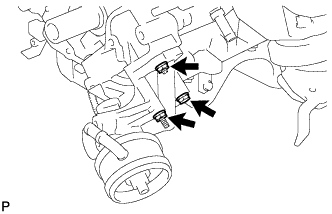
- Install a new gasket to the oil filter bracket.
Install the oil filter bracket with the bolt, stud bolt and nut.
-
Torque:
- 18 N*m{
184 kgf*cm
, 13 ft.*lbf
}
| 6.
INSTALL OIL FILTER ASSEMBLY
|
|
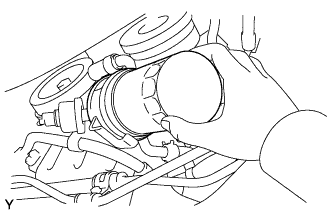
- Clean and check the oil filter installation surface.
Apply clean engine oil to the gasket of a new oil filter.
Lightly screw the oil filter into place by hand. Tighten it until the gasket contacts the seat.
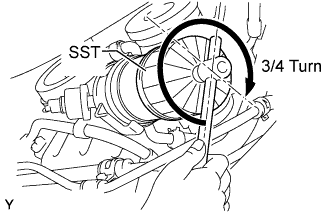
- Using SST, tighten the oil filter. Choose from the following to tighten the oil filter.
- SST
- 09228-07501
Using a torque wrench, tighten the oil filter.
-
Torque:
- 17 N*m{
175 kgf*cm
, 13 ft.*lbf
}
Tighten the oil filter a 3/4 turn by hand or with a common wrench.
| 7.
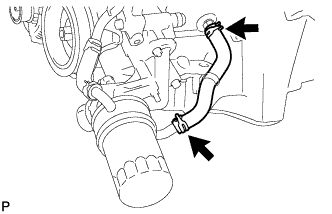
INSTALL OIL COOLER HOSE |
|
- Using needle-nose pliers, grip the claws of the clamps and slide the clamps to install the oil cooler hose.
| 8.
INSTALL OIL PRESSURE SENDER GAUGE ASSEMBLY
|
|
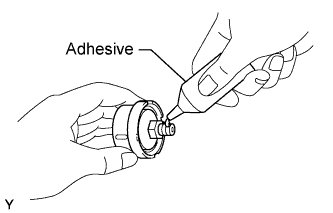
- Apply adhesive to 2 or 3 threads of the sender gauge.
- Adhesive:
- Toyota Genuine Adhesive 1344, Three Bond 1344 or equivalent
- NOTICE:
- Do not let adhesive adhere to the oil hole.
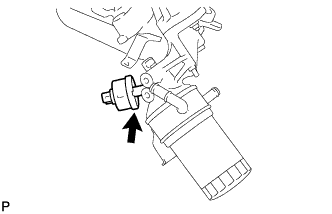
- Install the sender gauge.
-
Torque:
- 15 N*m{
153 kgf*cm
, 11 ft.*lbf
}
- NOTICE:
- Do not start the engine within 1 hour of installation.
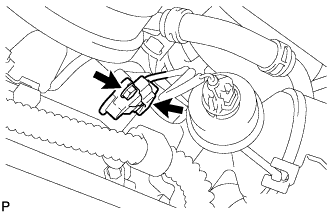
Connect the sender gauge connector.
| 9.
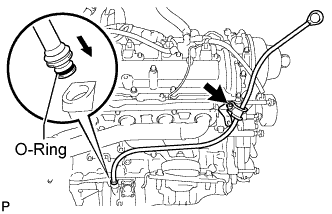
INSTALL ENGINE OIL LEVEL DIPSTICK GUIDE |
|
- Apply a light coat of engine oil to a new O-ring.
Install a new O-ring to the guide.
Install the dipstick guide with the bolt.
-
Torque:
- 8.0 N*m{
82 kgf*cm
, 71 in.*lbf
}
Install the dipstick.
| 10.
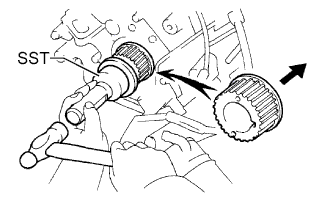
INSTALL CRANKSHAFT TIMING PULLEY |
|
- Align the timing pulley set key with the key groove of the pulley.
Using SST and a hammer, tap in the timing pulley with the flange side facing inward.
- SST
- 09223-46011
| 11.
INSTALL CRANKSHAFT POSITION SENSOR
|
|
- Install the sensor with the bolt.
-
Torque:
- 6.5 N*m{
66 kgf*cm
, 58 in.*lbf
}
Connect the sensor connector.
| 12.
INSTALL TIMING BELT |
|
Install the timing belt (Click here).
| 13.
INSTALL ENGINE ASSEMBLY |
|
Install the engine to the vehicle (Click here).
| 14.
CONNECT CABLE TO NEGATIVE BATTERY TERMINAL |
|
- NOTICE:
- When disconnecting the cable, some systems need to be initialized after the cable is reconnected (Click here).