INSTALLATION
Removal / installation · Vehicles built Sep 2011 – Dec 2011
| 1.
INSTALL ENGINE REAR OIL SEAL |
 |
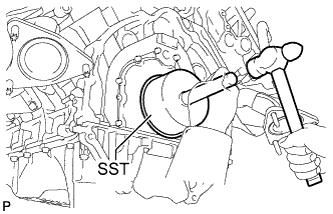
- Apply MP grease to the lip of a new oil seal.
- NOTICE:
- Do not allow foreign matter to contact the lip of the oil seal.
- Do not allow MP grease to contact the dust seal.
Using SST and a hammer, tap in the oil seal until its surface is flush with the rear oil seal retainer edge.
- SST
- 09223-56010
- NOTICE:
- Keep the lip of the oil seal free from foreign matter.
- Do not tap on the oil seal at an angle.
| 2.
INSTALL DRIVE PLATE AND RING GEAR SUB-ASSEMBLY
|
|
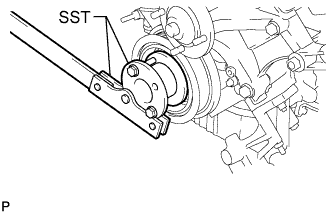
- Using SST, hold the crankshaft.
- SST
- 09213-70011
(09213-70020)
09330-00021
(09330-00030)
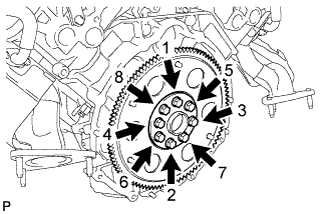
Install the front drive plate spacer, drive plate and rear drive plate spacer to the crankshaft.
- Install and uniformly tighten 8 new bolts in the sequence shown in the illustration.
-
Torque:
- 30 N*m{
306 kgf*cm
, 22 ft.*lbf
}
- NOTICE:
- Do not reuse the drive plate installation bolts.
- Do not impact or damage the drive plate installation bolts. Be sure to handle them carefully.
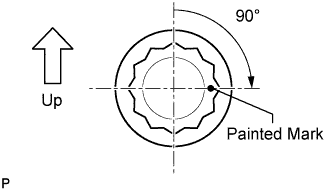
- Mark the upside of each drive plate installation bolt with paint.
Tighten the drive plate installation bolts another 90° as shown.
Check that the painted marks are now at a 90° angle to the upside.
| 3.
INSTALL AUTOMATIC TRANSMISSION ASSEMBLY |
|
Install the automatic transmission (Click here).
| 4.
CONNECT CABLE TO NEGATIVE BATTERY TERMINAL |
|
- NOTICE:
- When disconnecting the cable, some systems need to be initialized after the cable is reconnected (Click here).