INSTALLATION
Removal / installation · Vehicles built from Jan 2012
Versions by build date: Sep 2011 – Dec 2011 from Jan 2012
- HINT:
- Use the same procedure for the RH and LH sides.
- The procedure listed below is for the LH side.
- Use the same procedure for the RH and LH sides.
| 1. INSTALL FRONT SEAT INNER BELT ASSEMBLY (for Manual Seat) |

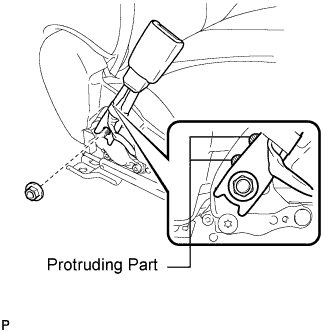  |
Install the front seat inner belt assembly with the nut.
- Torque:
- 42 N*m{ 428 kgf*cm , 31 ft.*lbf }
- NOTICE:
- Do not allow the anchor part of the front seat inner belt assembly to overlap the protruding part of the front seat adjuster.
Connect the connectors and attach the clamps.
| 2. INSTALL FRONT SEAT INNER BELT ASSEMBLY (for Power Seat) |
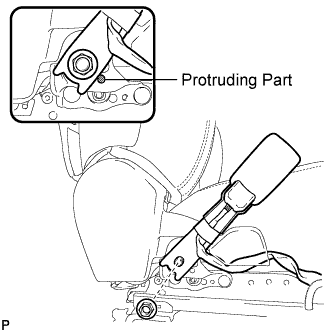 |
Install the front seat inner belt assembly with the nut.
- Torque:
- 42 N*m{ 428 kgf*cm , 31 ft.*lbf }
- NOTICE:
- Do not allow the anchor part of the front seat inner belt assembly to overlap the protruding parts of the front seat adjuster.
Connect the connectors and attach the clamps.
| 3. INSTALL FRONT SEAT ASSEMBLY (for Manual Seat) |
Install the front seat assembly (Click here).
| 4. INSTALL FRONT SEAT ASSEMBLY (for Power Seat) |
Install the front seat assembly (Click here).
| 5. CONNECT CABLE TO NEGATIVE BATTERY TERMINAL |
- NOTICE:
- When disconnecting the cable, some systems need to be initialized after the cable is reconnected (Click here).
| 6. CHECK SRS WARNING LIGHT |
| 7. INSPECT FRONT SEAT ASSEMBLY |
for Manual Seat:
Inspect Front Seat (Click here).
for Power Seat:
Inspect Front Seat (Click here).