B1413/13 Evaporator Temperature Sensor Circuit
Diagnostic trouble codes · Vehicles built from Jan 2012
Versions by build date: Sep 2011 – Dec 2011 from Jan 2012
DESCRIPTION
The No. 1 cooler thermistor is installed on the evaporator in the air conditioner unit to detect the cooled air temperature that has passed through the evaporator and control the air conditioning. It sends appropriate signals to the air conditioning amplifier assembly. The resistance of the No. 1 cooler thermistor changes in accordance with the cooled air temperature that has passed through the evaporator. As the temperature decreases, the resistance increases. As the temperature increases, the resistance decreases.The air conditioning amplifier assembly applies voltage (5 V) to the No. 1 cooler thermistor and reads voltage changes as the resistance of the No. 1 cooler thermistor changes. This sensor is used for frost prevention.
| DTC Code |
DTC Detection Condition |
Trouble Area |
| B1413/13 |
An open or short in the No. 1 cooler thermistor circuit. |
|
WIRING DIAGRAM
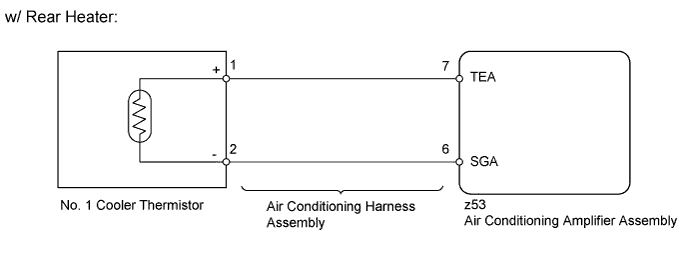

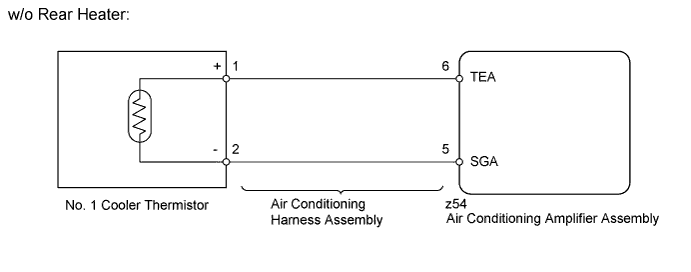
INSPECTION PROCEDURE
| 1. READ VALUE USING INTELLIGENT TESTER (NO. 1 COOLER THERMISTOR) |

Use the Data List to check if the No. 1 cooler thermistor is functioning properly.
Air Conditioner Tester Display
Measurement Item/Range
Normal Condition
Diagnostic Note
Evaporator Fin Thermistor
No. 1 cooler thermistor /
Min.: -29.7°C (-21.46°F)
Max.: 59.55°C (139.19°F)
Actual evaporator temperature displayed
Open in the circuit: -29.7°C (-21.46°F).
Short in the circuit: 59.55°C (139.19°F).
- OK:
- The display is as specified in the normal condition.
|
|
||||

| OK | ||
 |
||
| ||
| 2. INSPECT NO. 1 COOLER THERMISTOR |
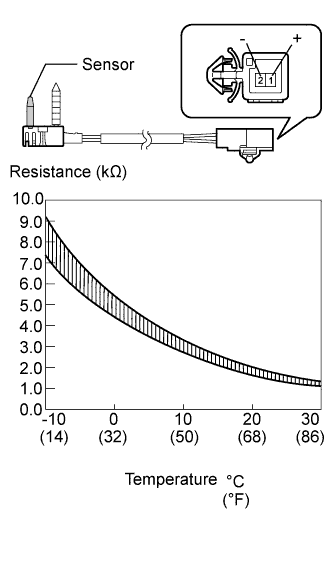 |
Remove the No. 1 cooler thermistor.
- for LHD (Click here)
- for RHD (Click here)
- for LHD (Click here)
Measure the resistance according to the value(s) in the table below.
- Standard Resistance:
Tester Connection
Condition
Specified Condition
1 (+) - 2 (-)
-10°C (14°F)
7.30 to 9.10 kΩ
-5°C (23°F)
5.65 to 6.95 kΩ
0°C (32°F)
4.40 to 5.35 kΩ
5°C (41°F)
3.40 to 4.15 kΩ
10°C (50°F)
2.70 to 3.25 kΩ
15°C (59°F)
2.14 to 2.58 kΩ
20°C (68°F)
1.71 to 2.05 kΩ
25°C (77°F)
1.38 to 1.64 kΩ
30°C (86°F)
1.11 to 1.32 kΩ
- NOTICE:
- Even slightly touching the sensor may change the resistance value. Be sure to hold the connector of the sensor.
- When measuring, the sensor temperature must be the same as the ambient temperature.
- Even slightly touching the sensor may change the resistance value. Be sure to hold the connector of the sensor.
- HINT:
- As the temperature increases, the resistance decreases (see the graph).
Result Result
Proceed to
OK (for LHD)
A
OK (for RHD)
B
NG (for LHD)
C
NG (for RHD)
D
|
|
||||
|
|
||||
|
|
||||

| A | ||
|
||
| ||