2011-2013 Land Cruiser · Service Manual Vehicle Interior

Blower Motor Circuit

Circuit diagnosis · Vehicles built Sep 2011 – Dec 2011

Versions by build date: Sep 2011 – Dec 2011 from Jan 2012

DESCRIPTION

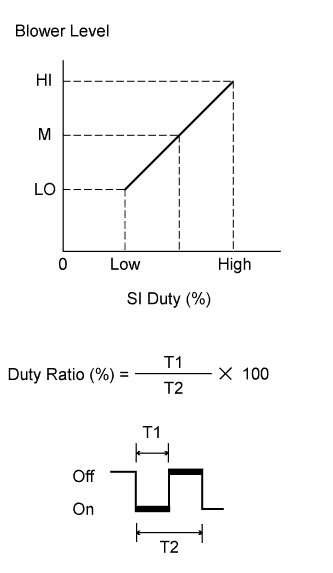
E184683E01
The blower with fan motor sub-assembly operates according to signals from the air conditioning amplifier assembly. The blower with fan motor sub-assembly speed signals are transmitted by changes in the duty ratio.
Duty Ratio:
The duty ratio is the ratio of the blower with fan motor sub-assembly on time (T1) to the total of the blower with fan motor sub-assembly on and off time (T2).
The air conditioning amplifier assembly controls the blower with fan motor sub-assembly speed.

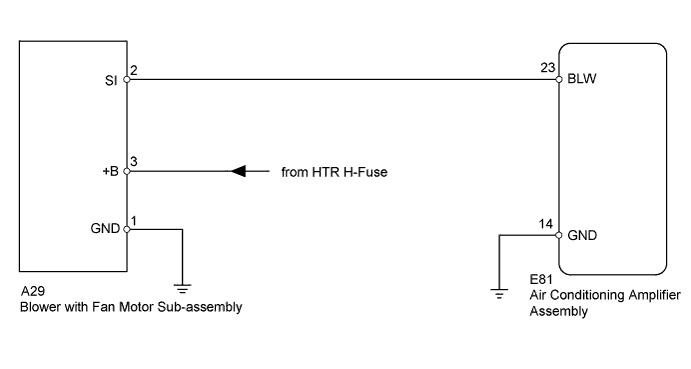
WIRING DIAGRAM

E185637E08

INSPECTION PROCEDURE

NOTICE:
Inspect the fuses for circuits related to this system before performing the following inspection procedure.


1. PERFORM ACTIVE TEST USING INTELLIGENT TESTER (BLOWER MOTOR)
  1. Select the Active Test, use the intelligent tester to generate a control command, and then check that the blower with fan motor sub-assembly operates (Click here).

    Air Conditioner 
    Tester Display
    Test Part
    Control Range
    Diagnostic Note
    Blower Motor
    Blower with fan motor sub-assembly
    Min.: 0, Max.: 31
    -

    OK:
    Blower with fan motor sub-assembly operates and blower with fan motor sub-assembly speed changes.

NG
Go to step 2
OK

PROCEED TO NEXT SUSPECTED AREA SHOWN IN PROBLEM SYMPTOMS TABLE (Click here)

2. CHECK HARNESS AND CONNECTOR (BLOWER WITH FAN MOTOR - BATTERY AND BODY GROUND)

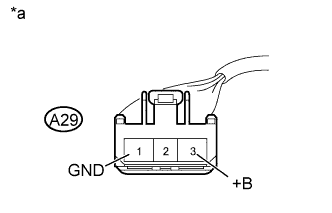
  1. E167100E23
    Disconnect the A29 blower with fan motor sub-assembly connector.

  1. Measure the voltage according to the value(s) in the table below.

    Standard Voltage:
    Tester Connection
    Condition
    Specified Condition
    A29-3 (+B) - Body ground
    Always
    11 to 14 V

  1. Measure the resistance according to the value(s) in the table below.

    Standard Resistance:
    Tester Connection
    Condition
    Specified Condition
    A29-1 (GND) - Body ground
    Always
    Below 1 Ω

Text in Illustration 
*a
Front view of wire harness connector
(to Blower with Fan Motor Sub-assembly)


NG
REPAIR OR REPLACE HARNESS OR CONNECTOR
OK


3. CHECK HARNESS AND CONNECTOR (BLOWER WITH FAN MOTOR - AIR CONDITIONING AMPLIFIER)
  1. Disconnect the E81 air conditioning amplifier assembly connector.

  1. Disconnect the A29 blower with fan motor sub-assembly connector.

  1. Measure the resistance according to the value(s) in the table below.

    Standard Resistance:
    Tester Connection
    Condition
    Specified Condition
    E81-23 (BLW) - A29-2 (SI)
    Always
    Below 1 Ω
    E81-23 (BLW) - Body ground
    Always
    10 kΩ or higher
    E81-14 (GND) - Body ground
    Always
    Below 1 Ω


NG
REPAIR OR REPLACE HARNESS OR CONNECTOR
OK


4. CHECK AIR CONDITIONING AMPLIFIER ASSEMBLY

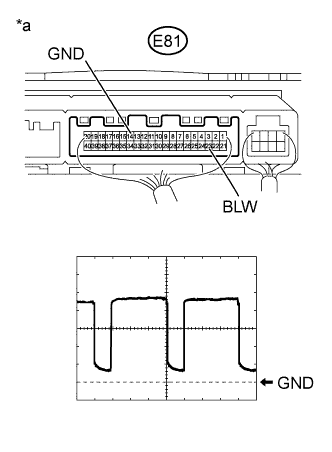
  1. E184008E05
    Remove the air conditioning amplifier assembly with its connectors still connected (Click here).

  1. Using an oscilloscope, check the waveform.

    Measurement Condition 
    Item
    Content
    Terminal No. (Symbol)
    E81-23 (BLW) - E81-14 (GND)
    Tool Setting
    1 V/DIV., 500 μs/DIV.
    Condition
    Ignition switch ON
    Blower switch LO level

    OK:
    Waveform is as shown in the illustration.

    Text in Illustration 
    *a
    Component with harness connected
    (Air Conditioning Amplifier Assembly)

    HINT:
    Waveform varies with the blower level.


NG
REPLACE AIR CONDITIONING AMPLIFIER ASSEMBLY (Click here)
OK


5. REPLACE BLOWER WITH FAN MOTOR SUB-ASSEMBLY
  1. Temporarily replace the blower with fan motor sub-assembly with a new or normally functioning one (Click here).


NEXT


6. CHECK BLOWER WITH FAN MOTOR SUB-ASSEMBLY
  1. Operate the blower with fan motor sub-assembly to check that it functions properly.

    OK:
    Blower with fan motor sub-assembly operates normally.


NG
REPLACE AIR CONDITIONING AMPLIFIER ASSEMBLY (Click here)
OK

END (BLOWER WITH FAN MOTOR SUB-ASSEMBLY IS FAULTY)


← Air Conditioning Control Panel Circuit (from Jan 2012)Blower Motor Circuit (from Jan 2012) →