INSTALLATION
Removal / installation · Vehicles built from Jan 2012
| 1. INSTALL NO. 2 CYLINDER HEAD GASKET |

Place a new cylinder head gasket on the cylinder block surface with the front face of the Lot No. stamp upward.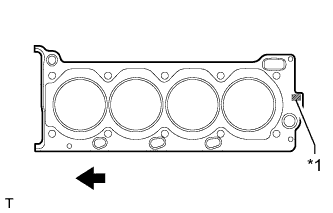

Text in Illustration *1
Lot No.

Engine Front
- NOTICE:
- Make sure that the gasket is installed facing the proper direction.
- Make sure that no oil is on the front end (indicated by the arrows) of the No. 2 cylinder head gasket.
- Make sure that the gasket is installed facing the proper direction.
| 2. INSTALL CYLINDER HEAD SUB-ASSEMBLY LH |
Place the cylinder head on the cylinder block.
- NOTICE:
- Make sure that no oil is on the mounting surface of the cylinder head.
- Place the cylinder head gently in order not to damage the gasket with the bottom part of the head.
- Make sure that no oil is on the mounting surface of the cylinder head.
Install the cylinder head bolts.
- HINT:
- The cylinder head bolts are tightened in 3 progressive steps.
Apply a light coat of engine oil to the threads and under the heads of the cylinder head bolts.
Step 1: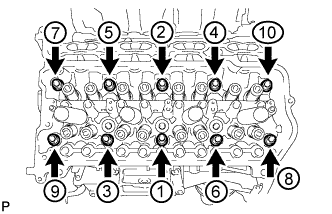
Using a 10 mm bi-hexagon wrench, install and uniformly tighten the 10 cylinder head bolts with the plate washers in several steps in the sequence shown in the illustration.- Torque:
- 36 N*m{ 367 kgf*cm , 27 ft.*lbf }
Mark the front side of each cylinder head bolt head with paint.
Step 2:
Tighten the cylinder head bolts 90°.Step 3:
Tighten the cylinder head bolts an additional 90°.Check that the paint marks are now at a 180° angle to the front.
Install and uniformly tighten the 2 bolts in the sequence shown in the illustration.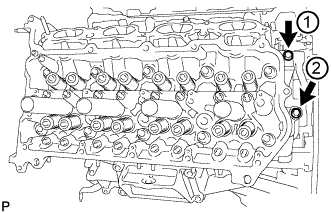
- Torque:
- 21 N*m{ 214 kgf*cm , 15 ft.*lbf }
- NOTICE:
- Thoroughly wipe clean any seal packing.
| 3. INSTALL CYLINDER HEAD GASKET |
Place a new cylinder head gasket on the cylinder block surface with the front face of the Lot No. stamp upward.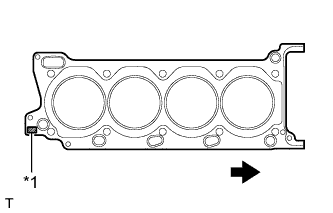
Text in Illustration *1
Lot No.
Engine Front
- NOTICE:
- Make sure that the gasket is installed facing the proper direction.
- Make sure that no oil is on the front end (indicated by the arrows) of the cylinder head gasket.
- Make sure that the gasket is installed facing the proper direction.
| 4. INSTALL CYLINDER HEAD SUB-ASSEMBLY |
Place the cylinder head on the cylinder block.
- NOTICE:
- Place the cylinder head gently in order not to damage the gasket with the bottom part of the head.
- Make sure that no oil is on the mounting surface of the cylinder head.
- Place the cylinder head gently in order not to damage the gasket with the bottom part of the head.
Install the cylinder head bolts.
- HINT:
- The cylinder head bolts are tightened in 3 progressive steps.
Apply a light coat of engine oil to the threads and under the heads of the cylinder head bolts.
Step 1: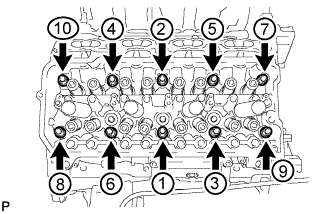
Using a 10 mm bi-hexagon wrench, install and uniformly tighten the 10 cylinder head bolts with the plate washers in several steps in the sequence shown in the illustration.- Torque:
- 36 N*m{ 367 kgf*cm , 27 ft.*lbf }
Mark the front side of each cylinder head bolt head with paint.
Step 2:
Tighten the cylinder head bolts 90°.Step 3:
Tighten the cylinder head bolts an additional 90°.Check that the paint marks are now at a 180° angle to the front.
Install and uniformly tighten the 2 bolts in the sequence shown in the illustration.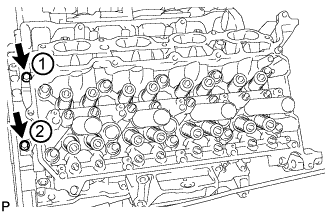
- Torque:
- 21 N*m{ 214 kgf*cm , 15 ft.*lbf }
- NOTICE:
- Thoroughly wipe clean any seal packing.
| 5. INSTALL VALVE STEM CAP |
Apply a light coat of engine oil to the valve stem caps.
Install the 32 valve stem caps to the cylinder head.
| 6. INSTALL VALVE LASH ADJUSTER ASSEMBLY |
Inspect the valve lash adjusters (Click here).
Install the 32 valve lash adjusters to the cylinder head.
- NOTICE:
- Install each valve lash adjuster to the same place it was removed from.
| 7. INSTALL NO. 1 VALVE ROCKER ARM SUB-ASSEMBLY |
Apply engine oil to the valve lash adjuster tips and valve stem cap ends.
Install the 32 No. 1 valve rocker arms as shown in the illustration.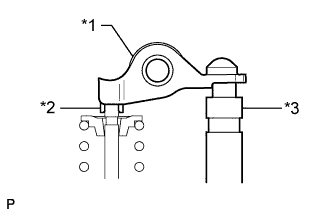
Text in Illustration *1
No. 1 Valve Rocker Arm
*2
Valve Stem Cap
*3
Valve Lash Adjuster
| 8. INSTALL CAMSHAFT SUB-ASSEMBLY |
| 9. INSTALL EXHAUST MANIFOLD ASSEMBLY |