INSTALLATION
Removal / installation · Vehicles built from Jan 2012
| 1. INSTALL AIR FUEL RATIO SENSOR (for Bank 1 Sensor 1) |

Temporarily install the air fuel ratio sensor to the exhaust manifold LH by hand.
Using SST, tighten the air fuel ratio sensor.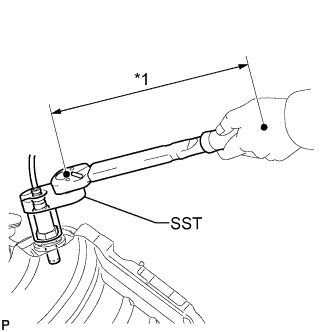

- SST
- 09224-00010
- Torque:
- without SST:
- 44 N*m{ 449 kgf*cm , 32 ft.*lbf }
- with SST:
- 40 N*m{ 408 kgf*cm , 30 ft.*lbf }
Text in Illustration *1
Fulcrum Length
- HINT:
- Use a torque wrench with a fulcrum length of 300 mm (11.8 in.). When using a torque wrench with a fulcrum length that is not 300 mm (11.8 in.), calculate the torque specification for the torque wrench and SST based on the "without SST" torque specification (Click here).
- Make sure SST and the wrench are connected in a straight line.
- Use a torque wrench with a fulcrum length of 300 mm (11.8 in.). When using a torque wrench with a fulcrum length that is not 300 mm (11.8 in.), calculate the torque specification for the torque wrench and SST based on the "without SST" torque specification (Click here).
| 2. INSTALL AIR FUEL RATIO SENSOR (for Bank 2 Sensor 1) |
Temporarily install the air fuel ratio sensor to the exhaust manifold RH by hand.
Using SST, tighten the air fuel ratio sensor.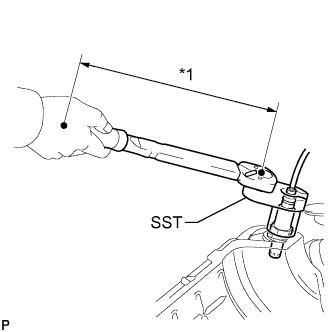
- SST
- 09224-00010
- Torque:
- without SST:
- 44 N*m{ 449 kgf*cm , 32 ft.*lbf }
- with SST:
- 40 N*m{ 408 kgf*cm , 30 ft.*lbf }
Text in Illustration *1
Fulcrum Length
- HINT:
- Use a torque wrench with a fulcrum length of 300 mm (11.8 in.). When using a torque wrench with a fulcrum length that is not 300 mm (11.8 in.), calculate the torque specification for the torque wrench and SST based on the "without SST" torque specification (Click here).
- Make sure SST and the wrench are connected in a straight line.
- Use a torque wrench with a fulcrum length of 300 mm (11.8 in.). When using a torque wrench with a fulcrum length that is not 300 mm (11.8 in.), calculate the torque specification for the torque wrench and SST based on the "without SST" torque specification (Click here).
| 3. INSTALL EXHAUST MANIFOLD ASSEMBLY RH |
w/ Secondary Air Injection System: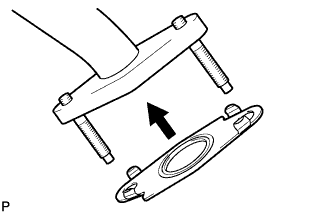
Install a new gasket to the No. 3 air tube.- HINT:
- Install the gasket with the claws of the gasket facing the tube.
Install a new gasket to the cylinder head.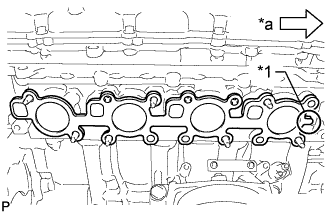
Text in Illustration *1
Tab
*a
Front
- HINT:
- Install the gasket with the gasket tab facing toward the front of the engine.
w/ Secondary Air Injection System:
Install the exhaust manifold to the cylinder head with the 7 new nuts labeled A.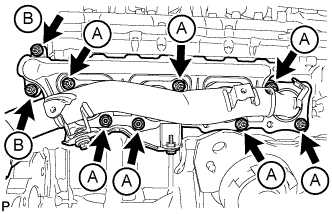
- Torque:
- 21 N*m{ 214 kgf*cm , 15 ft.*lbf }
Install the exhaust manifold to the No. 3 air tube with the 2 nuts labeled B.
- Torque:
- 10 N*m{ 102 kgf*cm , 7 ft.*lbf }
w/o Secondary Air Injection System:
Install the exhaust manifold with 7 new nuts.- Torque:
- 21 N*m{ 214 kgf*cm , 15 ft.*lbf }
Connect the air fuel ratio sensor connector and attach the wire harness clamp.
| 4. INSTALL NO. 1 EXHAUST MANIFOLD HEAT INSULATOR |
Install the heat insulator with 3 new bolts.
- Torque:
- 10 N*m{ 102 kgf*cm , 7 ft.*lbf }
| 5. INSTALL ENGINE OIL LEVEL DIPSTICK GUIDE |
Apply engine oil to a new O-ring, and then install the O-ring to the engine oil level dipstick guide.
Install the engine oil level dipstick guide with the bolt.
- Torque:
- 10 N*m{ 102 kgf*cm , 7 ft.*lbf }
Attach the engine wire clamp.
Install the engine oil level dipstick.
| 6. INSTALL MANIFOLD STAY |
Temporarily install the manifold stay with the 3 bolts.
Tighten the 3 bolts in the sequence shown in the illustration.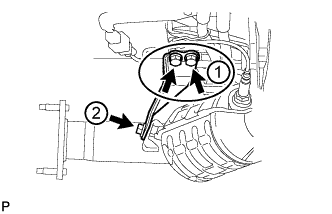
- Torque:
- 40 N*m{ 408 kgf*cm , 30 ft.*lbf }
| 7. INSTALL EXHAUST MANIFOLD ASSEMBLY LH |
w/ Secondary Air Injection System:
Install a new gasket to the No. 4 air tube.- HINT:
- Install the gasket with the claws of the gasket facing the tube.
Install a new gasket to the cylinder head.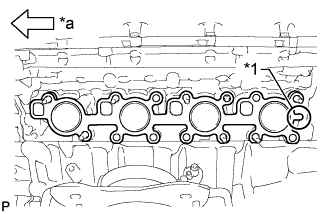
Text in Illustration *1
Tab
*a
Front
- HINT:
- Install the gasket with the gasket tab facing toward the rear of the engine.
w/ Secondary Air Injection System:
Install the exhaust manifold to the cylinder head with the 7 new nuts labeled A.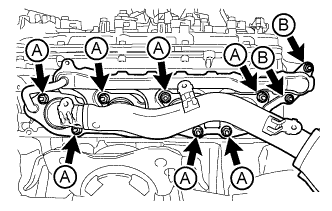
- Torque:
- 21 N*m{ 214 kgf*cm , 15 ft.*lbf }
Install the exhaust manifold to the No. 4 air tube with the 2 nuts labeled B.
- Torque:
- 10 N*m{ 102 kgf*cm , 7 ft.*lbf }
w/o Secondary Air Injection System:
Install the exhaust manifold with 7 new nuts.- Torque:
- 21 N*m{ 214 kgf*cm , 15 ft.*lbf }
Connect the air fuel ratio sensor connector and attach the wire harness clamp.
| 8. INSTALL NO. 2 EXHAUST MANIFOLD HEAT INSULATOR |
Install the heat insulator with 3 new bolts.
- Torque:
- 10 N*m{ 102 kgf*cm , 7 ft.*lbf }
| 9. INSTALL NO. 2 MANIFOLD STAY |
Temporarily install the manifold stay with the 3 bolts.
Tighten the 3 bolts in the sequence shown in the illustration.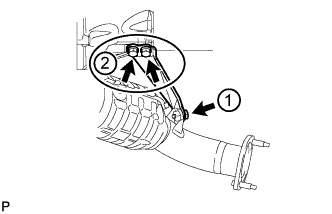
- Torque:
- 40 N*m{ 408 kgf*cm , 30 ft.*lbf }
| 10. INSTALL PROPELLER SHAFT HEAT INSULATOR |
Install the propeller shaft heat insulator with the 2 bolts.
- Torque:
- 16 N*m{ 160 kgf*cm , 12 ft.*lbf }
| 11. INSTALL FRONT PROPELLER SHAFT ASSEMBLY |
| 12. INSTALL FRONT EXHAUST PIPE ASSEMBLY |
| 13. INSPECT FOR EXHAUST GAS LEAK |
| 14. INSTALL FRONT FENDER APRON TRIM PACKING C |
Install the front fender apron trim packing C with the 4 clips.
| 15. INSTALL FRONT FENDER APRON TRIM PACKING A |
Install the front fender apron trim packing A with the 3 clips.
| 16. INSTALL FRONT FENDER APRON TRIM PACKING D |
Install the front fender apron trim packing D with the 4 clips.
| 17. INSTALL FRONT FENDER APRON TRIM PACKING B |
w/ KDSS
Install the front fender apron trim packing B with the 3 clips.
w/o KDSS
Install the front fender apron trim packing B with the 4 clips.
| 18. INSTALL NO. 2 ENGINE UNDER COVER |
Install the No. 2 engine under cover with the 2 bolts.
- Torque:
- 29 N*m{ 296 kgf*cm , 21 ft.*lbf }
| 19. INSTALL NO. 1 ENGINE UNDER COVER SUB-ASSEMBLY |
Install the No. 1 engine under cover sub-assembly with the 10 bolts.
- Torque:
- 29 N*m{ 296 kgf*cm , 21 ft.*lbf }
| 20. INSTALL FRONT FENDER SPLASH SHIELD SUB-ASSEMBLY RH |
Push in the clip to install the front fender splash shield sub-assembly RH.
Install the 3 bolts and 2 screws.
| 21. INSTALL FRONT FENDER SPLASH SHIELD SUB-ASSEMBLY LH |
Push in the clip to install the front fender splash shield sub-assembly LH.
Install the 3 bolts and screw.
| 22. INSTALL AIR CLEANER AND HOSE |
Install the air cleaner and hose with the 3 bolts, and then tighten the hose clamp.
- Torque:
- for bolt:
- 5.0 N*m{ 51 kgf*cm , 44 in.*lbf }
- for hose clamp:
- 2.5 N*m{ 25 kgf*cm , 22 in.*lbf }
Attach the clamp and connect the mass air flow meter connector.
Connect the No. 2 PCV hose and No. 1 air hose.
| 23. INSTALL V-BANK COVER SUB-ASSEMBLY |
Attach the 2 V-bank cover hooks to the bracket. Then align the 3 V-bank cover grommets with the 3 pins, and press down on the V-bank cover to attach the pins.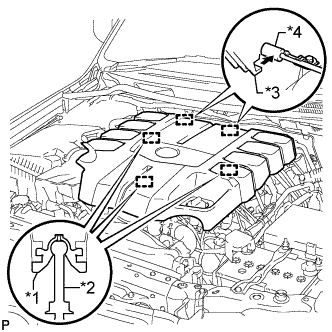
Text in Illustration *1
Grommet
*2
Pin
*3
Hook
*4
Bracket